Connect SmartHub to the Azure Cognitive Search Engine
The following topics describe how to add an Azure Cognitive Search engine to your instance of SmartHub.
Known limitations when upgrading SmartHub from 6.0.x to 6.1.0.0
Due to the changes made to support vector search, any Microsoft Azure search engines that are already configured will not work after upgrading SmartHub from 6.0.x to 6.1.0.0, due to the changes needed to support Vector Search. To fix the Microsoft Azure search engines, follow the steps:
-
Create a backup of your FederatorConfiguration.xml file found at <SH_root>\Configuration. This step is only a safety measure in case something goes wrong in the steps below.
-
Navigate to the SmartHub Administration page found at <SH_address>/_admin.
-
Select the General Settings page.
-
Scroll down to the Import/Export Settings section.
-
Click EXPORT SETTINGS.
-
Click IMPORT and select the newly downloaded FederatorConfiguration.xml file. The FederatorConfiguration.xml file must be decrypted.
-
Verify that Microsoft Azure search engine settings are correct and that they contain a new Query Tuning stage named AzureTranslator.
How to Configure the Azure Cognitive Search Engine
Use the follow instructions to configure an Azure Cognitive Search engine
- Open a web browser and navigate to your SmartHub Administration page at http(s)://<web-app-url>/_admin
-
Click General Settings.
-
Click Add New Search Engine.
-
Type: Select Regular
-
Name the search engine and select the Azure from the drop-down list.
-
Enter a name for your search engine.
-
Set the following configuration parameters:
Parameter Required/Optional Description Search Service Name
Required
Name of an existing search service in Azure to connect to. Search Service DNS Suffix Optional -
This is the DNS suffix of the search service. If left empty, the default value search.windows.net is used.
API key
Required
An API key which has at least read access to the search service. API Version The API version used to interrogate the index. For Vector Search functionality use the 2023-10-01-Preview version Index Name
This is the name of the index in search service to query. Fields with Manual Highlight Optional These are the names of the columns in the search index for which the highlight is done manually, without truncating the original value. The properties should be separated by comma. The Default value is escbase_title.
-
-
Save the configuration.
Note: When upgrading SmartHub 6.0 to the latest version, the API Version setting for the Azure Search Engines that you have already configured must be set manually. In older SmartHub versions, 2020-06-30-Preview was the default API version that was used.
Pipeline Stages
The following stages are automatically added to both the User Experience tuning stages for the new Azure search engine:
-
Range Facets
-
This user experience tuning stage is used to configure range facets.
-
-
Property Mapper
- This user experience tuning stage translates managed properties names so that they map to an existing property on the Azure search engine.
- You can modify the Property Mapper stage configuration by assigning a search index field to the properties that are used by default by the SmartHub user interface.Important: In the Property Mapper, the property "Rank" must be mapped to the property "_score". For example,
Rank,_score; - For more information, see Map Metadata Property Values: Property Mapper.
-
Azure Translator
-
This user experience tuning stage translates the search query into an Azure search query.
-
For more information, see Translate queries into an Azure search query with the Azure Query Translator.
-
How To Configure Scoring Profile In Azure
Procedure:
- Go to your Azure Cognitive Search Service.
- Click Overview > Indexes.
- Select your index that will be used also in SmartHub.
- Select Scoring Profiles > Add scoring profile.
- Enter a scoring profile name and click Add scoring profile.

- Click Add functions > Add Scoring function.
- From the Function type dropdown, select Freshness.
- Choose Field name for boosting.
- Choose interpolation:
- Required for scoring functions.
- Defines the slope for which the score boosting increases from the start of the range to the end of the range.
- Choose a Boost value:
- Required for scoring functions.
- A positive number used as multiplier for raw score. It cannot be equal to 1.
- Choose Boosting duration (Sets an expiration period after which boosting stops for a particular document.)
- The Boosting duration must be formatted as an XSD "dayTimeDuration" value.
- Example: "P1D" (1 day), "PT15M" (15 minutes)
- Click Ok > Save.
Troubleshooting
Check the server logs for any configuration errors. By default, logs appear in the directory <SmartHub_Install_Directory>\Logging.
- When using a field that does not exist in the Azure index as a Filter or as a Sort option, the field will be ignored by the query.
- Searching for a field that does not exist or applying a filter that has no corresponding field in the Azure index will return 0 results.
Vector Search
You can learn more about vector search by referring to Enhancing search results with Vector Search. For more details about the search performed in Azure, see Deciding which type of search to use.
Enable Vector Queries
In order for SmartHub to perform vector queries, the VectorQueries property of the SearchQuery object must be populated. This can be achieved through a Query Tuning Stage. A sample script for generating vector queries using OpenAI can be found at Generate vector is a Query scripting pipeline.
Retrieve And Process Vector Field(s)
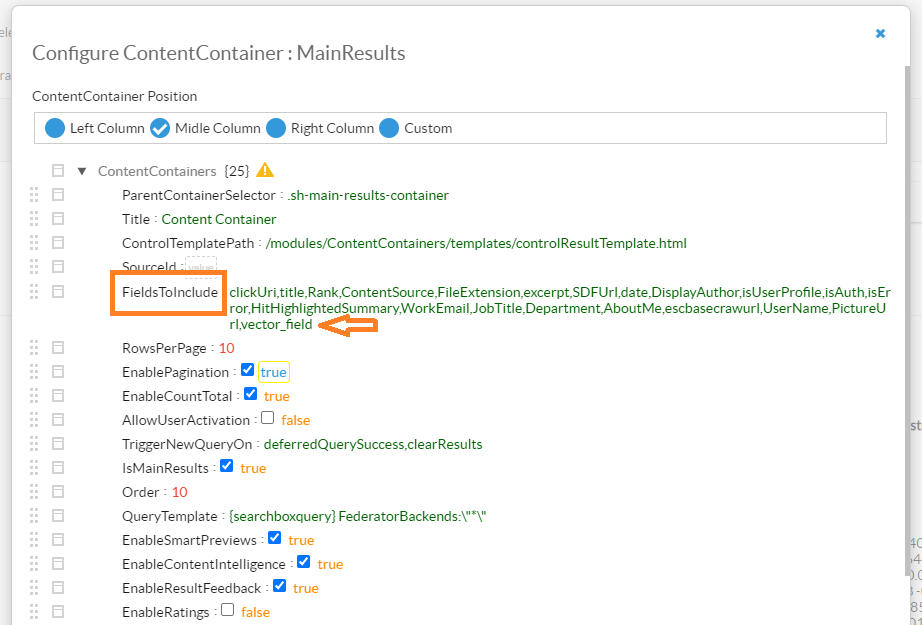
Although it is not recommended to return vector field(s) on the returned results, there may be cases when it is needed. To achieve this, do the following:
-
Navigate to your results page.
-
Edit this page using the UI Editor.
-
Select the Basic mode
-
Open the Customize ContentContainers section.
-
On the left side panel, select and edit your content container.
-
Add your vector field(s) to the FieldsToinclude list.

-
Save the changes.
-
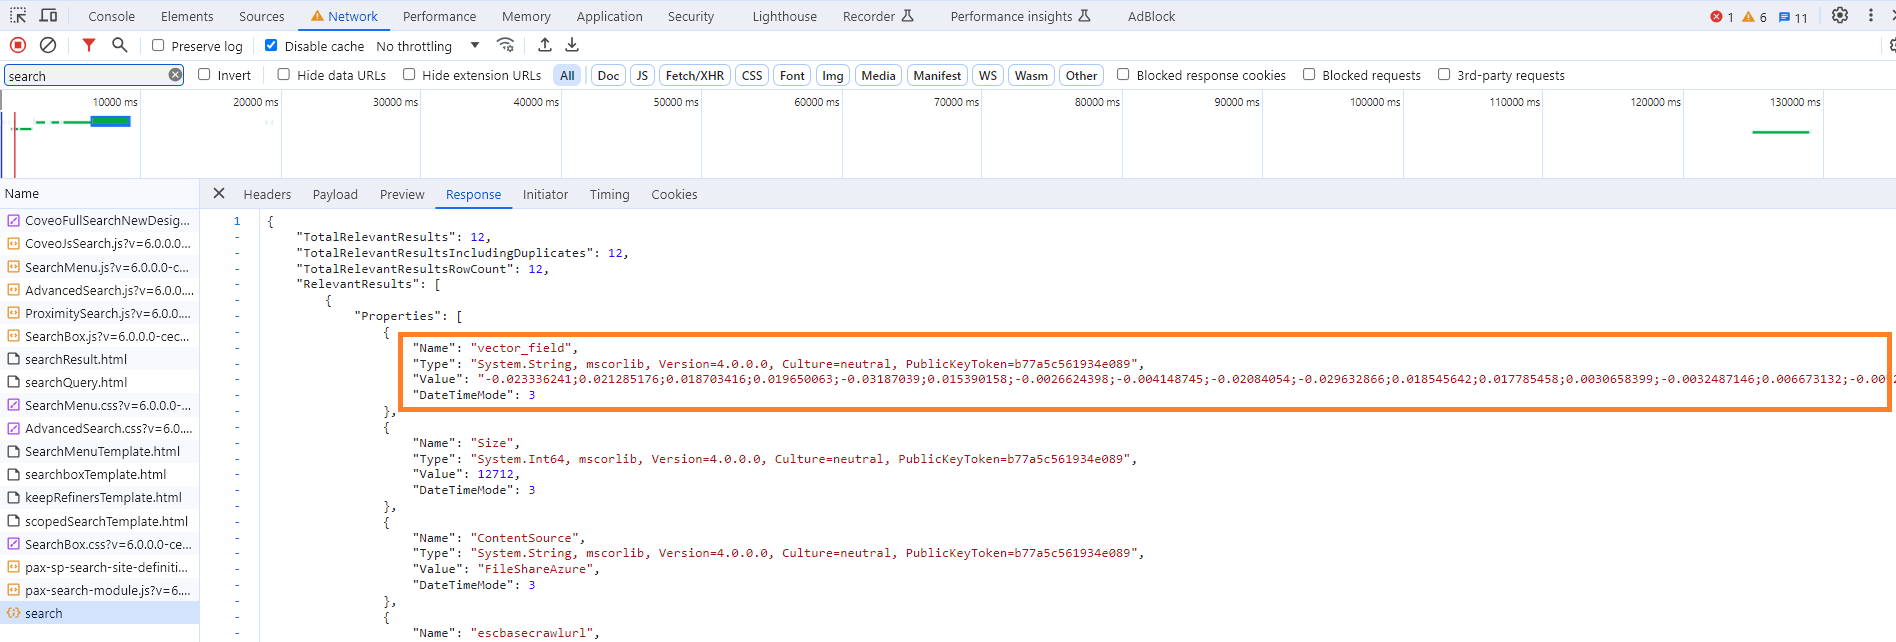
Validate that the vector fields are returned on the results:
-
Open the dev tools for your browser.
-
Navigate to the Network tab.
-
Look for the search request.
-
On the response, validate that the vector field was returned.

-