How to Generate Previews
Use the following information to generate previews.
- To generate offline previews for backend content the associated connector must be installed and configured in Connectivity Hub.
- For backends (search engines) that don't have an associated connector but have an associated fetcher, only on-demand previews will be available.
The instructions vary depending on your search engine and connector.
Generate Previews for SharePoint 2013/16/19 Search Engines
Info: Pause all crawls, regardless of type, before you run the following PowerShell instructions.
- In order to generate Previews, add the following content enrichment configuration to your Search Service application.
- Open a SharePoint Management Shell as an Administrator and run the following:
 $endpoint = "http://servername:1237/ContentProcessingService"   $ssa = Get-SPEnterpriseSearchServiceApplication –Identity $ssaName -wa silentlycontinue
   $config = New-SPEnterpriseSearchContentEnrichmentConfiguration
   $config.Endpoint = $endpoint
   $config.DebugMode = $true
   $config.Timeout = 30000
   $config.InputProperties
 = "IsDocument", "body", "Author", "Filename",
"FileType","MimeType","FileExtension","OriginalPath",
"url","ContentType","contentclass","LastModifiedTime","Size",
"escbasecrawlurl"   $config.SendRawData = $True
   $config.MaxRawDataSize = 71680
   $config.FailureMode = "Warning"   Set-SPEnterpriseSearchContentEnrichmentConfiguration –SearchApplication $ssa –ContentEnrichmentConfiguration $config
Generate Previews for SharePoint Online Search Engines
Crawl-time Previews
- For Crawl-time previews of SharePoint Online content, install the SharePoint Online connector.
- For On-demand previews, configure fetchers.
Configure your Content Sources
Configure your Connector Framework Content Sources as described below:
- In the Connector Framework user interface, edit the Content Source for which you want Previews.
- In the Advanced tab, in the section "Enrichment Pipeline Integration," select Content Enrichment Service.
- Add the URL to your Preview Generation Service.
- This service runs on the server where the Smart Previews Import server is installed.
- Enter the URL in the format below.
- Note that you can use the exact URL below if you replace "YourSmartPreviewCEWSServer" and "port" with your own configured values.
http://<YourSmartPreviewCEWSServer>:<port>/ContentProcessingService/v2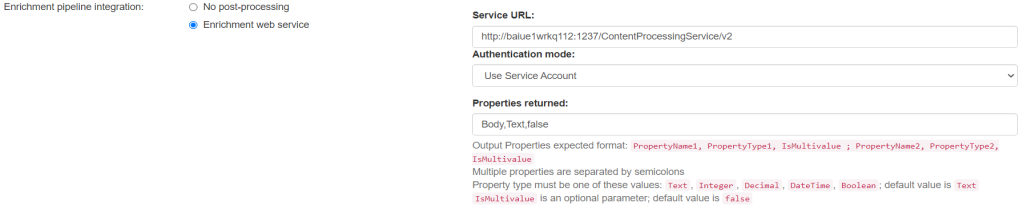
- This service runs on the server where the Smart Previews Import server is installed.
Configure and Perform a Full Update Sync on a Null Target
If the null target solution is not already deployed in your SharePoint environment, you will first need to deploy the null target.
- Download the Null Target package from the Customer Portal.
- Right-click the .zip file, and select Properties.
- Check the "Unblock" check box.
- Check the "Unblock" check box.
- Extract the .zip file contents.
- Execute the "DelpoyNullTargetWSP.exe" file to deploy the solution.
- Alternatively, you can run PowerShell as an Administrator and run commands to add and deploy the solution.
Add a Null Target
Note: Users of Connectivity Hub can skip this topic.
Once the null Target solution is deployed, perform the following steps in the Connector Framework to add a null Target.
Perform the following steps for each Content Source:
- Navigate to the "Targets" tab.
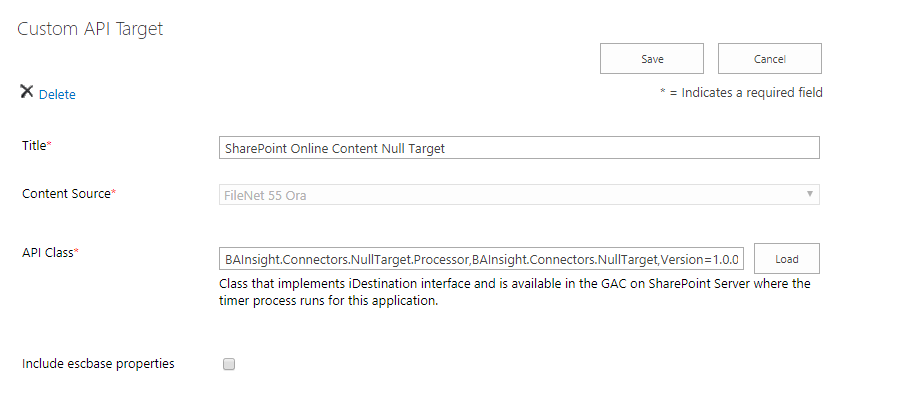
- In the "Add New" drop-down list, select "Target Custom API".
- The page re-loads (with the form) to create a new Target.
- The page re-loads (with the form) to create a new Target.
- Enter a name for this Target configuration.
- Select the Content Source for which you want to generate previews.
- Provide the following in the field API Class, and then click Load:
BAInsight.Connectors.NullTarget.Processor,BAInsight.Connectors.NullTarget,Version=1.0.0.0, Culture=neutral, PublicKeyToken=9e27a9d745350a59 - Leave the rest of the settings as their defaults.
- Click "Save".
- When complete, your new Target is listed within the Targets tab.

Start a Target Full Update Job
Start a Target Full Update job on the Target to generate previews.
- From the Targets page, click the "Tasks" hyperlink next to the Target you wish to run the synch on.
The Task Process Management page opens. - The Item field is already populated with the correct Target.
- Leave this value as is.
- Leave this value as is.
- In the Job Definitions field select "Target Full Update" from the drop-down menu.
- Leave the other options as their defaults and click "Start Job".

- The Target processes the items from the Content Source.
- This passes documents off to the Preview CEWS for preview generation.
Scheduling Regular Incremental Updates
Once the Full update is complete, schedule regular incremental updates to generate previews for any newly added or modified documents:
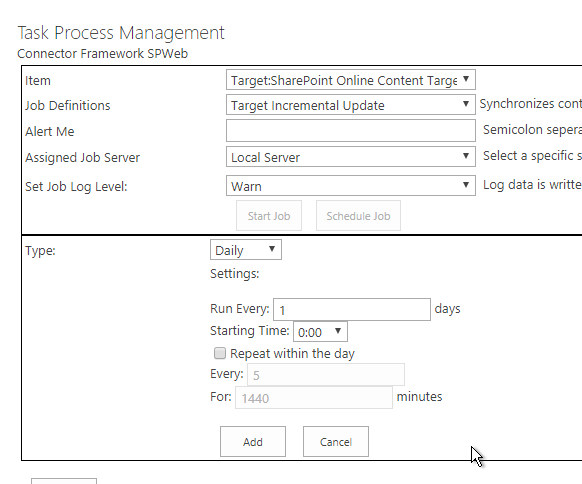
- On the Targets page, click the "Tasks" link next to the Target you wish to run the synch on.
The Task Process Management page opens. - The Item field is already populated with the correct Target.
- Leave this value as is.
- Leave this value as is.
- In the Job Definitions field select "Target Incremental Update" from the drop-down menu.
- Leave other options as their defaults and click "Schedule Job."
- Schedule your incremental updates to run on the interval you desire by using the settings provided.
- To schedule the job, click "Add" when you are done.
Generate Previews for Elastic Search/Azure Search/SOLR Search Engines
Configure your Connectivity Hub Content Sources as described below:
- In the Connectivity Hub user interface, edit the Content Source for which you want Previews.
- In the Advanced tab, in the "Enrichment Pipeline Integration"section and select Content Enrichment Service.
- Add the URL to your preview generation service.
- This service runs on the server where the Smart Previews Import server is installed.
- Enter the URL in the format below.
- Note that you can use the exact URL below if you replace "servername" with your own.
http://servername:1237/ContentProcessingService/v2
- This service runs on the server where the Smart Previews Import server is installed.
- A Full Target update of the Content Source is required to generate the previews.