How to Add On-Demand Previews
About
On-Demand previews are accomplished using a feature called Fetchers.
How to add and configure fetchers in BA Insight SmartHub is described below.
How to Add a New Fetcher
To configure the fetchers, follow these steps:
- Navigate to the Configuration page for the Smart Previews Hybrid site.
- For example: https://<SmartPreviewsHybridAddress>/Pages/Configure.aspx.
- For example: https://<SmartPreviewsHybridAddress>/Pages/Configure.aspx.
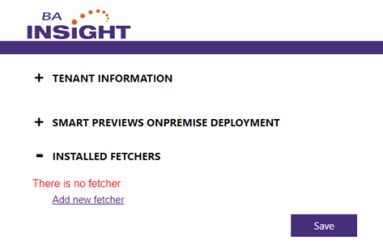
- Expand the INSTALLED FETCHERS section and click the link Add new fetcher.
- Configure the fetcher using one of the following options:
Connector Framework Fetcher Settings
Complete the fields listed below after clicking the "Add new fetcher" button.
- Fetcher Name:
- Name as desired.
- For example: "Connector Framework Fetcher"
- Full Assembly Name:
BAInsight.SmartPreviewHybrid.OnPrem, Version=1.0.0.0, Culture=neutral, PublicKeyToken=bd5ed2e4b6962cd0
- Full Class Name:
SmartPreviewService.Fetchers.ConnectorFrameworkFetcher
- URL Prefix:
spworks://
- Authentication Mode:
- Select Basic Authentication.
- Select Basic Authentication.
-
User:
-
Enter a user that has permissions to access all the content on the farm.
The provided user must have one of the following formats:
- domain\username
- username@example.com
-
- Password:
- Enter the password for the user.
- Enter the password for the user.
- Settings:
- This field must have the following format:
site:http\://;version: - Add the following required parameters that enable the connection to the farm:
- site:
- For Connector Framework 4.0, enter an on-premise site collection.
- The Central Administration address is typically used.
- For Connectivity Hub, enter the home address of Connectivity Hub.
- For example: https://connectivityhub.bainsight.com
- For Connector Framework 4.0, enter an on-premise site collection.
- version:
- For Connector Framework 4.0, enter v1.
- For Connectivity Hub enter v2.
- Entering any value other than v1 or v2 causes this setting to default to v1.
- site:
- This field must have the following format:
File System Fetcher
After clicking the "Add new fetcher" button complete the fields listed below:
- Fetcher Name:
- Name as desired.
- For example: "File System Fetcher"
- Full Assembly Name:
BAInsight.SmartPreviewHybrid.OnPrem, Version=1.0.0.0, Culture=neutral, PublicKeyToken=bd5ed2e4b6962cd0
- Full Class Name:
SmartPreviewService.Fetchers.FileSystemFetcher
- URL Prefix:
file://
- Authentication Mode:
- Select Basic Authentication.
- Select Basic Authentication.
- User:
- Enter a user that has permissions to access all the content on the farm.
- Enter a user that has permissions to access all the content on the farm.
- Password:
- Enter the password for the user.
- Enter the password for the user.
- Settings:
- Not required.
Website Fetcher
Complete the fields listed below after clicking the "Add new fetcher" button.
- Fetcher Name:
- Name as desired.
- For example:
SharePoint Fetcher
- Full Assembly Name:
BAInsight.SmartPreviewHybrid.OnPrem, Version=1.0.0.0, Culture=neutral, PublicKeyToken=bd5ed2e4b6962cd0
- Full Class Name:
SmartPreviewService.Fetchers.WebSiteFetcher
- URL Prefix:
- <Your website URL>
- <Your website URL>
- Authentication Mode:
- Select Basic Authentication.
- Select Basic Authentication.
- User:
- Enter a user that has permissions to access all the content on the farm.
- Enter a user that has permissions to access all the content on the farm.
- Password:
- Enter the password for the user.
- Enter the password for the user.
- Settings:
- Not required.
SharePoint Fetcher
Complete the fields listed below after clicking the "Add new fetcher" button.
- Fetcher Name:
- Name as desired.
- For example:
SharePoint Fetcher
- Full Assembly Name:
BAInsight.SmartPreviewHybrid.OnPrem, Version=1.0.0.0, Culture=neutral, PublicKeyToken=bd5ed2e4b6962cd0
- Full Class Name:
SmartPreviewService.Fetchers.SharePointFetcher
- URL Prefix:
http://
- Authentication Mode:
- Select Basic Authentication.
- Select Basic Authentication.
- User:
- Enter a user that has permissions to access all the content on the farm.
- Enter a user that has permissions to access all the content on the farm.
- Password:
- Enter the password for the user.
- Enter the password for the user.
- Settings:
- Not required.
SharePoint Online Fetcher
Complete the fields listed below after clicking the "Add new fetcher" button.
- Fetcher Name:
- Name as desired.
- For example:
SharePoint Online Fetcher
- Full Assembly Name:
BAInsight.SmartPreviewHybrid.OnPrem, Version=1.0.0.0, Culture=neutral, PublicKeyToken=bd5ed2e4b6962cd0
- Full Class Name:
SmartPreviewService.Fetchers.SharePointOnlineFetcher
- URL Prefix:
https://
- Authentication Mode:
Select the authentication mode you want to use.- If Basic Authentication is selected provide:
- User: Enter a user that has permissions to access all the content on the farm.
- Password: Enter the password for the user.
- If Certificate Authentication is selected provide:
- Certificate Distinguished Name:
- Enter the distinguished name of the certificate.
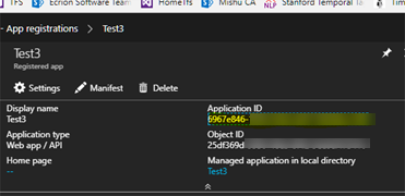
Application ID:
Enter the Azure Application ID.
You can find the Azure Application ID when you access your Azure App in the registered applications from the Azure Portal:
Note: Follow the steps from the section Configure Certificate Authentication to get the Certificate Distinguished Name and Application ID.
- Certificate Distinguished Name:
- If Basic Authentication is selected provide:
- Settings:
- Provide parameters if needed in the format '
name:value' separated by a semicolon. - Use escaping
\;or\:if you need to put these symbols as parameter name or value.- site:
- Enter a SharePoint Online site collection.
- Required.
- tenantName:
- Optional
- Enter the SharePoint Online tenant name.
- Use this option only if you are using Certificate Authentication and your provided site URL doesn't contain the tenant name.
- tenantEntryPoint:
- Optional
- Enter the SharePoint Online root site.
- Use this option only if you are using Certificate Authentication and your provided site URL doesn't contain the root site.
- For Example: site:https\://tenant.sharepoint.com;tenantName:tenant
- site:
- Provide parameters if needed in the format '
4. Click the load fetcher UI button.
5. Save the configuration.
Egnyte Fetcher
Note: The Egnyte fetcher requires the Egnyte backend is installed in SmartHub.
Complete the fields listed below after clicking the "Add new fetcher" button.
- Fetcher Name:
- Name as desired.
- For example: "Egnyte Fetcher"
- Full Assembly Name:
BAInsight.SmartPreviewHybrid.OnPrem, Version=1.0.0.0, Culture=neutral, PublicKeyToken=bd5ed2e4b6962cd0
- Full Class Name:
SmartPreviewService.Fetchers.Egynte.EgnyteFetcher
- URL Prefix:
- https://<appYourDomain>.egnyte.com
- Load Fetcher UI:
- Click "Load Fetcher UI" to load additional fields.
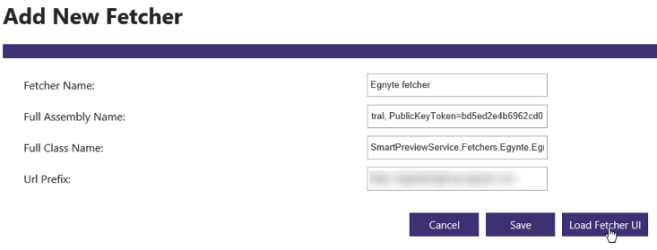
- Click "Load Fetcher UI" to load additional fields.
- Egnyte Domain:
- Enter your Egnyte app domain.
- For example: appYourDomain.egnyte.com.
- Client Id:
- Enter your Egnyte client ID
- Enter your Egnyte client ID
- Client Secret:
- Enter your Egnyte client secret
- Enter your Egnyte client secret
- Click the Authorize button.
- A new tab opens. Follow the prompts to login to your Egnyte account.
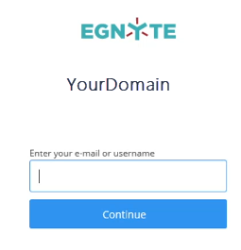
- Click Allow Access.
- A web pages opens entitled "404 File Not Found." This is expected.
- Copy the code from the URL location bar at the top of your browser, from after the '=' character to the '&' character. See the graphic below.

- Return to the Edit Fetcher page (in a previous browser tab).
- Paste the copied code into the "Authorization Code" field.
- Click the Get Tokens button.
- A new web page opens with a generated Access token. No Refresh token is required.
- Copy the Access token.
- Return to the Edit Fetcher page (in a previous browser tab).
- Paste the Access token into the Access Token field.
- Click Save.
- Navigate back to the Configuration page for the Smart Previews Hybrid site.
- For example: https://<SmartPreviewsHybridAddress>/Pages/Configure.aspx.
- Refresh the page. Your new Egnyte fetcher appears.
NetDocuments Fetcher
Note: NetDocuments fetcher requires the NetDocuments backend is installed in SmartHub.
Complete the fields listed below after clicking the "Add new fetcher" button.
- Fetcher Name:
- Name as desired.
- For example:
netdocuments Fetcher
- Full Assembly Name:
BAInsight.SmartPreviewHybrid.OnPrem, Version=1.0.0.0, Culture=neutral, PublicKeyToken=bd5ed2e4b6962cd0
- Full Class Name:
SmartPreviewService.Fetchers.NetDocsFetcher.NetDocsFetcher
- URL Prefix:
- Choose a prefix based on your NetDocuments Data Center.
- Supported values are:
- https://vault.netvoyage.com
- https://eu.netdocuments.com
- https://de.netdocuments.com
- https://au.netdocuments.com
-
Continue Setup: Click "Continue Setup" to load additional fields.
Note
After clicking Continue Setup, any changes you make to the previous fields will not be picked up.
If you need to change the URL Prefix afterwards, you must cancel the current configuration screen and start again.
- Click the Authorize button.
- This opens the NetDocuments web page.
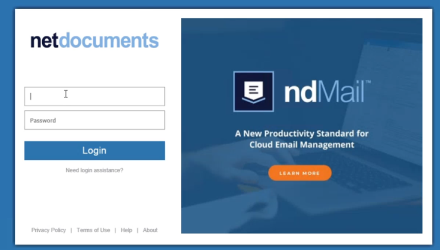
- Login using your NetDocuments credentials.
- Click Allow on the page that appears next.
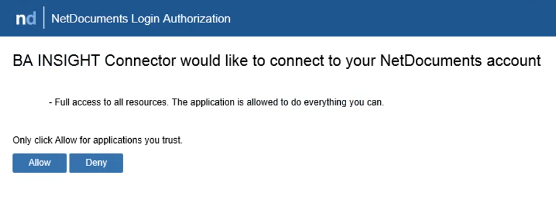
- Copy the code that appears.
- Return to the Edit Fetcher page and paste the code into the Authorization Code field.
- Click the "Get Tokens" button.
- A web page appears showing an Access token and Refresh token.
- Copy the tokens separately.
- Return to the "Edit Fetcher" page.
- Paste the tokens into their respective fields.
- Click the Save button.
- Navigate back to the Configuration page for the Smart Previews Hybrid site.
- For example: https://<SmartPreviewsHybridAddress>/Pages/Configure.aspx.
- Refresh the page. Your new NetDocumentsfetcher appears.
iManage Fetcher
- Fetcher Name:
- Name as desired.
- For example:
iManage Fetcher
- Full Assembly Name:
BAInsight.SmartPreviewHybrid.OnPrem, Version=1.0.0.0, Culture=neutral, PublicKeyToken=bd5ed2e4b6962cd0
- Full Class Name:
SmartPreviewService.Fetchers.iManage.IManageFetcher.
- URL Prefix:
Enter either:- https://cloudimanage.com
- or the address that iManage DataCenter enforces
- Load Fetcher UI:
- Click "Continue Setup" to load additional fields.
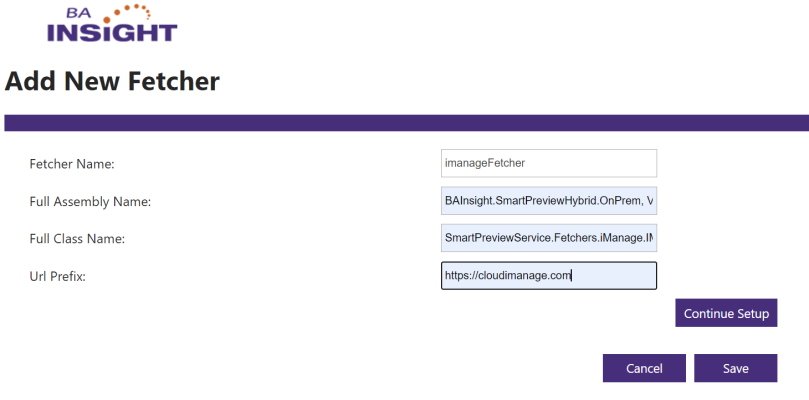
- Click "Continue Setup" to load additional fields.
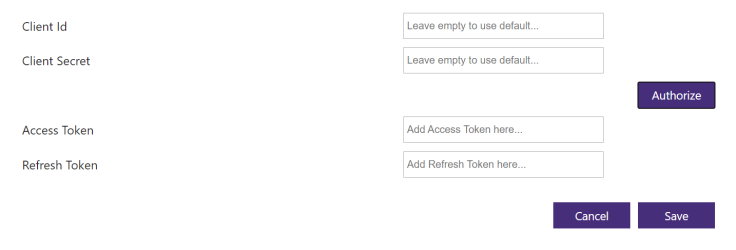
- Fill in the Client Id/Secret fields.
- Leave empty to use the default values.
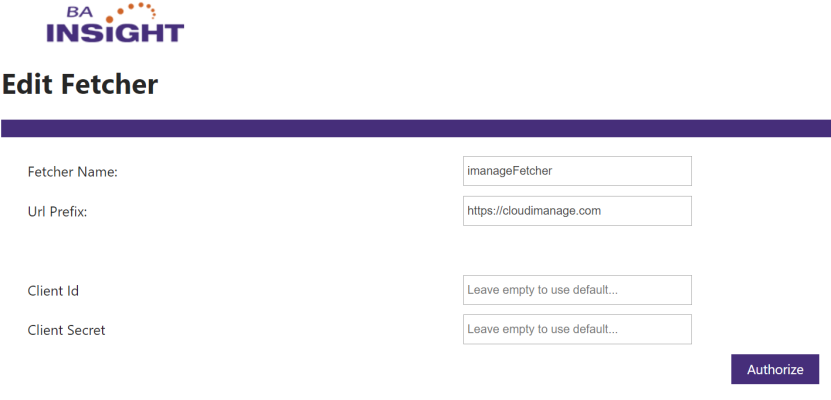
- Leave empty to use the default values.
- Click Authorize
- Login to iManage.
- A web page appears showing an Access token and Refresh token.
- Copy the tokens separately.
- Return to the "Edit Fetcher" page.
- Paste the tokens into their respective fields.
- Click the Save button.
- Navigate back to the Configuration page for the Smart Previews Hybrid site.
- For example: https://<SmartPreviewsHybridAddress>/Pages/Configure.aspx.
- Refresh the page. Your new iManage fetcher appears.
-
It must have the format https://<SmartPreviewsHybridAddress>/Pages/OAuth.aspx