Add Resources to a Work Plan
Project managers can add resources (both named and generic) to any work planner of any project. Resources can be added individually or as a team.
This page covers the following topics:
To add a new resource to a work plan:
- Open the required work planner.
-
Enter the name of a resource into the "Add a resource by typing here" textbox on the Resource Sheet:

- Select the resource from the drop-down list that appears.
Once you select a resource, it will appear in a new row on the Resource Sheet.
Tip: Click on the information icons  under each columns to view a breakdown of how each total is calculated. For example, select the icon under the "Actual Effort" column to view effort from the current work plan as well as other work plans:
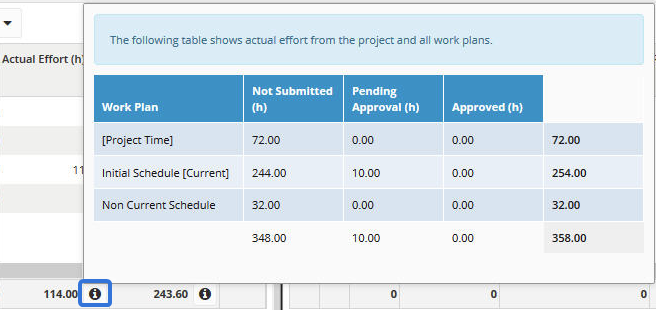
Note: You can assign a different resource type to the same resource in different work planners.
Note: Before closing the work planner, always make sure you click Save after you take all necessary actions.
- Open the required work planner.
-
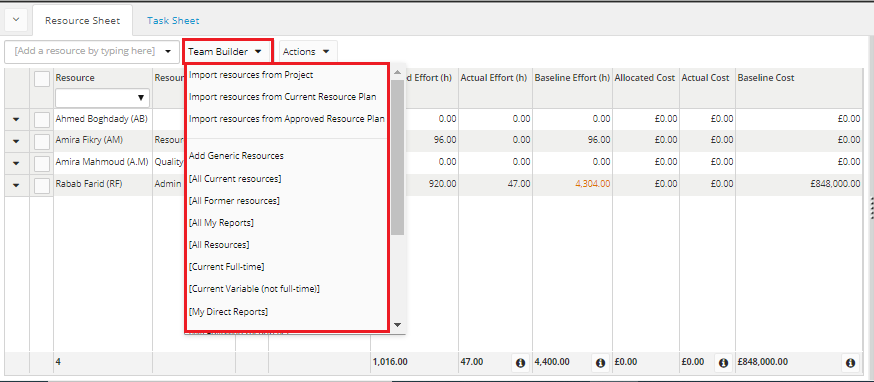
Select the Team Builder drop-down menu from the Resource Sheet:
-
From the displayed list, you can choose to:
- Import resources added to the project, to the current resource plan or to the approved one. These options will directly add the resources to the Resource Sheet.
- Add generic resources. This will open up a dialog box.
- Add resources by a resource filter. This will open up a dialog box.
- (If adding generic resources) Use the Generic Resources drop-down menu to select which generic resources to add, then click the Add button.
- (If adding resources with a resource filter) Use the checkboxes to select which resources from the filter should be added, then click the Add button.
Note: Before closing the work planner, always make sure you click Save after you take all necessary actions.