Creating a Report Template
The first step to creating a Custom Report is to define the Report Template using MS Excel. Eclipse will use this file to extract a custom set of data and generate a report that better suits your needs.
Each Report Template is created using an MS Excel document. By "marking up" an Excel file and uploading it to Eclipse PPM, you can create your own Custom Report that compiles your preferred data.
Note: MS Excel files must be saved with the .xlsx extension before being uploaded to Eclipse PPM. In MS Excel, this is known as an Excel Workbook. This extension is available with Microsoft Office 2007 as well as every following release.
"Marking up" an Excel file is a way of formatting it to allow Eclipse PPM to render a report. It is done by inserting markers that indicate which data should be included. Once marked up, and Excel file can be uploaded into Eclipse PPM to create a new Report Template. All reports will be returned as an MS Excel file once they are generated in Eclipse PPM.
This topic will cover the following:
Formatting an Excel File
Most of the difficulty in creating Report Templates lies in preparing an Excel file to be uploaded to Eclipse PPM. However, a simple structure can be used to set up your Excel file for markup, which will make it easy to prepare while creating a new Report Template.
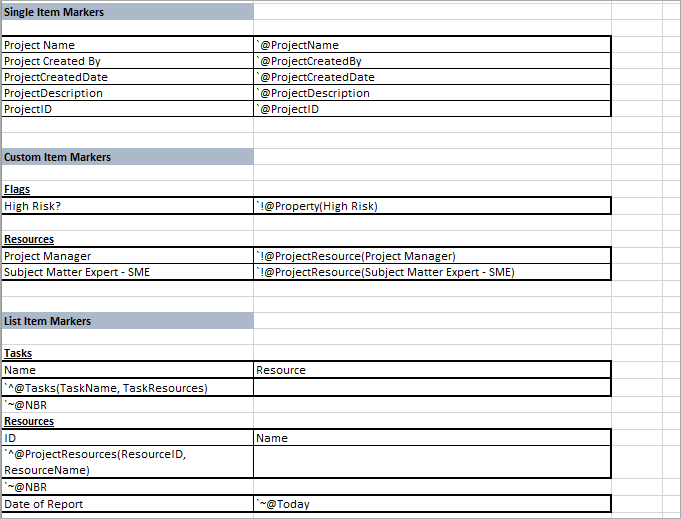
A simple strategy for formatting an Excel file is to organize it by marker type. Before inserting any markers, this type of Excel file might look like this:
![]()
Once marked up, a Project Report Template might look like this:
Once you become more comfortable constructing Report Templates in MS Excel, you will become better at customizing Excel files to your unique business needs.
Tip: Pay attention to the recommended formatting tips of each marker below; following them will make it much easier to prepare your Excel file.
Markers
Every Report Template is filled with markers. A marker indicates where Eclipse PPM should render data while running a report. They also indicate how to format the data within the report based on marker type.
The following marker types can be used in a template:
Single Item Markers
A Single Item Marker is the most basic marker type. When entered into a template, a Single Item Marker will be directly replaced by whichever type of data it represents once a Custom Report is rendered.
Each Single Item Marker must be prefixed with `@.
Note: The ` punctuation mark is a back quote, not an apostrophe. It is located to the left of the number keys on a standard QWERTY keyboard.
For example, a Report Template that is prepared like this:
Renders a Custom Report that looks like this:
Tip: While formatting your Excel file for Single Item Markers, you should include a column for labeling data as well as a column for the markers themselves (similar to the images above). This will make your report much more clear.
For a full list of available Single Item Markers, click here.
Custom Item Markers
A Custom Item Marker represents a field in Eclipse that has been given a custom name. Each Custom Item Marker consists of both the field and the custom name in parentheses.
Each Custom Item Marker must be prefixed with `!@.
Note: The ` punctuation mark is a back quote, not an apostrophe. It is located to the left of the number keys on a standard QWERTY keyboard.
For example, all properties on a project require their own custom name. To create a Custom Item Marker for a flag property named "High Risk," both the field ("Property") and the custom name of the property itself ("High Risk") must be included. The Custom Item Marker will look like this: `!@Property(High Risk).
Similar to Single Item Markers, Custom Item Markers will be directly replaced by whichever data type it represents.
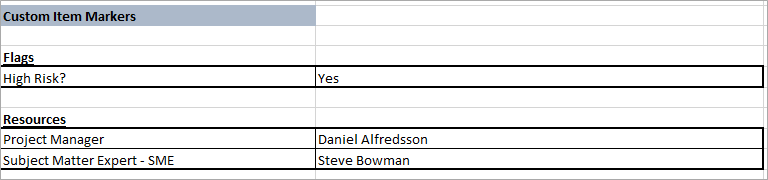
For example, a Report Template that looks like this:

Renders a Custom Report that looks like this:
Tip: Similar to Single Item Markers, Custom Item Markers should be structured with a labeling column in the Report Template MS Excel file for clarity. Additionally, it might help to organize Custom Item Markers by type (as seen in the images above with different headings for "Flags" and "Resources"). The variance between different types of Custom Item Markers might cause confusion if they are all lumped together.
For a full list of available Custom Item Markers, click here.
List Item Markers
A List Item Marker will render a list of multiple data fields in a Custom Report. As opposed to both Single and Custom Item Markers, List Item Markers do not represent a one-to-one replacement with data. Instead, they will automatically occupy the required amount of cells both below and to the right of them.
Each List Item Marker must be prefixed with `^@.
Note: The ` punctuation mark is a back quote, not an apostrophe. It is located to the left of the number keys on a standard QWERTY keyboard.
For example, you might want to create a list of project resources and some of their associated data. For this to happen, a List Item Marker must contain the list type (ProjectResources) as well as the associated data fields in parentheses separated by commas. In this case, the List Item marker would look like this: `^@ProjectResources(ResourceID, ResourceName, ResourceInitials, Role).
Note: Be sure not to add spaces within data fields in your List Item Markers. For example, you must write "ResourceName" instead of "Resource Name." Full lists of fields can be found on the Report Template Marker Reference Sheet.
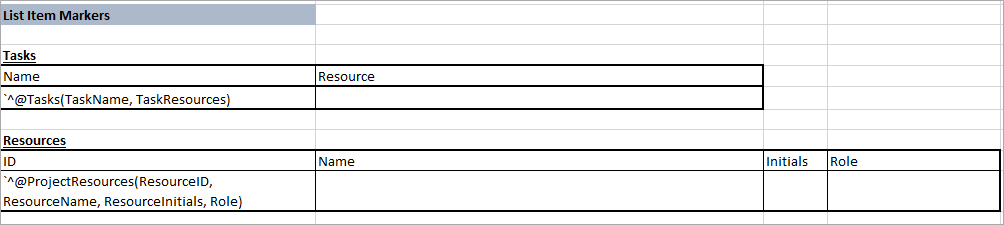
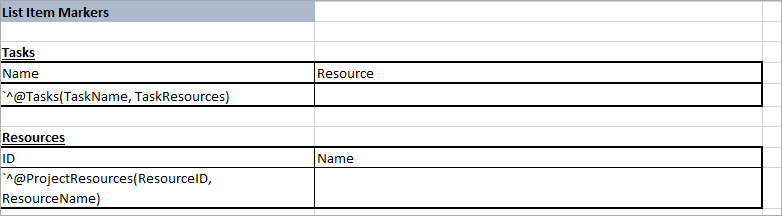
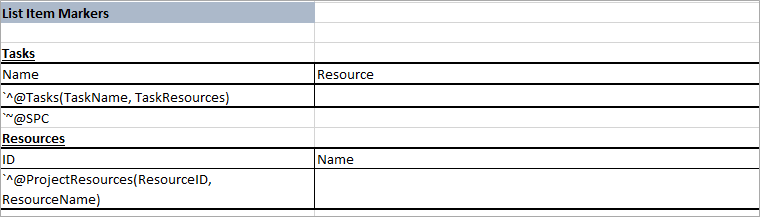
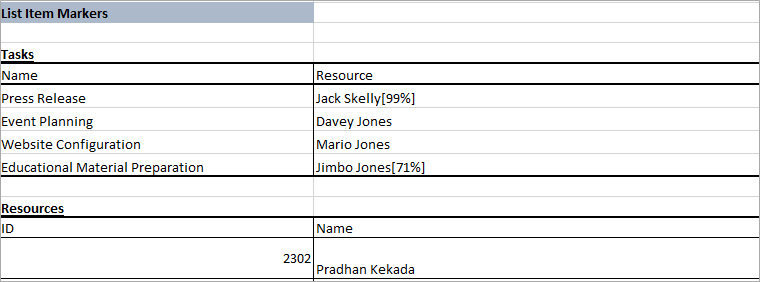
A Report Template that is prepared like this:

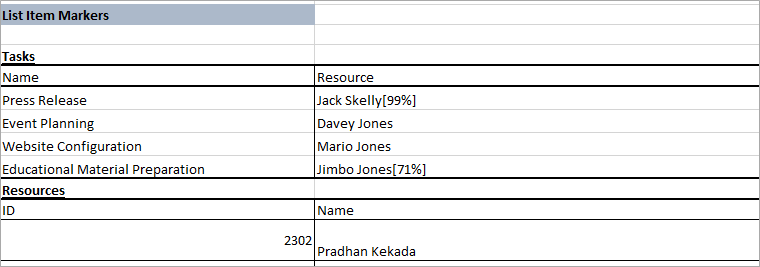
Renders a Custom Report that looks like this:
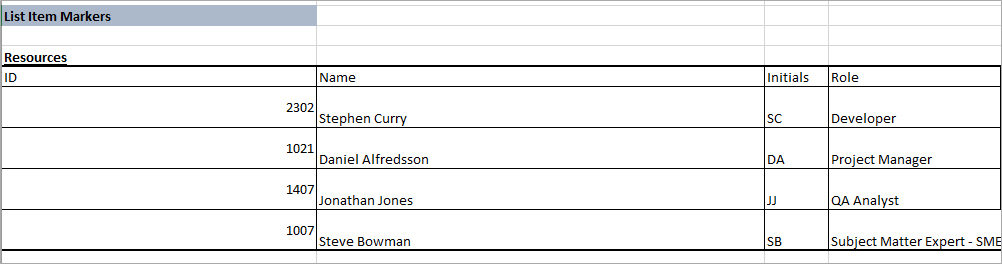
Note: Each List Item Marker will automatically the same number of columns as it has fields in the parentheses. In the example above, the List Item Marker ends up occupying four columns because it has four fields. Additionally, each new list item (for example, each new resource in the images above) will occupy a new row below the cell that contains the List Item Marker.
Tip: If you intend on labeling your MS Excel file for List Item Markers, be sure to include same number of columns as there are data fields within the parentheses. In the images above, for example, the List Item Marker contains four different fields (ResourceID, ResourceName, ResourceInitials, Role). The MS Excel file has been prepared with four labeled columns for each of these fields.
Tip: Lists rendered by List Item Markers will take up all empty cells directly below them in the Report Template. Once the list reaches cells that are not empty, it will push them down to avoid overlapping other content. You should always place a Non-Breakable Row or Spacer marker under a List-Item Marker in your Report Template (`~@NBR or `~@SPC). This will make sure that the list will not affect any content directly under it once rendered in a Custom Report.
For a full list of available List Item Markers, click here.
For ways to filter and order the date rendered by List Item Markers, see Piping Options.
Common Markers
A Common Marker represents common data that exists outside of Eclipse PPM. When entered into a template, Common Markers will be directly replaced with the data they represent (similar to Single and Custom Item Markers).
Each Common Marker must be prefixed with `~@.
Note: The ` punctuation mark is a back quote, not an apostrophe. It is located to the left of the number keys on a standard QWERTY keyboard.
For example, the date that a report is rendered on can be included in a Report Template. In this case, the Common Marker would look like this: `~@Today.
A Report Template that is prepared like this:

Renders a Custom Report that looks like this:

Tip: While formatting your Excel file for Common Markers, you should include a column for labeling data as well as a column for the markers themselves (similar to the images above). This will make your report much more clear.
As of right now, "Date of Report" is the only Common Marker available.
Content Flow Markers
A Content Flow Marker does not actually represent any data. Instead, it helps control the flow of data once a Custom Report is rendered. Including Content Flow Markers into your Report Template will improve the clarity and organization of your Custom Reports.
There are only two types of Content Flow Markers:
Non-Breakable Row
A Non-Breakable Row marker preserves an entire row in the Report Template from becoming overlapped by other cells once a Custom Report is rendered.
A Non-Breakable Row marker looks like this: `~@NBR
Note: The ` punctuation mark is a back quote, not an apostrophe. It is located to the left of the number keys on a standard QWERTY keyboard.
Non-Breakable Row markers should always be used in the row directly under a List Item Marker. When a List Item Marker is rendered, the list will only push down cells that are directly under the list itself.
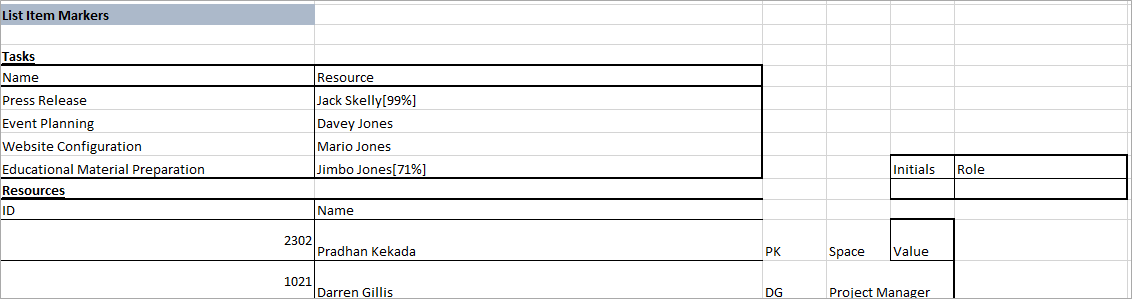
For example, have a look at this Report Template. The List Item Marker has an empty row directly under it, but no Non-Breakable Row marker:
Once rendered into a Custom Report, the "Tasks" List Item Marker will only push down the cells directly below it. This will affect how the "Resources" data looks in the report:
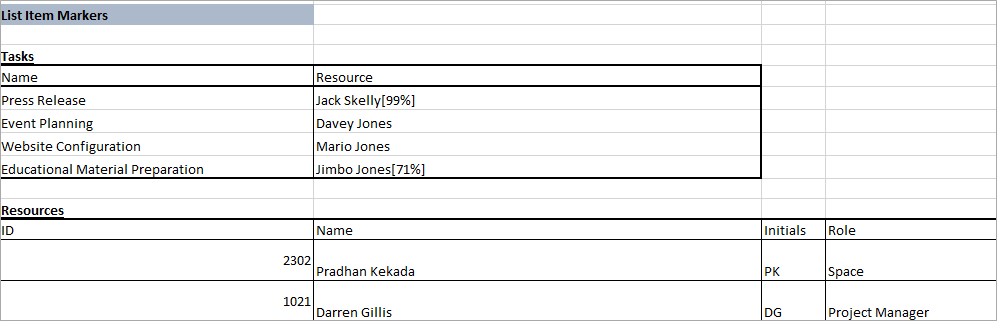
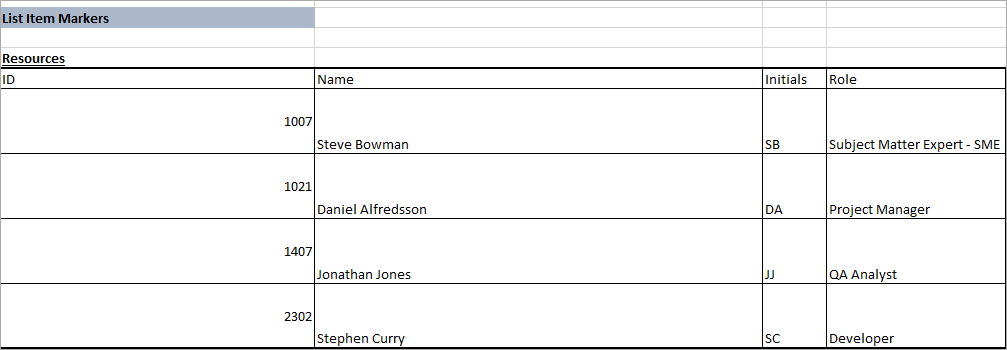
A Non-Breakable Row marker prevents this by acting as a barrier under List Item Markers. It ensures that the entire row will remain intact, which protects everything below it:

Once the Custom Report is rendered, protects the "Resources" List Item Marker from the "Tasks" List Item Marker:
Spacer
A Spacer marker will preserve the space between a list and the content directly below it after the list renders in a Custom Report.
A Spacer marker looks like this: `~@SPC
Note: The ` punctuation mark is a back quote, not an apostrophe. It is located to the left of the number keys on a standard QWERTY keyboard.
When a List Item Marker renders into a list in a Custom Report, it will occupy all empty cells directly below it. Once the list reaches cells that are not empty, it will push them down to avoid overlapping other content. However, this might result in messy-looking report.
For example, this Report Template does not have a Spacer marker between two list item markers. Instead, there is only an empty row:
Once rendered in the Custom Report, the list will automatically occupy the empty spaces below it and bump up against the next list:
To make sure that there is an extra space, include a Spacer marker in the Report Template:
This will preserve the spaces directly under a list, which leads to clearer formatting:
Tip: It is important to remember that the Spacer marker will only preserve cells directly below a list. In the images above, for example, the Spacer marker only preserves the two cells under the "Tasks" list. This could cause problems if the "Resources" list under it had more columns; spaces would only be preserved under the two "Tasks" columns: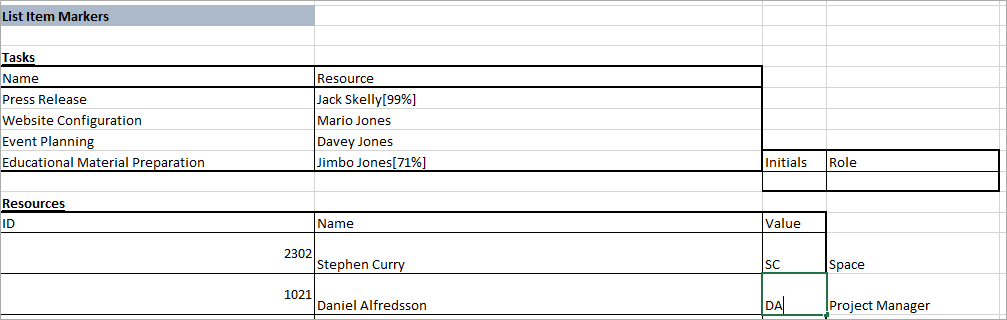
If this is the case, consider using a Non-Breakable Row marker to preserve an entire row in your Report Template.
Piping Options
While markers decide which data is included in a Custom Report, Piping Options dictate how that data appears. You can use piping options to either filter or order data from List Item Markers to your liking.
Piping options are added directly on the end of a List Item Marker and separated by periods.
There are only two types of piping options:
Filtering
Filtering options allow you to "filter out" unwanted data to make sure that only relevant data is included in your Custom Report. They indicate which data will be included once you render a Custom Report.
Each filtering option must be prefixed with FilterBy and placed within parentheses.
Filtering instructions must be included on the end of List Item Markers, separated by periods. Here is an example of a "Tasks" List Item Marker with filters:

When this Report Template is rendered, the "Tasks" List Item Marker will only include milestone tasks and critical tasks.
For a full list of available filtering options, click here.
Ordering
Ordering options allow you to dictate the order in which data from a List Item Marker appears.
Each ordering option must be prefixed with either OrderByAscending or OrderByDescending.
Ordering instructions must be included on the end of List Item Markers; they must also be separated by periods. Here is an example of a "Resources" List Item Marker with an ordering instructions:

Once rendered in a Custom Report, the Resources will be organized by their ID numbers:
All of the Ordering options can be found under Piping Options in the Report Template Marker Reference Sheet.