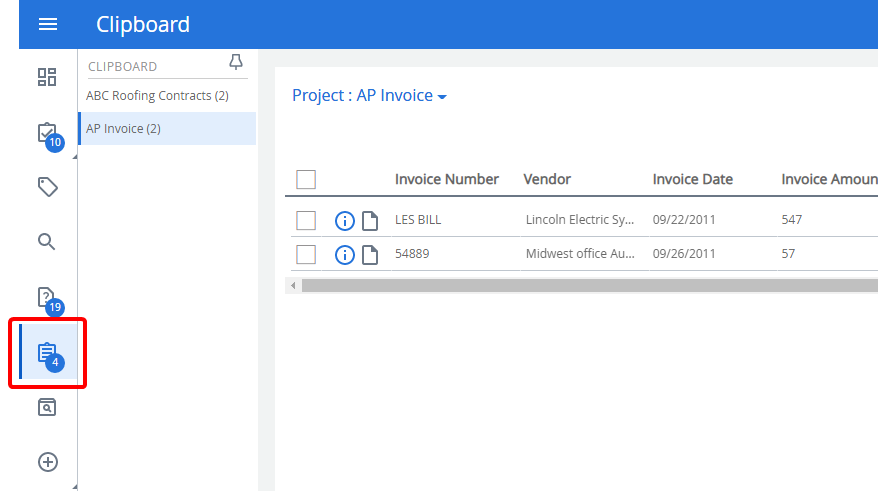
The Clipboard is an area where you can compile, gather, and place files of similar interest. Each user has their own Clipboard for each project. Files added to your Clipboard are simply pointers to the original file. Hence, one file can be on the Clipboard of more than one user. You cannot add documents to the clipboard. There is no limit on the number of files you can add to the Clipboard.
Tip: There can be Clipboard-only users. For these users, Project Administrators can select a group of files and place them on the user's Clipboard. These users have access only to the files the Project Administrators have placed on their Clipboard. This can be a useful feature if you have an auditor coming.
Note: Clipboard is displayed in the Navigation menu only when one or more files have been added to the Clipboard.
Topics include:
Remove files from the Clipboard
Delete Files from the Clipboard
Archive files from the Clipboard
Route files from the Clipboard
Create a barcode break sheet from the Clipboard
Create a barcode break sheet for multiple dividers from the Clipboard
Search for files on the Clipboard
Clear all files from the Clipboard
Assign Clipboard files to another user
Print file list from Clipboard
Export file list from the Clipboard
Update index field values for all files on the Clipboard
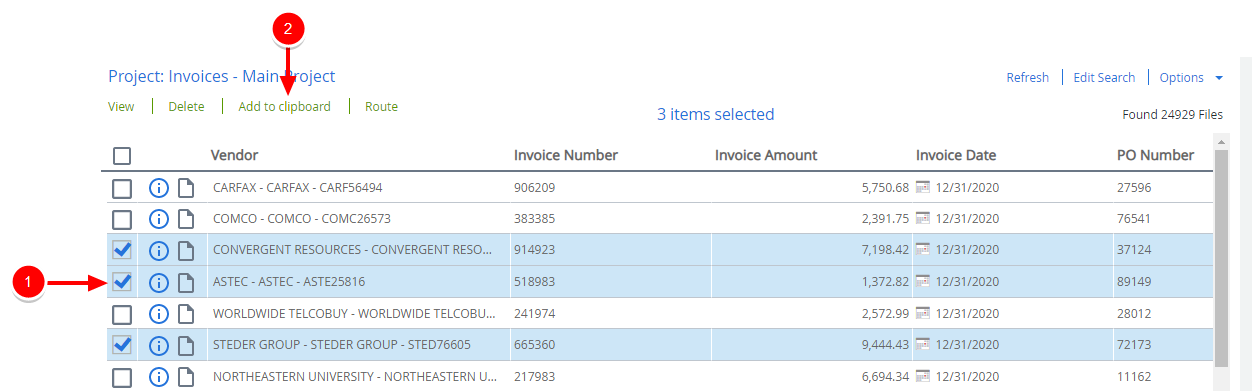
Add files to the Clipboard
The Clipboard is an area where you can compile, gather, and place files of similar interest. There is no limit on the number of files you can add to your Clipboard.
- On the Search results page, select the check box next to the file(s) that you want to add to the Clipboard.
-
Click Add to clipboard.
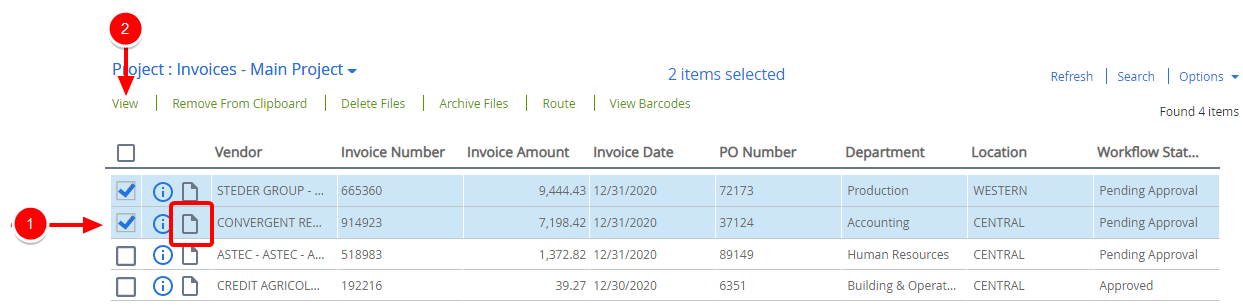
View Clipboard files
You can quickly view files from your Clipboard. The file will open in your default viewer.
-
Click View next to the file that you want to view or select the check box next to the file, then click View.
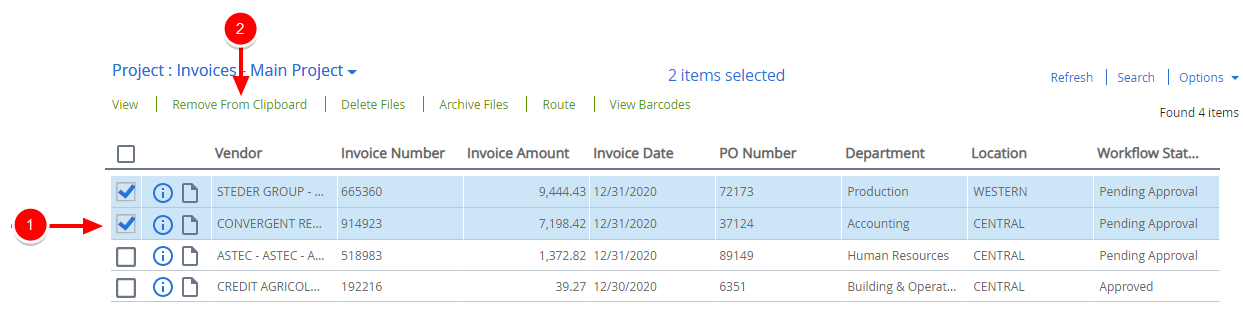
Remove files from the Clipboard
You can remove all files from the Clipboard. Removing a file from the Clipboard only removes the reference to the file from the Clipboard. The file remains in the FileBound project and is not deleted.
-
Select the check box next to the file(s) that you want to remove from the Clipboard, then click Remove From Clipboard.
Delete Files from the Clipboard
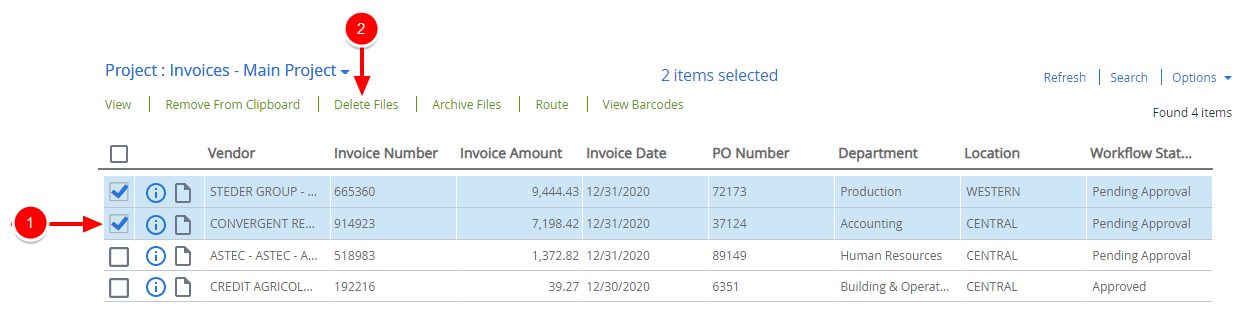
You can delete one or more files from a Clipboard. Deleted files are removed from your Clipboard AND deleted from FileBound.
Example: You are be the hiring manager for a marketing position that has opened in your company, and the Human Resources department has placed the resumes of five applicants on your Clipboard. As you interview the applicants, you decide that two of them are not qualified for the position, so you don’t want to save their files. In this case, you would delete their resumes from your Clipboard.
Note: If the Recycle Bin has been turned on by the System Administrator, files that are deleted from the Clipboard will go to the Recycle Bin. If the Recycle Bin is not enabled, files will be deleted permanently.
-
Select the check box next to the file(s) that you want to delete, then click Delete Files.
-
Click Yes to confirm the deletion.
Archive files from the Clipboard
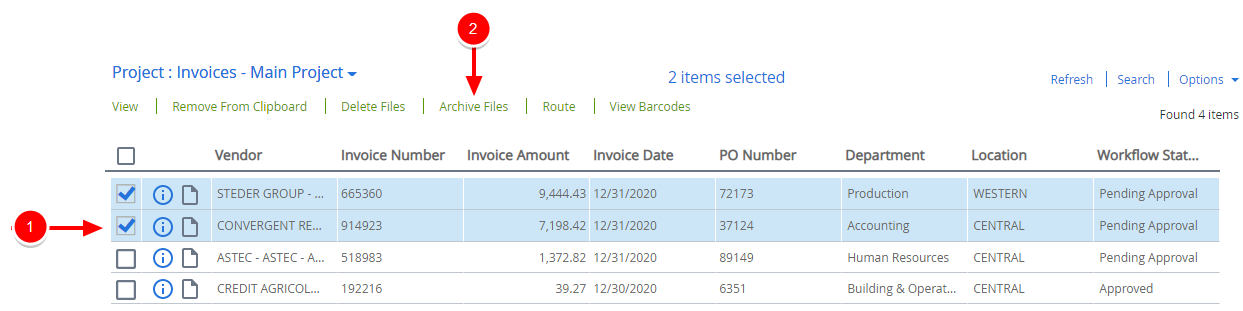
You can archive project files that you don't currently need. Creating an archive does not alter the availability of the documents within FileBound.
Documents can only be associated and organized into one archive at a time. If a document is tagged as being associated with one archive and then is associated with a new archive, it will no longer be associated with the first archive.
Tip: After an archive has been created, new documents can be tagged with the archive name and added to the archive. If documents are added to the archive after it has been created, it is recommended that the original archive that was created and saved to disk, be destroyed, as the new archive created includes the recently added documents.
-
Select the check box next to the file(s) that you want to archive, then click Archive Files.
-
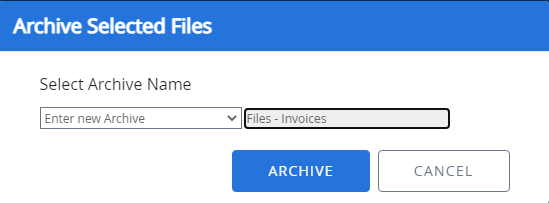
In the Archive Selected Files dialog box, select the archive file name from the Select Archive Name list.
To create a new archive, select Enter new Archive from the Select Archive Name list and type a name for the archive.
-
Click Archive.
Once an archive has been created, it can be managed in the project configuration. See Archives for more information.
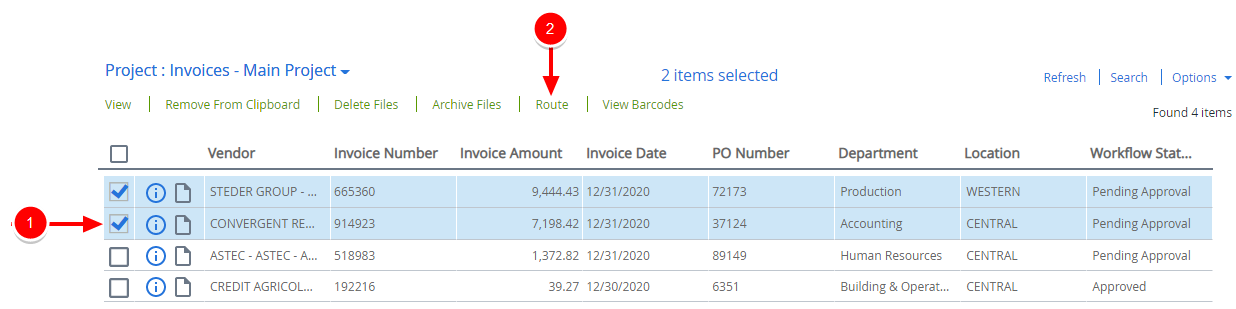
Route files from the Clipboard
You can route the files on your Clipboard to a workflow process that has been created for the project. After you route a file, it will remain on your Clipboard and can be routed through another workflow process.
-
Select the check box next to the file that you want to route from the Clipboard, then click Route.
-
In the dialog box, select the workflow process to route the file down from the list, then click Next.
-
In the dialog box, select a routing action. The following options are available:
- First Document in File: Routes only the first document of the selected file.
- Every Page: Routes all pages of the selected file.
-
Type your comments in the Comments box.
-
Click Finish.
-
Click OK on the "Documents routed successfully" message.
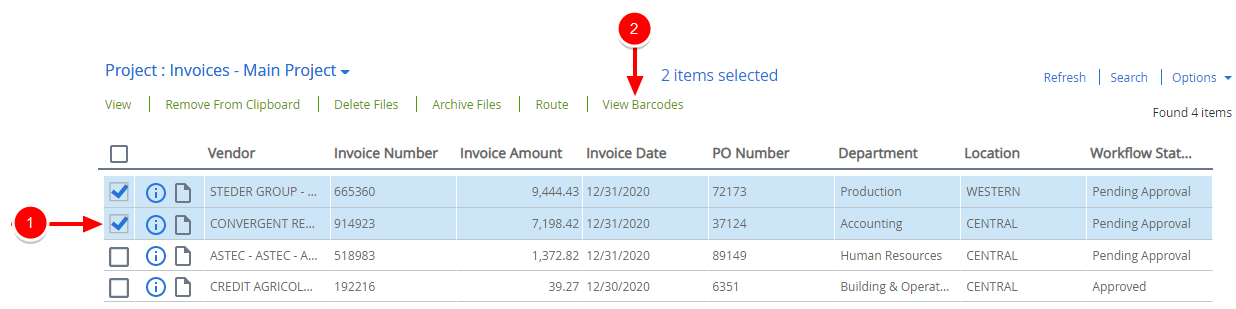
Create a barcode break sheet from the Clipboard
You can print barcodes that can be used when scanning new files into FileBound. You can print barcodes for specified index fields or only the key field for the selected file(s).
-
Select the check box next to the file(s) that you want to generate barcodes for, then click View Barcodes.
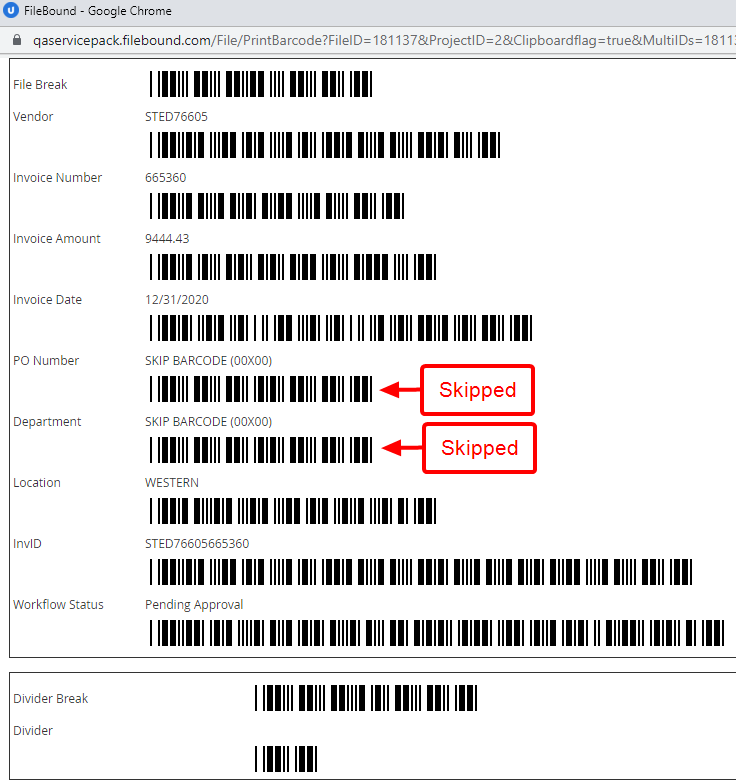
- On the Print Barcode page, select the Key Field Only check box to print barcodes for the key field only. The key field appears in red text.
- Select the Skip This Field check box next to the index field(s) you do not want to print barcodes for.
- If enabled for the project, select a separator from the Separator list.
-
Select a divider from the Divider list.

-
Click Print Barcode. The barcodes for all of the index fields that were not skipped are generated and displayed. The File Break barcode organizes the files according to the project and divider name in FileBound. Skip Barcode is displayed for the index fields that were selected to be skipped.
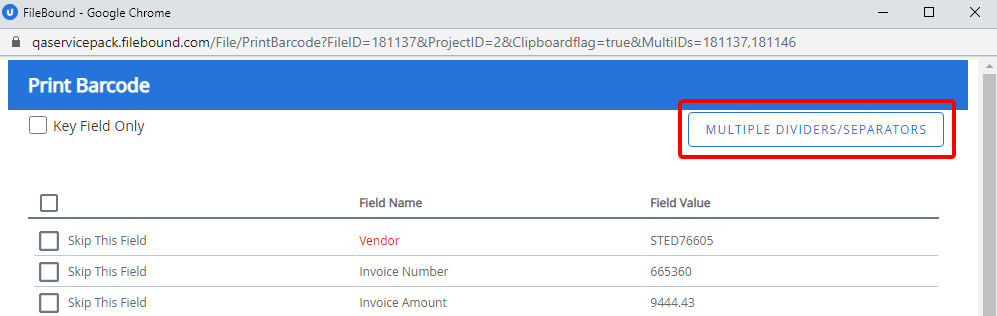
Create a barcode break sheet for multiple dividers from the Clipboard
You can print barcode break sheets for single or multiple separator(s)/divider(s) that can be used while scanning new files into FileBound.
-
Select the check box next to the file(s) that you want to generate barcodes for, then click View Barcodes.
-
On the Print Barcode page, click Multiple Dividers/Separators.
-
Select the check boxes next to the dividers and separators that you want to generate barcodes for, then click Print Barcode.
Search for files on the Clipboard
You can search for files that have been placed on your Clipboard. The search is conducted for the selected project only.
-
Select a project, then click Search.
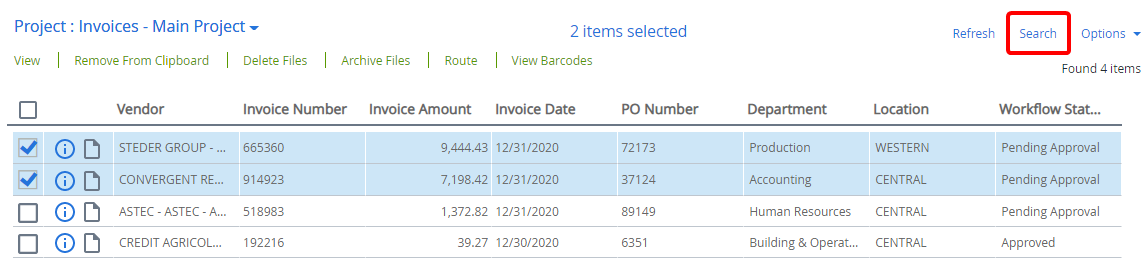
-
In the Search Clipboard dialog box, specify project search criteria in the relevant index field boxes, then click Search.
You can type in Project Link type fields to quickly locate the value you are looking for. This search is a 'contains' search of drop-down items.
The Project list cannot be changed because the project has already been selected on the Clipboard.
Clear all files from the Clipboard
You can quickly remove all files from your Clipboard. Removing a file from the clipboard only removes the reference to the file from the Clipboard. The file remains in the FileBound project and is not deleted.
-
Click Options, then select Clear all Files from Clipboard.
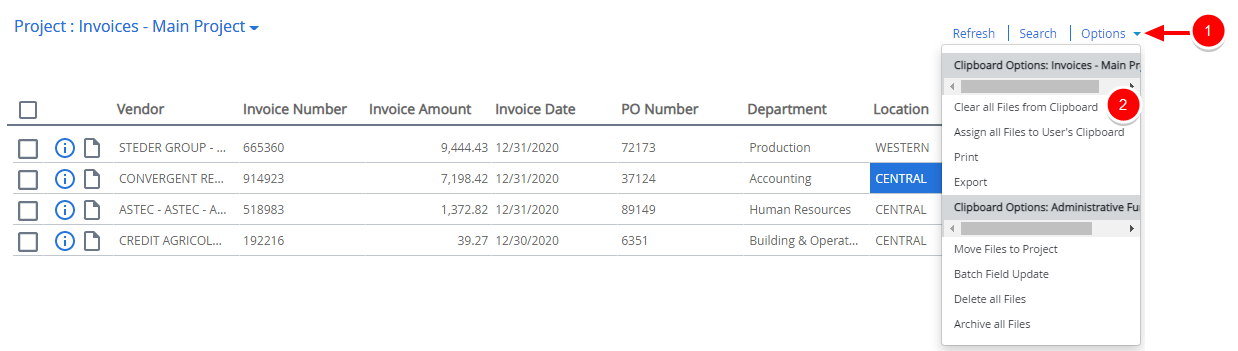
Assign Clipboard files to another user
You can add files from your Clipboard to the Clipboard of another user. For example, if an auditor needs to perform an audit on all invoices that were approved in May 2017, you can assign all of the May 2017 invoices to the auditor's clipboard.
When you assign files on your Clipboard to another user, they will be removed from your Clipboard.
-
Click Options, then click Assign all Files to User's Clipboard.
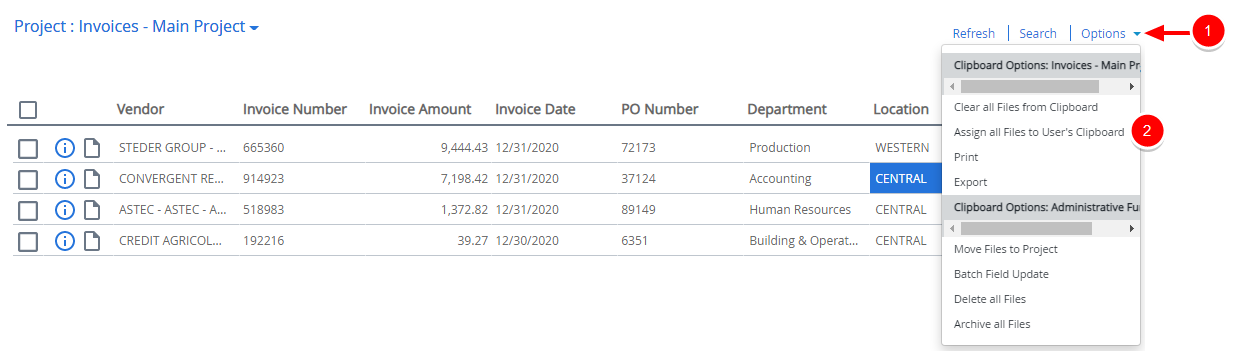
-
Select the user that you want to assign the files to, then click Re-assign.
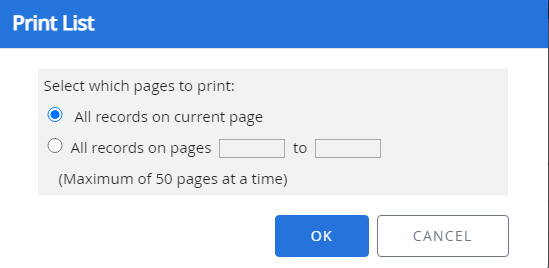
Print file list from Clipboard
The list of files on the Clipboard can be printed.
-
Click Options, then click Print.
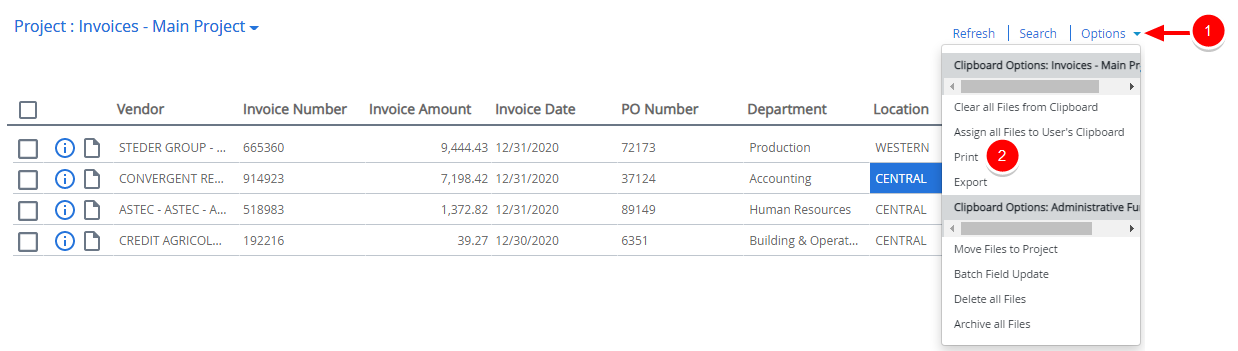
-
In the Print List dialog box, select the Clipboard pages you want to print the file list from. The following options are available:
- All records on current page: Prints the list of files on the current page.
- All records on pages: Allows you to provide a page range for the file list that will be printed.
-
Click OK.
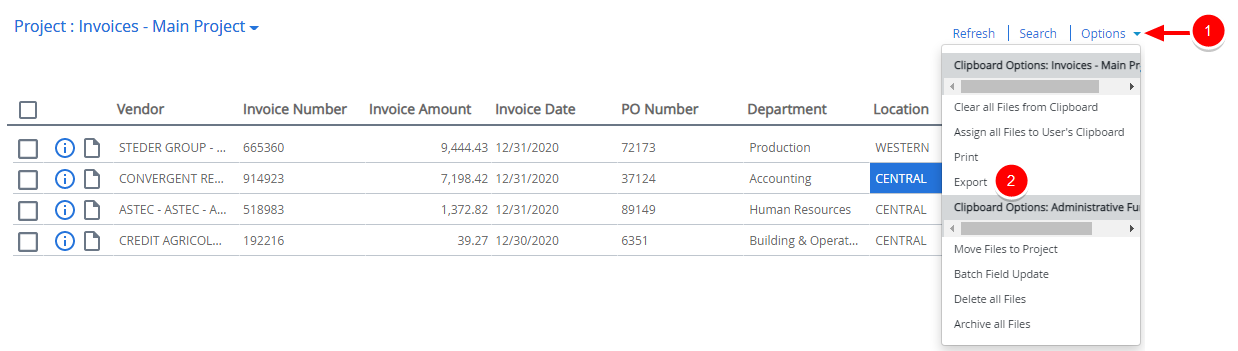
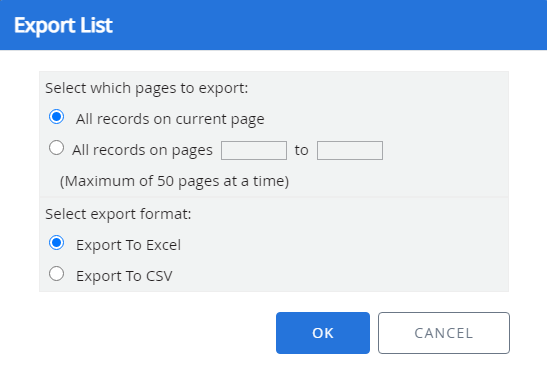
Export file list from the Clipboard
The list of files on the Clipboard can be exported in Microsoft Excel or .csv format.
-
Click Options, then click Export.
-
In the Export List dialog box, select the pages to export. The following options are available:
- All records on current page: Exports the list of files on the current page.
- All records on pages: Allows you to provide a page range for the file list that will be exported.
-
Select the export file format. The following options are available:
- Export To Excel: Exports the list of files to Microsoft Excel format.
- Export To CSV: Exports the list of files in .csv format.
-
Click OK.
-
In the Save As dialog box, select a location to save the file, then click Save.
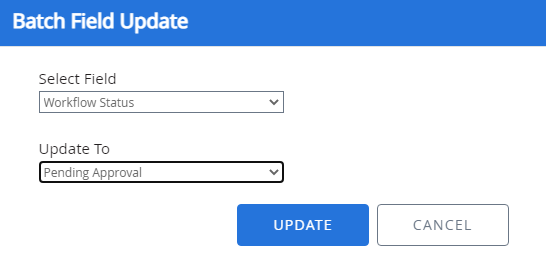
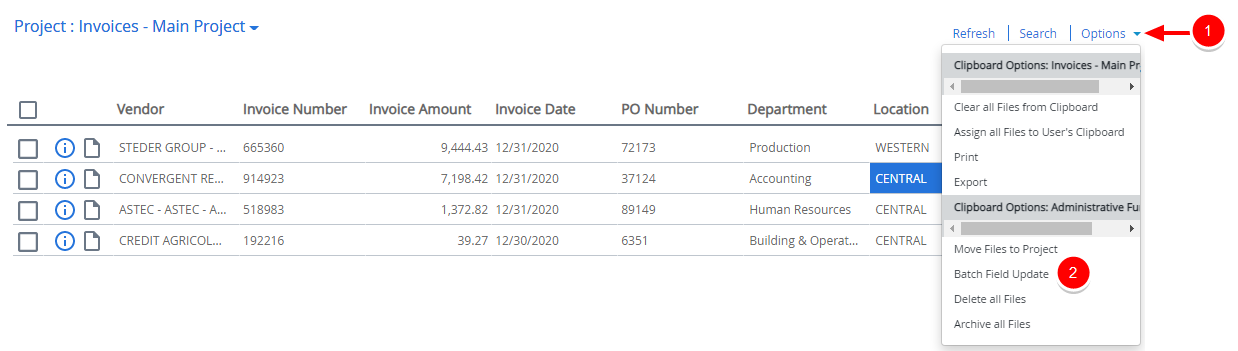
Update index field values for all files on the Clipboard
Administrators can update the index field values for all files on the Clipboard at one time.
Caution: Batch field update of cascade fields does not validate that the selection is valid and may cause data mismatch problems - USE AT YOUR OWN RISK.
-
Click Options, then select Batch Field Update.
- Select the field that you want to update from the Select Field list.
-
Select the new index field value in the Update To field, then click Update.