Scan documents
Any user that is assigned to a role with the Capture Documents permission can scan documents into Intelligent Capture. Once scanned in, documents will follow the workflow selected in the Profile drop-down menu.
The Intelligent Capture desktop application for TWAIN scanners needs to be installed and running before you can scan documents from a local USB scanner. You will be prompted to install the application the first time you scan documents. See Install the Intelligent Capture desktop application for TWAIN scanners for more information.
There are several ways to scan documents into Intelligent Capture:
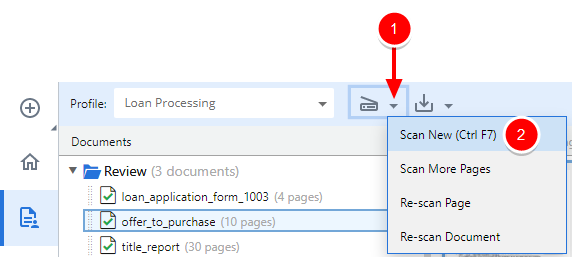
Scan New
The Scan New function will scan documents into the first step of a workflow.
You will only be able to scan a new document if it is an allowed feature for the selected workflow step AND you are assigned to a role with the Capture Documents permission.
- Place the page(s) you want to scan in your scanner.
- On the Toolbar, click the arrow next to Scan to Folder, then select Scan New from the drop-down menu. Or, use the Ctrl+F7 keyboard shortcut.
-
Select your scanner from the Scanner menu.
Click Refresh to refresh the list of scanners.
- Adjust the DPI, Depth, and Size as necessary.
- Specify a name for the document in the Document Name field.
- Select the Duplex check box to scan both sides of the page.
- Click Settings to adjust additional scanner settings if necessary. The scanner window that appears will differ based on your scanner.
- Click Scan.
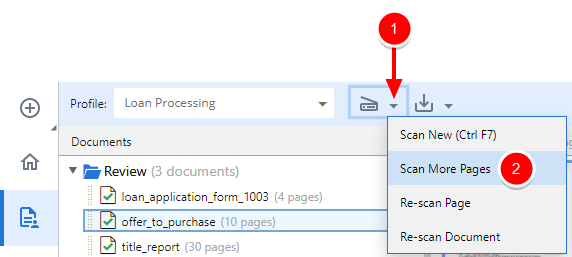
Scan More Pages
The Scan More Pages function allows you to add more pages to a document that already exists in Intelligent Capture. This may be helpful when you are scanning a large batch of pages that doesn't fit in your scanner at one time.
You will only be able to scan more pages if it is an allowed feature for the selected workflow step AND you are assigned to a role with the Capture Documents permission.
- In the Document Panel, select the document you want to scan more pages to.
-
On the Toolbar, click the arrow next to Scan to Folder, then select Scan More Pages from the drop-down menu.
- Place the additional pages you want to scan in your scanner, and click Scan in the Intelligent Capture application.
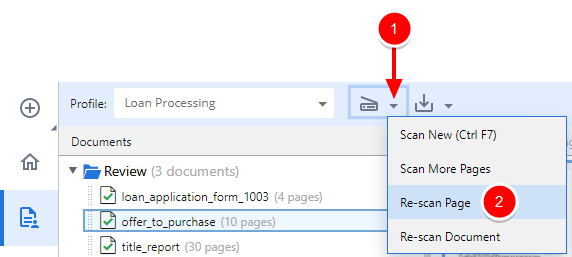
Re-scan a page
The Re-scan Page function allows you to re-scan a page that already exists in Intelligent Capture. The selected page will be replaced with the newly scanned image.
You will only be able to re-scan a page if it is an allowed feature for the selected workflow step AND you are assigned to a role with the Capture Documents permission.
- In the Document Panel, select the document you want to re-scan pages for.
-
In the Document Preview Window, select the thumbnail for the page you want to re-scan.
-
On the Toolbar, click the arrow next to Scan to Folder, then select Re-scan page from the drop-down menu.
- Place the page you want to re-scan in your scanner, and click Scan in the Intelligent Capture application.
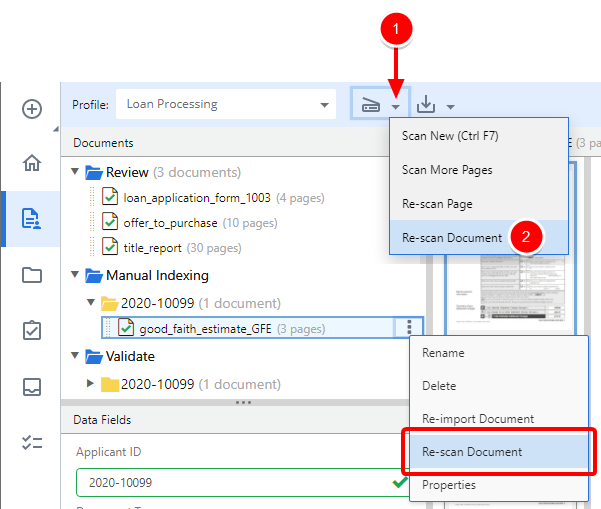
Re-scan a document
The Re-scan Document function allows you to re-scan a document that already exists in Intelligent Capture. The selected document will be replaced in its entirety with the newly scanned document.
You will only be able to re-scan a document if it is an allowed feature for the selected workflow step AND you are assigned to a role with the Capture Documents permission.
-
Perform one of the following:
- On the Toolbar, click the arrow next to Scan to Folder, then select Re-scan Document from the drop-down menu.
- Or, right-click the document you want to re-scan in the Document Panel, then select Re-scan Document from the drop-down menu
- Or, click the three dots next to the document you want to re-scan in the Document Panel, then select Re-scan Document from the drop-down menu.
- Place the document you want to re-scan in your scanner, and click Scan in the Intelligent Capture application.