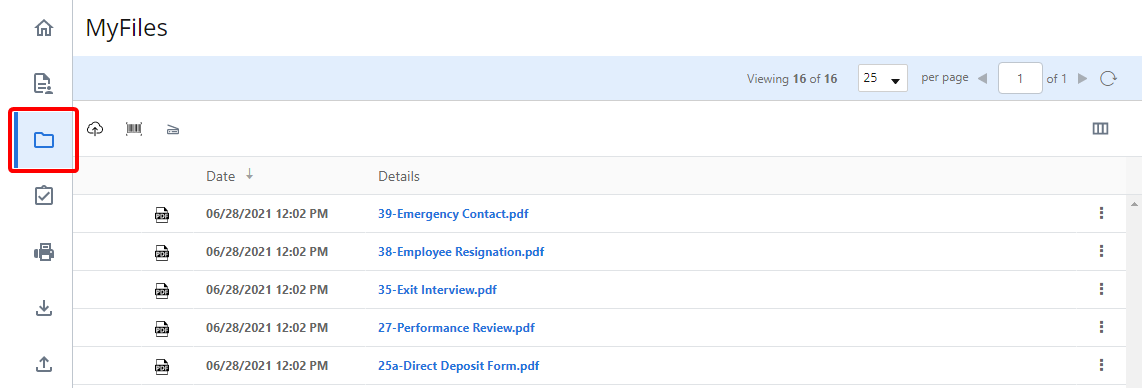
MyFiles
MyFiles is a place where you can scan and import documents into Intelligent Capture without sending them to a specific workflow. The document retention period is part of your Intelligent Capture license. The default is 30 days.
The following document types can be uploaded to and managed in MyFiles:
- PDF documents
- Microsoft Word documents (.doc, .docx)
- Microsoft Excel documents (.xls, .xlsx)
- Microsoft PowerPoint documents (.ppt, .pptx)
- Text documents (.txt, .rtf)
- Images (.tif, .tiff, .jpg, .jpeg, .gif, .png, .bmp)
Any user that is assigned to a role with the Manage MyFiles permission has access to their own personal MyFiles.
You can do the following from MyFiles:
Mark a document as read/unread
Submit a document to a workflow
Upload a document
-
Click Upload.
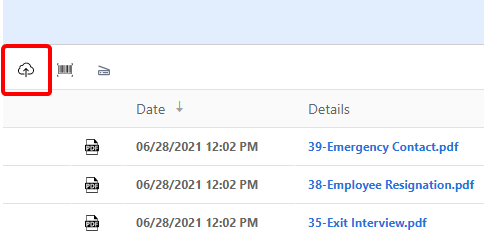
-
Click Choose File to select the documents you want to upload or move documents to the Upload to MyFiles window using a drag-and-drop operation.
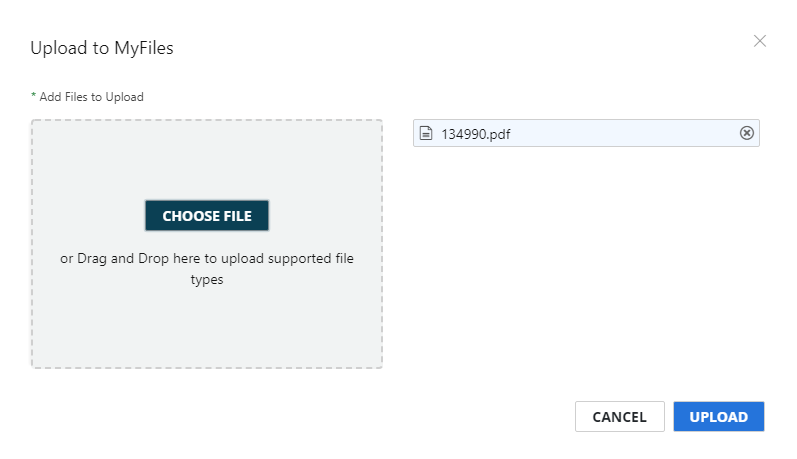
- Click Upload.
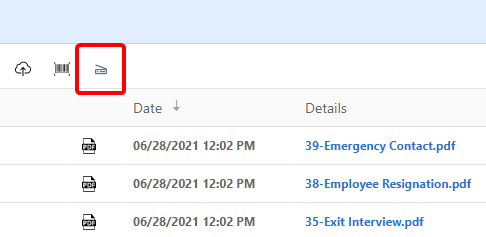
Generate a routing sheet
You can generate a routing sheet that can be used to scan documents directly into your MyFiles. Once you have generated a routing sheet, place it as the first or last page in a stack of documents in order for it to be processed correctly.
-
Click Routing Sheet.
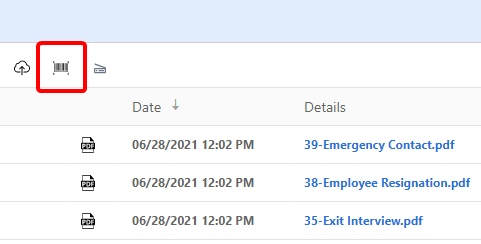
- Enter a Document Name. This is what the document will be named when scanned to MyFiles. If left blank, the original document name will be used.
-
Select a Delivery Format. This is the format the document will be converted to when scanned to MyFiles. The following options are available:
- DOC (OCR Text): The OCR engine extracts the text from the document and puts it in Microsoft Word .doc file format.
- DOCX (OCR Text): The OCR engine extracts the text from the document and puts it in Microsoft Word .docx file format.
- JPG (Image, Single Page): An image in JPG file format. A multi-page source will be broken into individual single page JPGs.
- PDF: A PDF document that is not text-searchable.
- PDF (Image+OCR Text): A PDF document that is text-searchable. The original look of the document will stay the same. The first layer of the PDF is an image maintaining the fidelity of the document, and the text is applied as a second layer.
- PDF (Text Only): A PDF document with no image layer. The OCR engine extracts the text from the document and puts it as the first layer of the PDF document. OCR imperfections can be seen when converting to this format type.
- PDF/A: A PDF/A document that is not text-searchable.
- PDF/A (Image+OCR Text): A PDF/A document that is text-searchable. The original look of the document will stay the same. The first layer of the PDF/A is an image maintaining the fidelity of the document, and the text is applied as a second layer.
- PDF/A (OCR Text): A PDF/A document with no image layer. The OCR engine extracts the text from the document and puts it as the first layer of the PDF/A document. OCR imperfections can be seen when converting to this format type.
- RTF (OCR Text): The OCR engine extracts the text from the document and puts it in RTF file format.
- TIFF: An image in TIFF file format.
- TIFF (Image, Single Page): An image in TIFF file format. A multi-page source will be broken into individual single page TIFFs.
- TXT (OCR Text): The OCR engine extracts the text from the document and puts it in TXT file format.
- XLS (OCR Text): The OCR engine extracts the text from the document and puts it in Microsoft Excel .xls file format.
- XLSX (OCR Text): The OCR engine extracts the text from the document and puts it in Microsoft Excel .xlsx file format.
- In the Save As dialog box, navigate to the location where you want the routing sheet to be saved.
- Edit the file name as necessary, then click Save.
Routing sheets are processed via the Routing Sheet stencil in a workflow. See Routing Sheet stencil for more information.
Scan a document
- Place the page(s) you want to scan in your scanner.
- Click Scan to MyFiles.
-
Select your scanner from the Scanner menu.
Click Refresh to refresh the list of scanners.
- Adjust the DPI, Depth, and Size as necessary.
- Specify a name for the document in the Document Name field.
- Select the Duplex check box to scan both sides of the page.
- Click Settings to adjust additional scanner settings if necessary. The scanner window that appears will differ based on your scanner.
- Click Scan.
Download a document
-
Perform one of the following:
- Right-click anywhere in the document row or click the three dots next to the document you want to download, then select Download from the drop-down menu.
- Or, click the name of the document.
- Or, select the check box next to a document, then click Download.
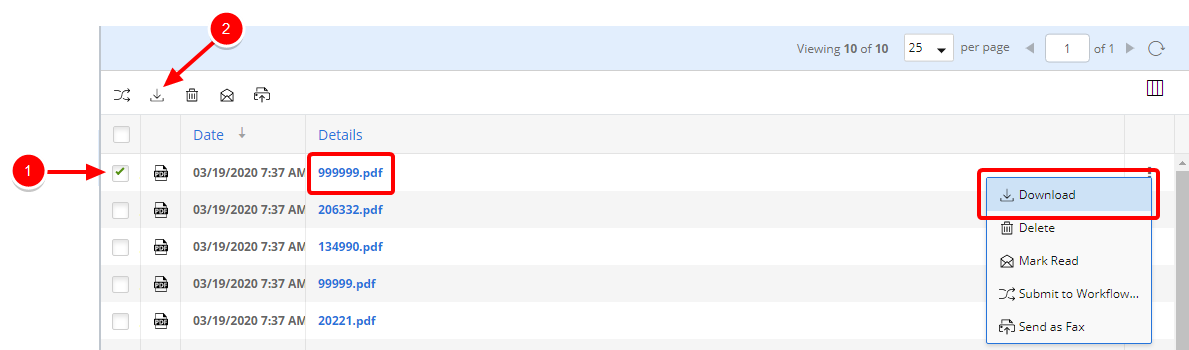
- In the Save As dialog box, navigate to the location where you want the document to be saved.
- Edit the file name as necessary, then click Save.
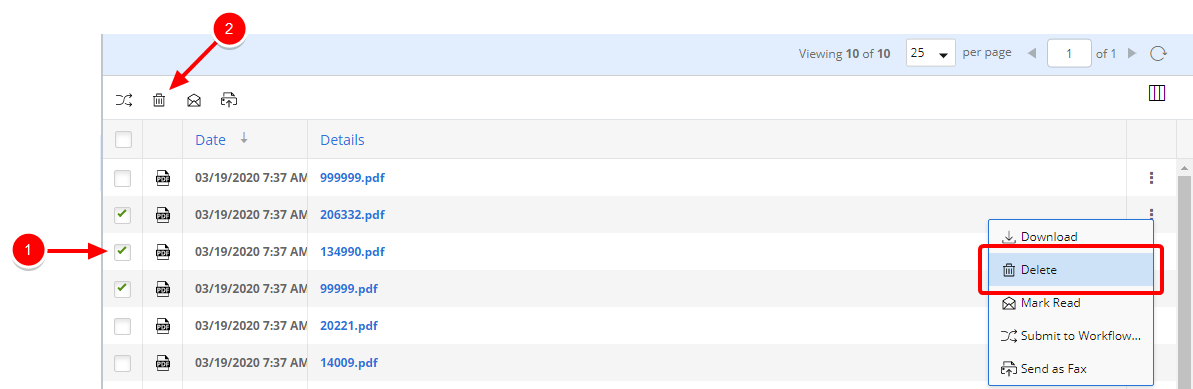
Delete a document
-
Perform one of the following:
- Right-click anywhere in the document row or click the three dots next to the document you want to delete, then select Delete from the drop-down menu.
- Or, select the check box next to one or multiple documents, then click Delete.
- Click Delete to confirm the deletion.
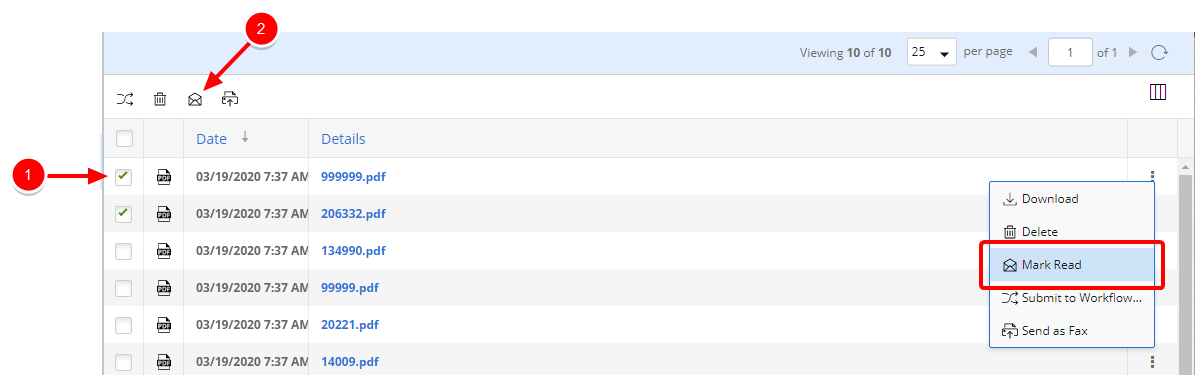
Mark a document as read/unread
MyFiles works very similar to how an email Inbox works in terms of read and unread documents. The date and details for new documents are displayed in bold. You can acknowledge documents by marking them as read. Once marked as read, they will no longer be displayed in bold.
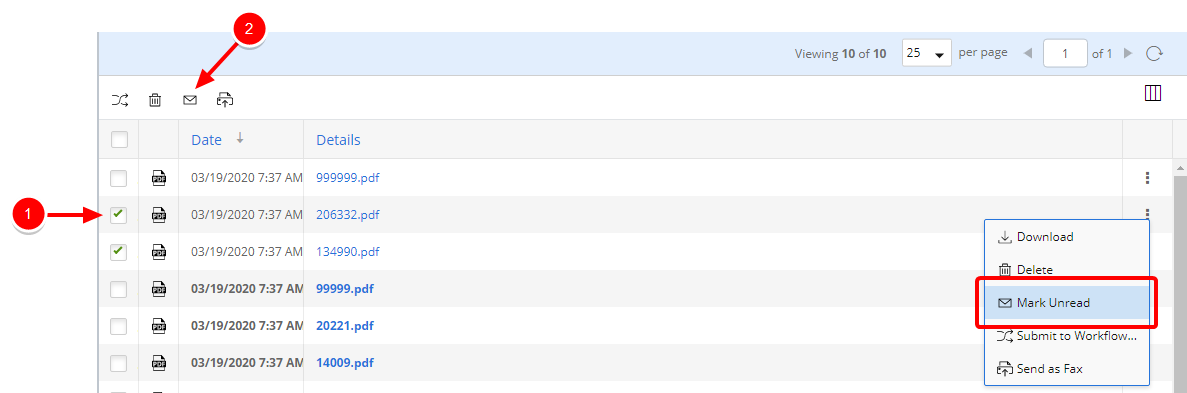
To mark a document as read, perform one of the following:
- Right-click anywhere in the unread document row or click the three dots next to the document you want to mark as read, then select Mark Read from the drop-down menu.
- Or, select the check box next to one or multiple unread documents, then click Mark Read.
To mark a document as unread, perform one of the following
- Right-click anywhere in the read document row or click the three dots next to the read document you want to mark as unread, then select Mark Unread from the drop-down menu.
- Or, select the check box next to one or multiple read documents, then click Mark Unread.
Submit a document to a workflow
-
Perform one of the following:
- Right-click anywhere in the document row or click the three dots next to the document you want to submit to a workflow, then select Submit to Workflow... from the drop-down menu.
- Or, select the check box next to one or multiple documents, then click Submit to Workflow....
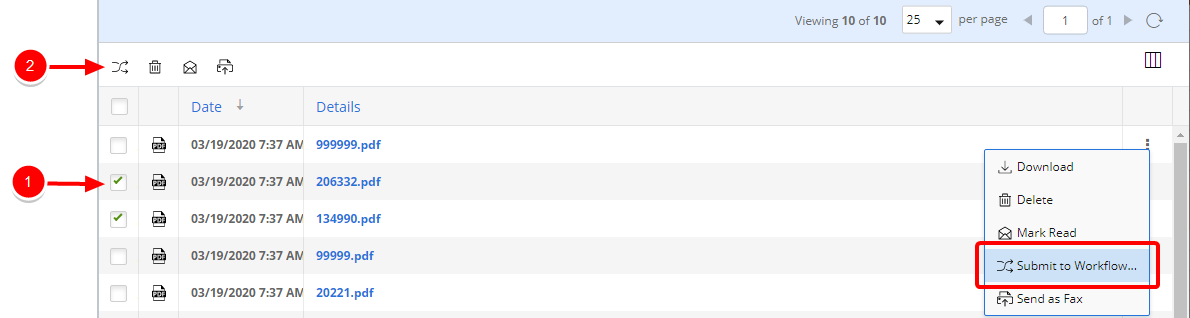
- Click the name of the workflow you want to submit the document to.
- If prompts have been configured on the workflow Start stencil, you will be prompted to enter data field values.
Copy a document to OneDrive
You can copy documents from My Files to your Microsoft OneDrive folders. This option will only be available if the OneDrive integration has been enabled for your account and you are assigned to a role that has permission to the integration.
-
Perform one of the following:
- Right-click anywhere in the document row or click the three dots next to the document you want to copy to OneDrive, then select Copy to OneDrive from the drop-down menu.
- Or, select the check box next to one or multiple documents, then click Copy to OneDrive.

- Select the appropriate OneDrive folder to copy to.
- Click Copy.
Note: If the document already exists in OneDrive, then the copied document appears in the OneDrive folder with a date and time stamp appended to the filename.
Convert a document
Any user that is assigned to a role with the Convert Documents permission can convert documents to other formats in MyFiles. Users can convert documents to the following formats.
- PDF/A
- DOC, DOCX
- XLS, XLSX
- TIFF
- RTF
- TXT
-
Perform one of the following:
- Right-click anywhere in the document row or click the three dots next to the document you want to convert to a different format, then select Convert Document from the drop-down menu.
- Or, select the check box next to one or multiple documents, then click Convert Document.

- Select the appropriate format in the Convert Document(s) window.
-
Click the down arrow next to the document icon to expand and view document versions and details.

- Click Refresh to update the MyFiles list and complete the conversion. Large documents may require additional time for the conversion.