My Settings
All users have a My Settings menu option, which gives you access to the options available to you, as well as information relating to any services that are assigned to you and the available options for those services.
The following options are available under My Settings:
My Profile
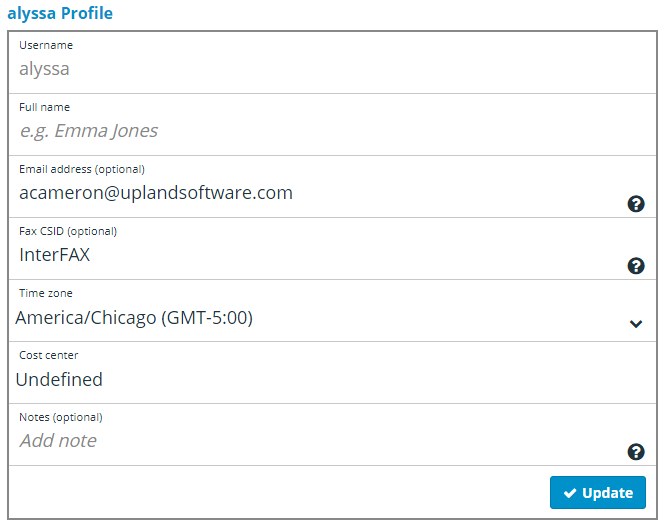
The My Profile page allows you to update your own details, including name, email address for communications, a unique CSID for outgoing faxes and to select your timezone. These are user details and are separate from account level details.
My Services
The My Services page shows the services (send or receive faxes) that are assigned to you. This is also where you will find the fax number associated with your user if you have an inbound InterFAX service.

See Services for more information.
Incoming Options
This menu item will only be available to users with an active inbound faxing service.
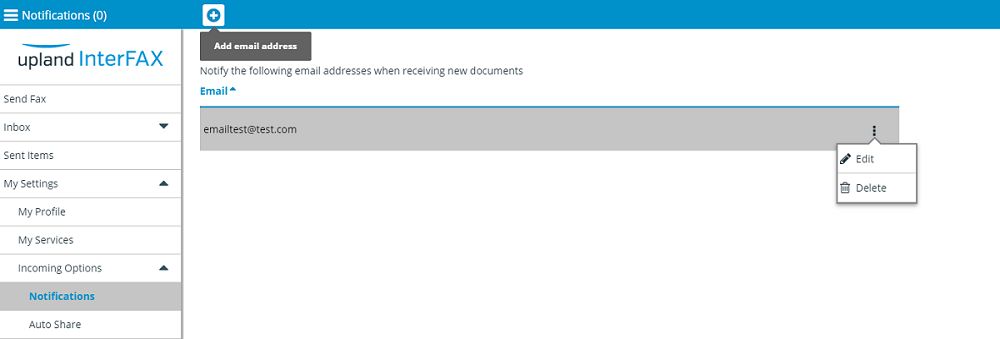
It is possible for you to receive a fax to multiple email addresses simultaneously. Under Notifications, you can add and remove additional email addresses that faxes are sent to.
- Click the Add email address (+) icon.
- In the Add email address window, enter the email address that you want to add.
- Click Add.
-
Once added, email addresses can then be edited or deleted via the menu at the right hand side of the entry in the list.
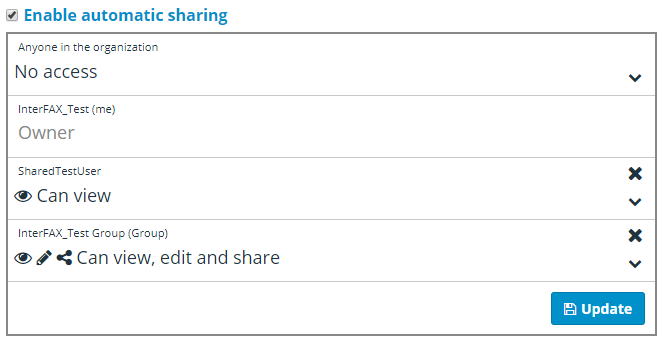
You can use InterFAX’s Auto Sharing feature to automatically share received faxes, with one or more users, or groups of users under an account.
Instead of sharing each fax manually, with auto sharing you can share all of your received faxes in just a few steps.
Individual users may create and change the Auto Sharing settings, which apply only to received faxes (received items of which the user is owner).
Enable auto sharing of received documents
-
Log in to the InterFAX user whose documents you would like to auto share.
Account Managers can log into individual users by navigating to Account Management / Users.
- In the Navigation Menu, click My Settings, then click Incoming Options, and select Auto Share.
-
Select the Enable Automatic Sharing check box.
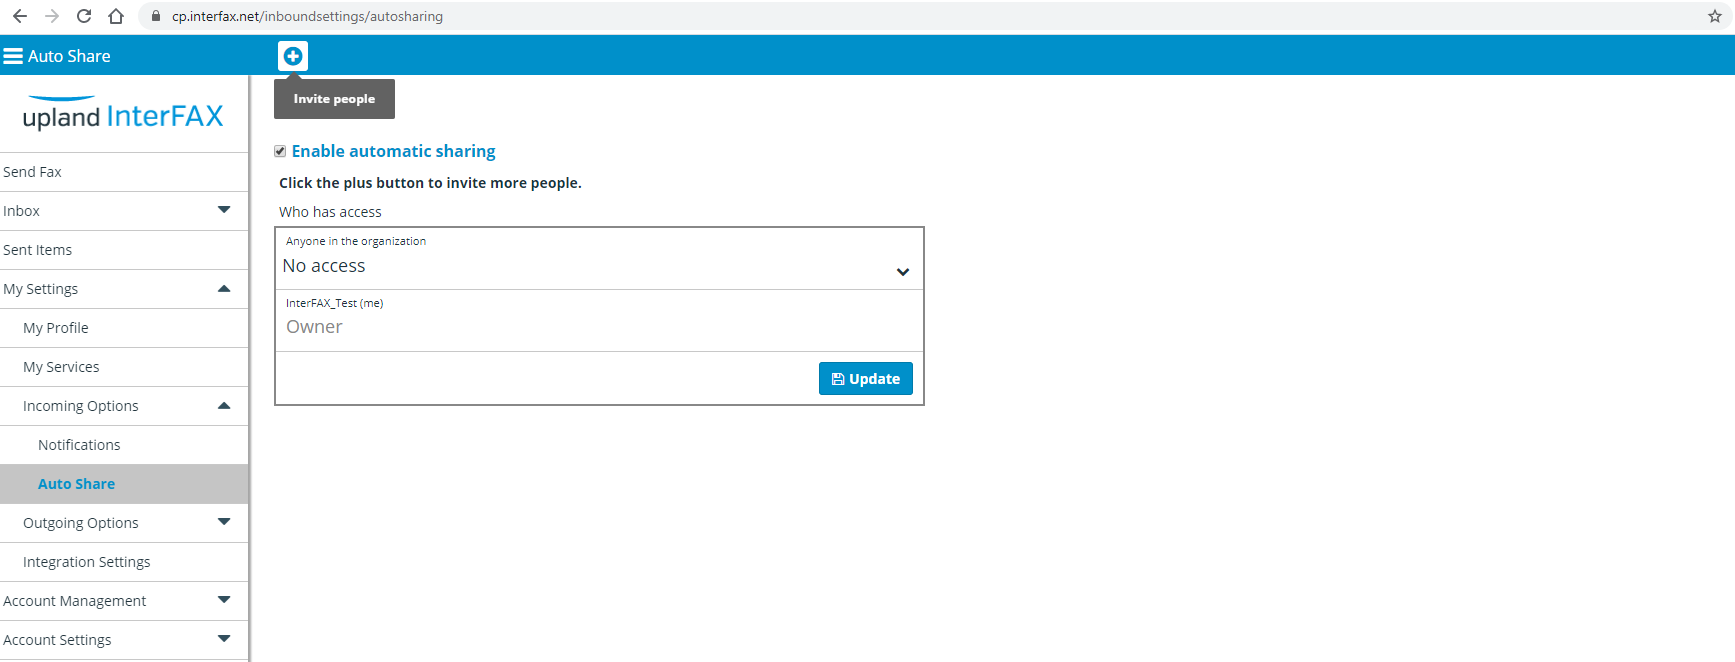
Now that automatic sharing is enabled, you can specify access to received items for all users under the account using the “Anyone in the organization” setting, and add new users or groups of users to auto share documents with.
- Click the Invite people (+) icon.
-
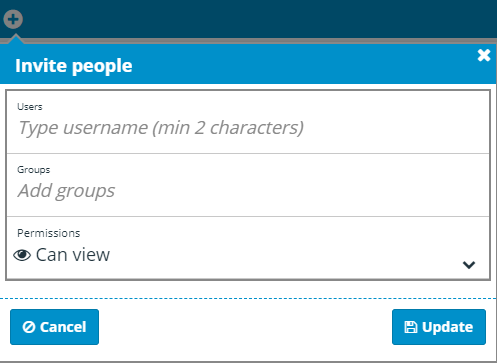
In the Invite people window, specify the user or group you would like to auto share faxes with. Once you start typing, suggested users or groups will be displayed.
-
Assign the desired permission level for the user or group. The following options are available:
-
Can view
-
Can view and edit
-
Can view and share
-
Can view, edit and share
-
- Click Update.
Once added, you will see the new entry in the Auto Sharing list and permissions can be amended by clicking the ‘Down’ arrow on the right hand side of its entry in the list, or deleted by clicking the ‘X’ icon.
Outgoing Options
This menu item will only be available to users with an active outbound faxing service.
Fax Pages settings allow you to define the default page settings for your outgoing faxes. You can define a default header, as well as default page attributes.
Fax header
Any text included under header properties will be included at the top of your outgoing fax pages by default.
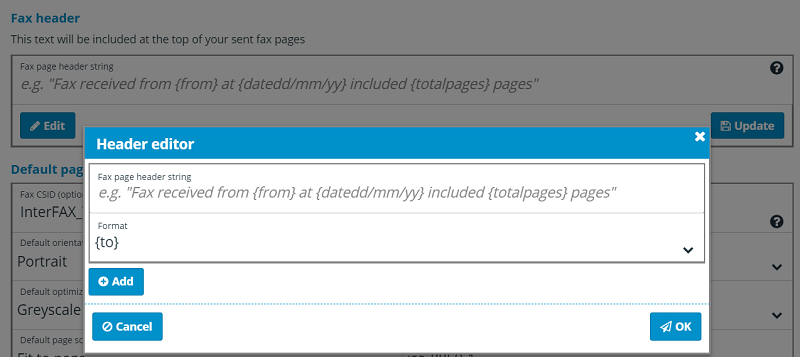
- Select Edit.
-
Enter header text, then click OK.
The header can consist of up to 90 characters of free text in the same language that is displayed in the browser. The following strings may be included:
-
{to}: The fax number the fax is sent to.
-
{from}: The CSID if defined in user settings, otherwise, the display name set in your email client’s ‘From’ definition.
-
{totalpages}: The total number of pages in the fax.
-
{pagenumber}: The specific number of this page.
-
{datedd/mm/yy}: Date format – dd/mm/yy
-
{datedd/mm/yyyy}: Date format – dd/mm/yyyy
-
{datemm/dd/yyyy}: Date format – mm/dd/yyyy
-
{dateyyyy/mm/dd}: Date format – yyyy/mm/dd
-
{datelong}: Long date (for example – October 31st, 2004)
-
{timehhmmss}: Time format – hh:mm:ss
-
{timehhmm}: Time format – hh:mm
-
{timehhmmsstt}: Time format – hh:mm:ss tt
-
Default Page Attributes
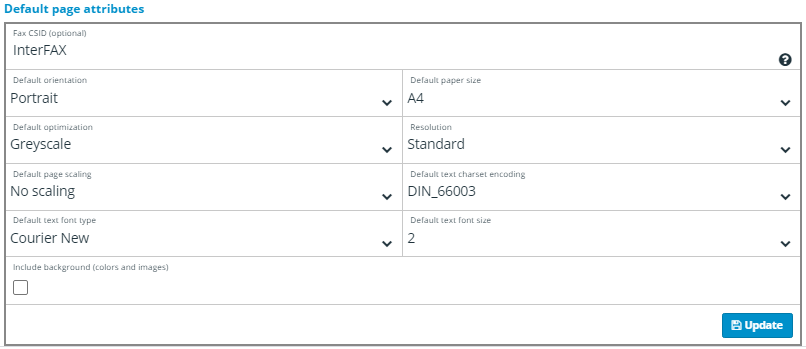
Fax CSID: This is how recipients of a fax identify the sender and a default can be set here.
Default Orientation: Specify Portrait or Landscape as the default orientation for outgoing faxes.
Default Paper Size: Specify A4, B4, Legal or Letter for the paper size for outgoing faxes.
Default optimization: Specify between Greyscale and B&W as default for optimization.
Resolution: Specify between Standard and Fine as the default resolution for outgoing faxes.
Default page scaling: Chose not to scale, or to fit the fax to the page when sending.
Default text charset encoding: Specify the default character set to be used for encoding.
Default text font type: Specify the default font type.
Default text font size: Specify the default font size.
Include background (colors and images): Select this check box to include background colors and images.
Fax Operations settings allow you to define default dialing rules and feedback settings for outgoing faxes Here you will also find a link to the InterFAX security certificate for encrypting emails.
Dialing rules

Default country dialing to: The default country for outgoing faxes. The by chooses the default country of residence based on your account; however, you may select a different default country if needed.
Default area code dialing to: The default area code for outgoing faxes. When a default area code is specified, it is automatically added to the front of fax numbers when a fax is sent. For more information on the correct formatting of fax numbers, see Fax number formats.
Number of attempts to perform: The number of attempts to perform in the case of an unsuccessful attempt during transmission of the fax. You can specify between 1 and 6 attempts.
Time between retries (in minutes): The amount of time, in minutes, to wait to make another attempt to transmit the fax in the case of an unsuccessful prior attempt.
Feedback email

Send feedback email: The conditions under which feedback emails are sent for outgoing fax transmissions. The following options are available:
- Never: No feedback will be sent regarding the status of outgoing fax transmissions.
- On success: Feedback will only be sent for successful fax transmissions, feedback will not be sent for faxes that fail to transmit.
- On failure: Feedback will only be sent for failed fax transmissions, feedback will not be sent for faxes that transmit successfully.
- Always: Feedback will be provided for all fax transmissions, regardless of the status of the transmission.
Feedback format: The format feedback is sent in. You can select between Plain text, HTML – Local language, HTML – English, XML, CSV, NEC Format and HTML – Local language + stamped 1st page.
Default reply email: A default email address for feedback. You will also receive feedback to the email address that sent the fax, as specified in Allowed Emails.
Always use default reply address: Select this check box to only receive feedback to the Default reply email address. When not selected, you will receive feedback to both the sending email address as well as the default.
Attach fax file to feedback: Select this check box to receive the transmitted fax, attached with the feedback message.
Delete image after completion: Select this check box to have fax images and precursor documents permanently removed from our servers after being sent, so that any sensitive data cannot be exposed.
Always include message body: Select this check box to force the inclusion of an email body section of a submitted email, along with the feedback for outgoing faxes.
Encrypting emails to InterFAX

Click the Retrieve certificate link to have the InterFAX security certificate emailed to you via a digitally signed email, enabling users to encrypt emails sent to InterFAX for faxing.
Allowed Emails settings allows you to set sending permissions in order to use InterFAX’s email to fax service, as well as authentication settings.
Integration Settings
Allows developers connecting through their own environments to define additional settings for inbound and outbound faxing.
Integration settings for incoming fax

Web feedback method: Allows you to specify a default notification method for inbound faxes. You can select to never receive notifications, to receive by HTTP Post, or by XML web service.
Delete fax image after retrieval by Web Service: Allows you to have fax images and precursor documents permanently removed from our servers after being retrieved, so that any sensitive data cannot be exposed.
Integration settings for outgoing fax
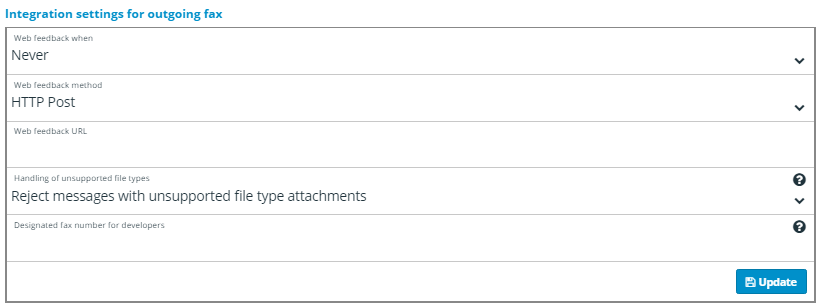
Web feedback when: Allows you to specify the conditions under which feedback is sent via the web service for outgoing fax transmissions, the following options are available:
- Always: Feedback will be provided for all fax transmissions, regardless of the status of the transmission.
- Never: No feedback will be sent regarding the status of outgoing fax transmissions.
- On success: Feedback will only be sent for successful fax transmissions. Feedback will not be sent for faxes that fail to transmit.
- On failure: Feedback will only be sent for failed fax transmissions. Feedback will not be sent for faxes that transmit successfully.
Web feedback method: Allows you to specify what format feedback is sent in. You can select between HTTP Post and XML web service.
Web feedback URL: The URL for the web service feedback to connect to.
Handling of unsupported file types: – Allows you to specify whether or not the InterFAX system should disregard unsupported file type attachments when processing outgoing fax transmissions.
Note: This option affects both web service and email to fax services.
Designated fax number for developers: Developer Accounts are limited to sending faxes to a single fax number. This number should be entered into this section. If you require a fax number for testing purposes and do not have one available, please contact us.