Imposition options
This page appears as part of the Advanced Print Wizard and the Output Creation Preset Wizard.
Imposition refers to the printing of multiple pages on a single sheet. This is also known as N-Up printing.
The options on the Imposition Options page allow for the setting of imposition repetition, order, margins and markings.
As imposition selections are very specific and can be quite confusing, we have provided a handy dynamic diagram that displays a representation of the current imposition selections in real time. Whenever selections are changed, this display changes to reflect the selections made.
You can even select how many pages are to be represented, whilst page numbers appear on the pages in the diagram and change dynamically, like everything else.
It is important to note that if Impositioning is used then the only meta data that will be available to the job thereafter will be the meta data at Job Segment level.
When using Impositioning everything within the Segment is Impositioned, so all meta data below the Job Segment level is lost. If Booklet Binding were selected, some of the imposition settings will be determined by the options made within the Booklet Options Page and those imposition settings will thus be disabled on this page.
Note: During Impositioning, all hyperlinks - both external and internal - are removed from the document (see Hyperlink and mailto link).
The Imposition selections that can be made are as follows:
-
Sample Page group: Use to choose a paper size for the logical page(s) which would be printed upon the actual physical Imposition sheet. This helps in decision making regarding what paper sizes and orientations to use, with the Sample Page shown in blue on the white Imposition Sheet in the output preview (and validation) diagram.
Note: The logical page size can be set independently of any template open in the Designer, allowing for output presets to be created independently from the active template.
If a template is currently loaded in Connect Designer, the size and portrait attribute of the first section of that template are used as defaults for the Sample Page.
As a general rule, it makes little sense to modify the Sample Page size within the Print Wizard (as the template media size will already have been selected), but it does make sense when creating Print Output Presets for other templates.
If no template is loaded or if the template does not have a Print section, then the Sample Page defaults to A4 portrait.-
Size: Use the drop-down to select the media size of the logical template page.
-
Orientation: Select orientation (aspect ratio) of the logical template page (Landscape or Portrait).
-
The Width and Height values are real-only and appear for display and design purposes only.
-
-
Imposition Sheet group: Use to select the physical media size that the logical pages will be printed upon. This appears as the white background in the output preview (and validation) diagram.
-
Size: Use the drop-down to select the size of the physical media the output is to be printed upon.
-
Orientation: Select orientation (aspect ratio) of physical media sheet (Landscape or Portrait).
-
The Width and Height values are real-only and appear for display and design purposes only.
-
-
Output diagram and validation. Use the settings here to control how the output diagram is to look and behave. It contains the following options:
-
Display size entry: Chose between a pre-set viewing percentage, or manually enter whatever percentage you would like, or select Fit Page or Fit Width to have the diagram display the page(s) within the diagram window dimensions.
-
Use the zoom in/out buttons
 /
/  to increase or reduce the viewing percentage by 25% increments.
 -
Sample size entry: Set the sample output size here. The output diagram will change dynamically to reflect the selection made here, if applicable.
The maximum Sample size is 10,000 for booklet imposition and 10,000,000 for standard impositions. -
Output diagram: A real-time display that reflects the selections made in the Imposition Options page. The blue page(s) are the individual logical page(s), upon a white background that represents the physical Imposition Sheet.
If the settings are invalid, the display will appear as red, such as in the following diagram:
In this example the error is that the logical pages are too large to fit upon the Imposition Sheet that has been selected.
-
-
Position group: These settings apply to the positioning of the logical page(s) within the Imposition Sheet.
-
Method selection: Set the position of the logical page(s) upon the Imposition Sheet. The choices are as follows:
-
Center: Have the logical page(s) centered within the Imposition Sheet.
-
Scale to fit: Scales the logical page(s) so that they fit the Imposition Sheet exactly.
-
Offset: Have the logical page(s) offset within the Imposition Sheet. The offset values can be set in the Left and Top entry boxes, which only become available for this positional method.
-
-
Left and Top values: These entry boxes are only enabled and their values applied when the Offset method has been chosen. They are used to set the offset of the logical page(s) upon the Imposition sheet.
-
Rotate selection: Select to rotate the logical page(s) within the Imposition Sheet.
-
-
Layout group: Select how the logical page(s) are to be laid out on the Imposition Sheet.
-
Horizontal selection: Set how many logical pages are to be placed on one horizontal line within the Imposition Sheet.
If the logic page was set to Rotate in the Position selections, then the Horizontal selection might appear as vertical, and the Vertical selection might appear as horizontal, on the real time output diagram.
-
Vertical selection: Set how many logical pages are to be placed on one vertical line within the Imposition Sheet.
-
Horizontal Gap selection: Set the amount of blank space to add between each logical page on this axis.
-
Vertical Gap selection: Set the amount of blank space to add between each logical page on this axis.
-
Note: If the Stack Depth is greater than the number of sheets in the entire job then you will get a single drill sorted block that can be guillotined and stacked to give the complete job in record order.
Stack Depth selection: Stack Depth defines the number of Imposition Sheets that will be printed before drill sorting resets.
Stack Depth works in conjunction with the Horizontal and Vertical page, Gap and Page Order selections in order to determine the printing order. This is best illustrated by way of example.
The following "Cut and stack" example has a job with 100 single page documents and repetition settings of 5 Horizontal and 2 Vertical, plus a Stack Depth of 5.
Each table represents a single Imposition Sheet, and the red line between the tables represents the Stack Depth:
Each set of 5 Imposition Sheets is a discrete drill sorted nUp block that can be guillotined and stacked. The first 5 sheets encompass records 1-50, whilst the next 5 sheets encompass records 51-100.
The following example is the same job but with a Horizontal repetition setting of 6: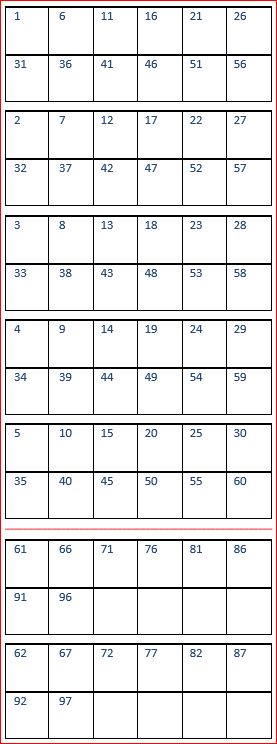
As you can see, the outputs are very different.-
Sides selection: Select how many sides of the Imposition Sheet are to be printed upon. Choice is between Simplex or Duplex.
-
Method selection: In 2018.2 we introduced a new imposition page order for cut & stack impositioning that works with continuous feed devices: Stack by Column. This option is intended for impositions with more than 1 row. It places the next page in the next row of the same column on the current sheet, instead of in the same row and column of the next sheet like the pre-existing Cut and Stack does.
The choices are between:-
Cut and Stack: Any preset created in a version of Connect prior to Connect 2018.2 will default to this Layout Method. It allows total control of subsequent Page Order choices.
-
Stack by Column: For use with continuous feed printers. This selection limits subsequent Page Order choices to column based options only.
-
-
Page Order: Select in which direction to go when adding sections to the output:
-
 Left to right, top to bottom
 -
 Right to left, top to bottom
 -
 Top to bottom, left to right
 -
 Top to bottom, right to left
-
-
Reverse selection: The reverse selections have been extended in Connect 2018.2, with the addition of the Inverse page order option. The options now available are:
-
Off. Output is not reversed.
-
Stack upside down: Essentially turns the stack upside down by reversing the output imposition page sides. The last sheet becomes the first, and in the case of duplex imposition, the back sides become the front sides.
For presets created in a version prior to Connect 2018.2, a "Reverse Pages" selection will apply this Stack upside down setting. -
Inverse page order: This impositions the output in the exact opposite order from what has been selected.
For example, if the selected order was Top to bottom, left to right (down the stack, left to right, top to bottom), then selecting Inverse page order would result in output that was up the stack, right to left, bottom to top.
In the case of duplex impositioning, the front and back sides don't switch.
-
-
-
-
CropMarks group: Select to add Crop Marks to the printed output.
-
Type: Use the drop-down to select whether to add Crop Marks to the page or not, and what type of Crop Marks to use. The Crop Mark types available are Standard or Japanese.
-
Page side: What side(s) of the page to put the Crop Marks. The choices are Front, Back or Both.
-
Width: Select the width of the crop mark lines.
-
Offset: How much separation (if any) to leave between the vertical and horizontal corner markings.
-
Length: Select the Length of the crop mark lines.
-
Advanced Print Wizard and Output Creation Preset Wizard navigation options
-
Preview button (active in Advanced Print Wizard only): Click to launch a Proof Preview window, which displays how the printed output would look based upon the currently chosen selections.
-
Back and Next buttons: Used to navigate back and forth through all the selected options within the Wizard. Up until the Print button is pressed, one can reverse all the way through the wizard to return to the main selection page (the Print options page) and add or remove printing options from the print run.
-
Print button (Advanced Print Wizard only) or Finish button (Output Creation Preset Wizard only):
Click to produce print output/finalize the Preset according to the current settings.
This can be done at any point within the Wizard, whether or not all the options selected in the Print options page have been completed or not. -
Cancel button: Cancels the Print Wizard, without creating any printout.