List Level Welcome Messages
Welcome messages are created by setting up a triggered template, and then tying it to a specific list. A template can be used for multiple lists as well. As you add new users to a list you can choose to send them the associated welcome template automatically. Please review this document and do not hesitate to contact your Account Executive with any questions.
In this topic::
- Creating a Welcome Template
- Adding a Welcome Template to an Existing List
- Using a Welcome Template During Imports
Note: Your account settings determine your level of system access. If several of the options and/ or processes outlined in this document are not available, please contact your site administrator.
Creating a Welcome Template
The first step in setting up list level welcome messages is to create a triggered template. If you are familiar with creating triggered templates, the only change is that you will enable the template to be used for welcome messages by checking the appropriate box on the General tab. The full steps for creating a welcome message template are listed below:
- Once logged in, click on the Send tab.
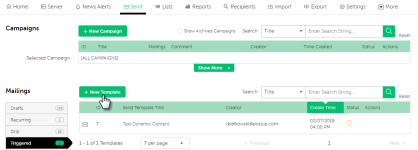
- Click on the Triggered tab.
- To edit an existing triggered template, click on the template title. To create a new template, click the + New Template button.
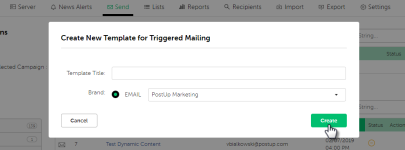
- Enter the Template Title. This is an internal template name, and will not be shared with recipients.
- Select the appropriate Brand for the template. The brand controls the mailing identity for the message. Once you have selected your brand, click Create.
- The mailing edit page will open, starting on the General tab. To use this template for welcome messages, check the Enable for Welcome Messages box at the bottom of the page.
- Click Apply Changes to manually save. PostUp will also save your changes when you click on the Targeting tab.
- On the Targeting tab, use the List Targeting section to determine which list will be used for any recipients who click to unsubscribe from the welcome message. You can also use the Targeting tab to set any suppression criteria. If you do not set a list, recipients who unsubscribe will be globally unsubscribed from all mailings and lists.
- Once you have set a list and any suppression criteria if applicable, click on the Content tab.
- The From, To, and Reply To fields should be entered by default based on your brand. Use the Content tab to add the subject line and HTML or text content for your welcome message. You can preview your content or use the Apply Changes and Send Test Message button at the bottom of the page to send yourself a test email.
- [Optional] Use the Rendering and Seeding tabs to test the format and deliverability of your message.
- Adjust tracking and response options to your desired settings on the Responses & Results tab.
- To enable the welcome message template, go to the Preview & Send tab and hit Save.
Adding a Welcome Template to an Existing List
To use welcome messages with an existing list, you must tie the template to the appropriate list. This is done by updating the list settings. Follow these steps to update the list:
- Click on the Lists tab.
- Find the appropriate list and click the Edit button.
- Scroll about halfway down the page to the Subscriptions section. Here you will find the Welcome Message options. Change the Enable Welcome Message option to yes to allow welcome messages to be used, and then select the appropriate template from the drop down menu.
- Use the Welcome Message Brand dropdown to choose whether to specify a brand for the message, or use the brand tied to the welcome template.
- Scroll to the bottom of the page and click Save to finalize your changes.
Using a Welcome Template During Imports
Once a welcome message is tied to a list, you can easily choose to use it during an import to send to any recipients being added to the list for the first time. The import process will also allow you to tie existing welcome templates to a new list. The steps to use the welcome template during imports are as follows:
- Click on the Import tab.
- Select the Standard import type, then either choose your file or enter data in the text section. Click the Next button.
- Complete the import page as per normal procedure until you reach the Lists section. If you choose to Create New List you can use the Welcome Messages option to enable it for welcome messages and select the appropriate template. If you are adding to an existing list, once you have selected the list(s) you will see any available welcome templates under the Welcome Messages section. Click on the appropriate template to have the message sent to any recipients that are being added to the list for the first time. If you do not select a welcome message, it will not send to new recipients.
- Click on the Next button to start your import.


