Create a Hierarchical Tag
A Hierarchical Tag allows you to set values at different levels. In other words, you can create "parent" and "child" relationships between Tag values.
Example: Imagine a Tag with values that are a mix of managers and employees. A Hierarchical Tag allows the employee values to be organized as "child" values of the managers: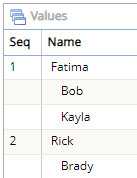
Fatima and Rick are managers ("parent" values) and their employees ("child" values) are indented directly below them. This hierarchical relationship will be displayed when the Tag is attached to entities in PowerSteering: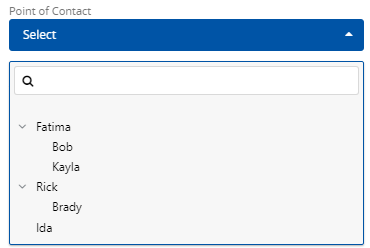
To create a Hierarchical Tag:
Before You Start: Only PowerSteering administrators and users with the "Tag Administration" Context permission can create new Hierarchical Tags.
-
Select Admin → Configuration → Tags from the Navigation Menu:
Click thumbnail to play.
-
Select the Add New Tag button:
-
Edit the information for your new Tag.
Note: See Add a New Tag for information on Tag details.
-
Select the "Hierarchical" checkbox while editing information:

-
Select the Add Tag button:

-
Select Add / Update from the "Values" window:

-
Add the first level of "parent" values for the Tag:
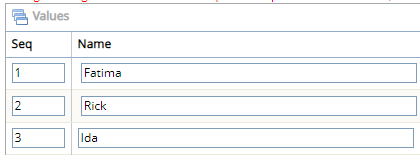
Note: These values will be at the top of the value hierarchy.
-
Select the Update Values button at the top or bottom right-hand corner of the table:

Note: "Child" values can only be added to saved Tag values. Therefore, you will need to save your current values ("parents") and update them again to add "child" values.
-
Select Update from the "Values" window:

-
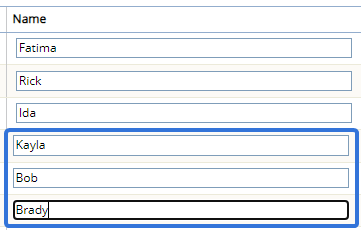
Add any "child" values that will belong to any of the existing "parent" values:
-
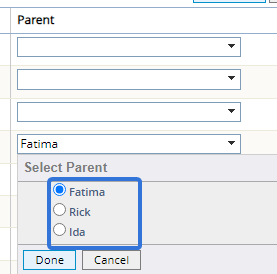
Use the drop-down menus in each "child" value's "Parent" column to determine the value's "parent":
-
Select the Done button after choosing a "parent":

-
Repeat Steps 8-12 to create as many additional levels of "child" values as you like.
Tip: Be careful not to add too many layers of "child" values because they eventually become tedious to delete. While deleting Tag values, only the lowest level of "child" values can be deleted at once; "parent" values cannot be deleted until all of their "children" values have been deleted first (meaning they are no longer "parent" values). This means that in order to delete a "parent" value, users must delete all of the value's "children", save the values, and then update the values again to delete the former "parent".
-
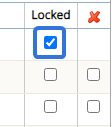
(Optional) Select the checkbox in any value's "Locked" column to lock the value. Locked values cannot be selected on the PowerSteering work types they are attached to:
Note: Locking a "parent" value will not result in automatic locks for its "child" values:
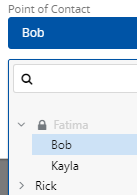
In this example, the "child" values ("Bob" and "Kayla") can still be selected even though the "parent" value ("Fatima") is locked. -
Select the Update Values button at the top or bottom right-hand corner of the table:

After selecting Update Values, the Hierarchical Tag and its values will be saved.
Tip: See Field Management for information on controlling how Tags appear on the work types they are attached to.
