Format a Numeric Metric Import File
Please note an issue occurs intermittently when a Metric Import file with multiple errors is imported into PowerSteering. It occurs when users attempt to navigate pages or expand the results per page while reviewing the errors:
After selecting these buttons, users may receive a "Bad Request" error:
Temporary Workaround: When this issue occurs, users will need to clear their browser cache. Google Chrome users can do this by selecting the Chrome menu (top right-hand corner) → More Tools → Clear browsing data (or by selecting Ctrl+Shift+Del). Microsoft Edge users can do this by selecting the Edge menu (top right-hand corner) → Settings → Privacy, search, and services. Alternatively, users can use their browser's DevTools and clear any cookies with JSESSIONID prefix: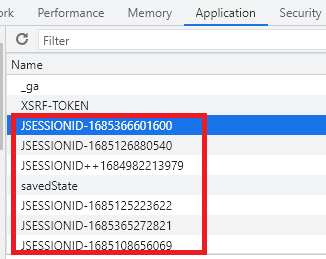
This action will clear the PowerSteering session, so another login will be required.
The file format for a metric upload is very easy to create but very specific in how it must be ordered and displayed. Once created, the headers for your import file can be reused for future imports. The source file for your import generally starts as an Excel spreadsheet which is then saved using the text (tab delimited) (*.txt) file format. See Import Metric Data for more information about the steps for completing the import process.
Note: Download an example metric import file here. Excel files must be saved in text (tab delimited) (*.txt) format before being imported into PowerSteering.
1. Select File Preference
The first row contains the header information; subsequent rows contain the metric data to be imported. The imports do not support special characters. Do not include any special characters, such as tildas, foreign keys, bullets, etc. in import files. There are two options for matching the data in the import file against the PowerSteering database:
Header Option 1: Match on PowerSteering ID or Project Sequence
Header Option 2: Match on Project ID
The header option you select will impact how you format your import file which is discussed in the next steps.
1.1. Header Option 1: Match on PowerSteering ID or Project Sequence

Header Option 1 matches using the PowerSteering ID, which is found in the URL of the web page or the Sequence Number which is found at the top of the Summary page. The import does not use the name of the project or object type to match the data to PowerSteering.
Note: The Sequence Number is a configuration option that must be enabled for viewing by the PowerSteering team.
1.2. Header Option 2: Match on Project ID

Header Option 2 matches using the Project ID which can be found on the Edit Details page.
Note: The Project ID is a configuration option that must be enabled for editing and viewing by the PowerSteering team.
2. Create Header Information

- Open an Excel spreadsheet.
- Enter header information (must use option 1 or option 2 layout).
Header Option 1 Column Names
- Project Name
- Project's PowerSteering ID:
- Project's Sequence
- Metric Template
- View
- Beneficiary
- Item Name
- Date
Header Option 2 Column Names
- Project Name
- Project's ID
- Type Name
- Metric Template
- View
- Beneficiary
- Item Name
- Date
Note: Regardless of which header option you choose, column header information must be entered exactly as shown in the order provided. This includes matching the punctuation, spacing, and lower and / or upper case of the wording shown in these examples and lists.
2.1. Proper Date Format

The column heading for the date information must be formatted in one of the following styles. You can use a dash or slash for each of the date formats shown below:
- Mon-YY (Jan-14)
- Mon-YYYY (Jan-2014)
- MM-YYYY (01-2014)
- YYYY-MM (2014-01)
- YYYY-Mon (2014-Jan)
- DD-MMM-YY (31-Jan-14)
- DD-MMM-YYYY (31-Jan-2014)
- DD-MM-YYYY (31-01-2014)
- YYYY-MM-DD (2014-01-31)
- YYYY-MMM-DD (2014-Jan-31)
Note: The date columns indicate the month and year where the metric data should be imported. For quarterly metrics you will enter the date that represents the first month / year of the quarter. For example if your fiscal year starts in April, and you wanted to enter a date to represent the first quarter of that fiscal year, you would use Apr-14 to represent the month and year of FYQ1. For yearly metrics you can use the calendar's first month.
For alternate calendars (such as using Periods rather than Months), you will need to equate the beginning of the periods with an actual month rather than a timeframe. For example, use January for first timeframe and so on. PowerSteering will only allow up to 12 timeframes.
3. Create Import Information
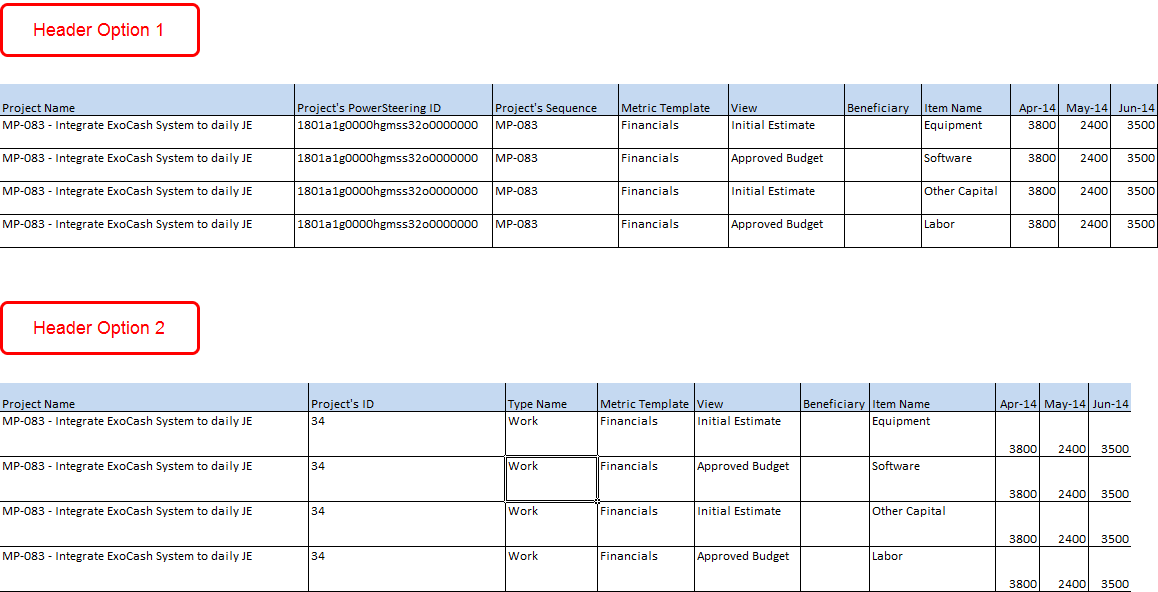
- Enter import information as needed into Excel spreadsheet. A description of each type of data entry is provided in the following steps.
3.1. Project Name
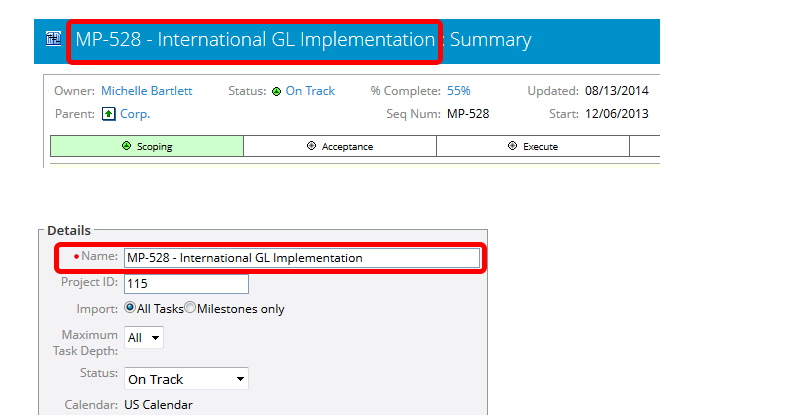
Although the project name is not used to match the PowerSteering database, it is recommended that you include this information as future reference in your import file. The project name can be found at the top of the Summary page or on the Edit Details page.
3.2. Project's PowerSteering ID

This information can be found in the URL from the Summary page. The PowerSteering ID is the entire string of numbers and letters that starts AFTER the equals sign and upper case letter U. This is used to match data if you are using Header Option 1. This information can also be obtained using a Report Wizard report by selecting the PowerSteering ID.
3.3. Sequence Number

This information can be found at the top of the Summary page. The Sequence Number is a configuration option that must be enabled for viewing by the PowerSteering team. This is used to match data if you are using Header Option 1. This information can also be obtained using a Report Wizard report.
3.4. Project ID
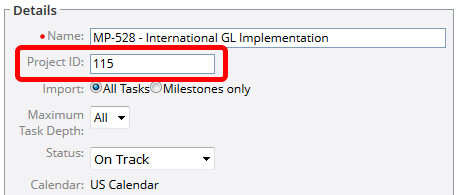
The project ID can be found on the Edit Details page. The Project ID is a configuration option that must be enabled for editing and viewing by the PowerSteering team. This is used to match data if you are using Header Option 2. This information can also be obtained using a Report Wizard report.
3.5. Type Name
The import process will take the following values for the Type Name column - Work, Tollgate, Organization and / or Deliverable. The selection of the type name does not seem to impact the import, but it must be one of the four values and be capitalized.
3.6. Metric Template

The name of the metric template appears in the Header of the Metric page and next to the word "Metric:" on the Metric page. You must match the name of the metric template exactly including case and spacing. This is used to match data if you are using Header Option 2.
3.7. View

The View is represented by the tabs at the top of your metric. You can only load one view per line of your spreadsheet and you must match the name of the view exactly including case and spacing. If your metric template does not contain any views, you can leave this field blank, but you must include the column with the header.
3.8. Beneficiary
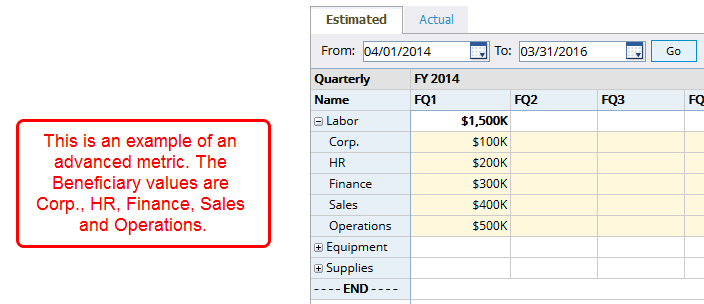
If you are using an advanced metric that has used a tag to further define metrics, you will need to enter the tag values identified as the beneficiaries. You must match the name of the tag value exactly including case and spacing.
Note: When importing to metrics with line items using the Percent Allocations by Beneficiary option, no beneficiary has to be defined in the import file. As long as the line item's percent allocations have been configured, the imported values should be automatically distributed among the defined tags, equal to the percentage that has been set.
3.9. Item Name
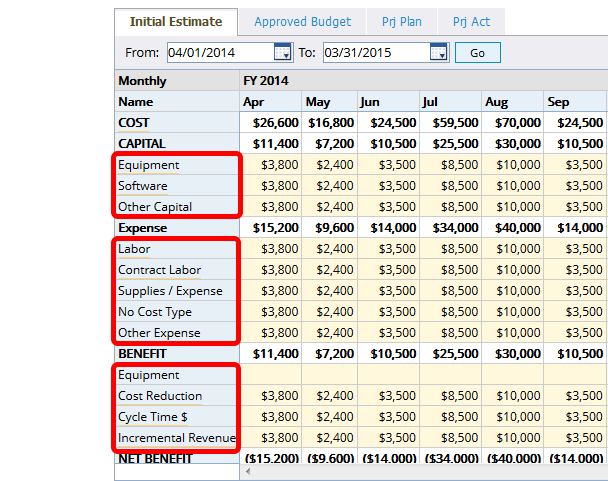
The Item Name represents the line item against which you are importing metric data. If there are line items that share the same name, you will need to further define the line item by providing an additional identifier for the data.
3.10. Item Name (Importing Duplicates)
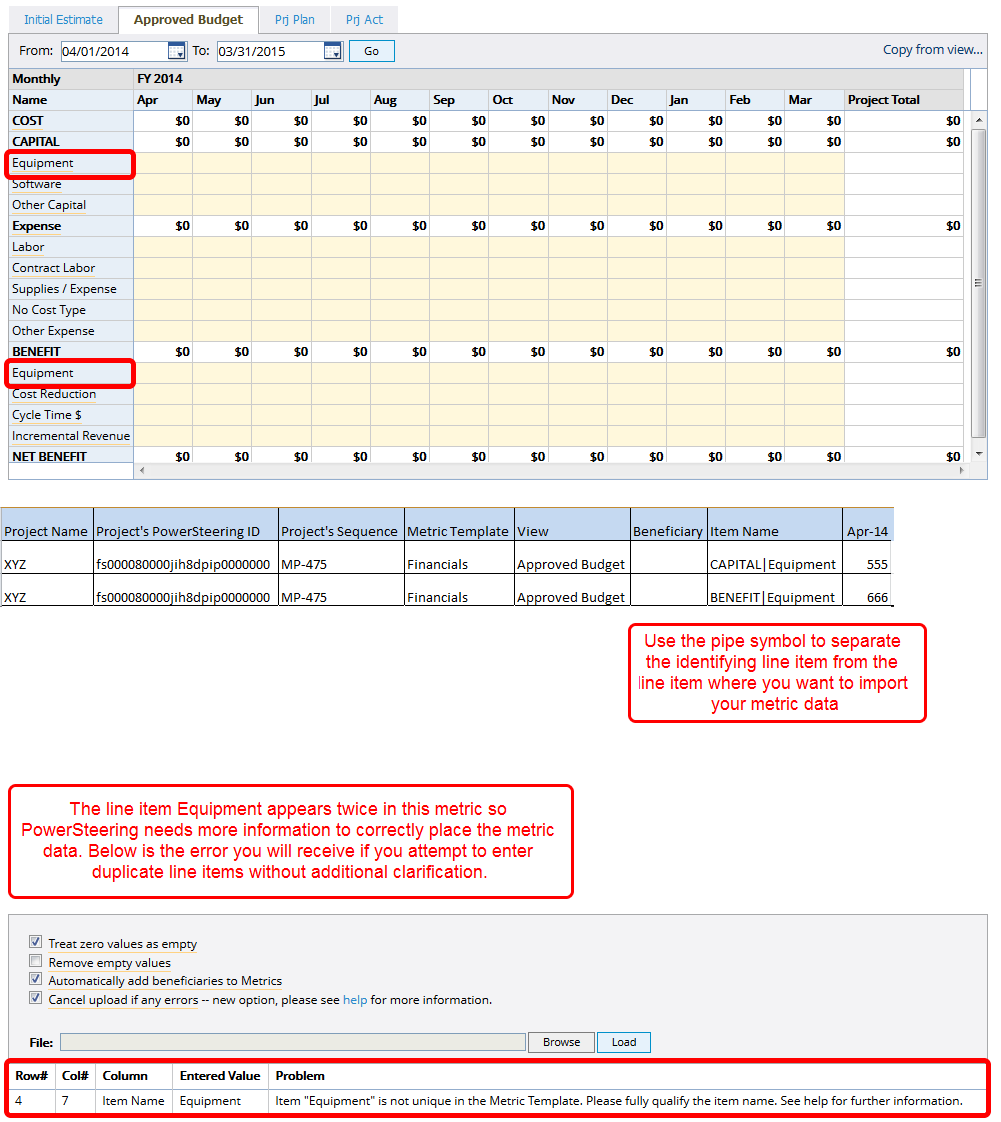
If a metric template has more than one item with the same name, the names of those items must be fully qualified using additional line items for description separated by the pipe symbol. Using the screen capture above as an example you can differentiate the two line items named Equipment by entering them as follows:
- CAPITAL | Equipment
- BENEFIT | Equipment
The pipe symbol can be padded with any number of spaces or none.
Note: Any item that appears above the line item can be used as its descriptor. In the above example, you could also use COST | Equipment to populate the first line item and Other Expense | Equipment to populate the second line item.
3.11. Item Sequence Number
The optional Item Sequence Number column allows the import of multiple line items with the same name. Without the Item Sequence Number, PowerSteering will not allow the same Item Name.
3.12 Date / Number
The numeric data you enter will populate the period that corresponds to its column heading. Numbers should be entered without commas, currency symbols, and/or monetary symbols such as K or M. A period is acceptable as a decimal point. If your metric is utilizing a monetary symbol such as K or M, enter data as its full value such as 30000 to represent $30k or 1000000 to represent $1M. If you wish to load data for a metric that has no frequency or date/time relevance (for example: a Scorecard Metric), you can use the column header Amount in place of the month/year.
Note: The date columns indicate the month and year where the metric data should be imported. For quarterly metrics, you will enter the date that represents the first month/year of the quarter. For example ,if your fiscal year starts in April, and you wanted to enter a date to represent the first quarter of that fiscal year, you would use Apr-14 to represent the month and year of FYQ1. For yearly metrics, you can use the calendar's first month.
3.12. Custom Field or Tag

Custom fields and/or tags can be entered on the import file. Create column headers that correspond to the exact custom field/tag name.
- To add a custom field column to the import file, use the following format: CustomField:<thefieldname>
- To add a tag to the import file, use the following format: Tag:<thetagname>
Note: Be sure that the entire Custom Field or Tag name is included after the colon and there is no space between the colon and the start of the custom field/tag name. You do not need to use the chevrons unless they are part of the name.
Caution: Be aware that any Custom Field or Tag columns that have values in the Metric will be erased if they are not included in the import file.
For example, imagine you are trying to add a value to only one Custom Field in your Metric:
If you do not include the other Custom Field or Tag columns in your import file, they will be cleared and your data will be lost:

To avoid this, ensure that your import file has columns for all of the Custom Fields and Tags of the Metric.
4. Save File
- Save your Excel file using the text (tab delimited) (*.txt) file format. .xlsx and .csv file formats are not supported.
Note: See Import Metric Data to learn how to upload your newly saved file into PowerSteering.