Timesheet Template Edit page - Setup tab (Legacy Timesheet)
This article details the timesheet options through the Setup tab of the Timesheet Template Edit page where you can define the following for the selected timesheet template view:
Show Notes:
Select Show Notes to display the Notes section and the corresponding Time Entry notes listed within User Timesheets.
Note: This option is selected by default.
Show Timesheet History:
Select Show Timesheet History to display the Timesheet History section with the state changes made within User Timesheets.
Note: This option is selected by default.
Show Non-working Time section:
- Select Show Non-working Time to display the Non-Working Time section and to allow the selection of leave time options (non-project related) to enter time against within User Timesheets.
Note: This option is selected by default.
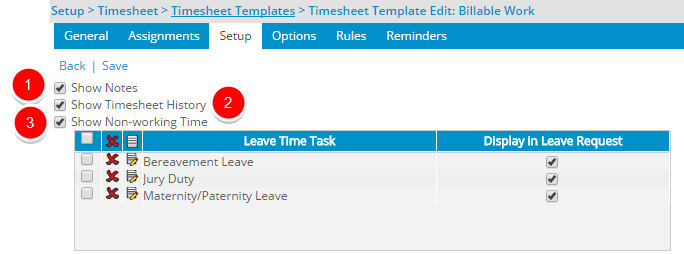
Note: When the option Show Non-working Time is selected, you can then define which Non-working Time are to be shown within the User Timesheets. From the table you can add, delete, and edit them. For Further details refer to Configuring the Timesheet Template so users can see the Non-working Time in their Timesheet page.
Note: When editing or saving a Timesheet Template, the system verifies that all selected leave times exist in the database. If a selected leave time is deleted from the database, it is removed from the Non-working Time table.
Show Leave Time Summary section:
Select the Show Leave Time Summary to display the Timesheet History section with the state changes made within User Timesheets.
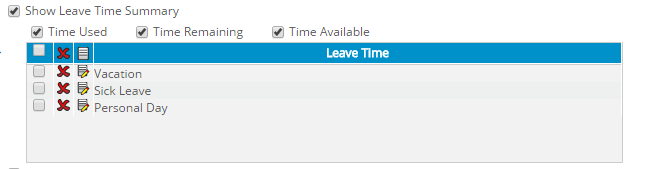
Note: This option is selected by default.
Upon selecting Show Leave Time Summary, you can then choose:
- Time Used to display the number of hours used for the leave time.
- Time Remaining to displays the number of unused hours remaining for the leave time.
- Time Available to display the number of hours that can be borrowed for the leave time; when these hours are used and deducted from Time Available, the Time Remaining goes into a negative.
Note: The above mentioned options are selected by default.
You can then define which Leave Time are to be shown within the User Timesheets. By default the Vacation,Sick Leave and Personal Day options are set. For further details refer to Showing the Leave Time Summary Section on User Timesheets.
Note: When editing or saving a template, the system verifies that all selected leave times still exist in the database. If a selected leave time is deleted from the database, it is removed from the Leave Time table.
Show In/Out Timesheet section:
Select the Show In/Out Timesheet option to display the In/Out Times section within the User Timesheets.

Upon choosing the Show In/Out Timesheet option, the following selection boxes are then available to you:
- Select Track In/out Time through Punch to allow the entry of In/Out time in the timesheet using the Punch In/Out functionality.
- From the Show <x> In/Out rows list, select the number of rows to display in the In/Out Times section of the timesheet.
Note: The Enforce Start and End Time and the Show In/Out Timesheet (Options tab) are mutually exclusive.
Show Project Time section
- Select Show Project Time to display the selected project time fields in the Assignments section within the User Timesheets.
- Select Show Adjustments option to display the adjustments created against project and leave time in the Adjustments section within the User Timesheet.
- The Default new Assignment and Show <x> Assignments options apply to both the Show Project Time and Show Adjustments sections of the timesheet is enabled when either the Show Project Time or the Show Adjustments option(s) are selected.
- Choose one of the available options for the Default new Assignment selection box:
- Choose Display as the last row to display the default assignment as the last row within the User Timesheets (default selection).
- Choose Display as the first row to display the default assignment as the first row within the User Timesheets.
- Choosing Do not display will result in the default assignment row to be hidden within the User Timesheets.

- Choose the number of rows of Assignments to display in the timesheet, with the options as follows:
- Select All to display all assignments in the timesheet (default selection).
- Select <1-20> to display the chosen number of assignments within the Assignments section of the timesheet.Depending on the number selected, that many rows are displayed in the timesheet, and the user has to scroll to see their remaining assignments, or the default assignment row if required.
- You can then define which fields are to be shown within the User Timesheets. For further details refer to Adding/Editing/Removing Project Time Fields from a Timesheet Template.
- Choose one of the available options for the Default new Assignment selection box:
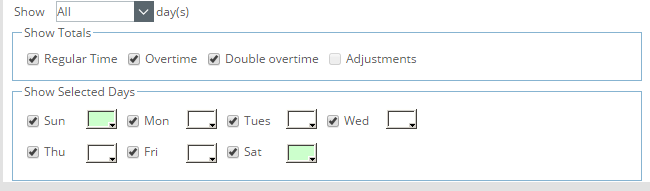
Show Selected Days section:
- From the available options for Show <x> day(s), select the number of days to display in the timesheet, with the options as follows:
- All: Displays all days within the period (default selection).
- <1-7>: Displays this number of days specified in the timesheet
Note:
- The Show <x> day(s) option applies to both the Show Non-working Time and Show Project Time options.
- When editing or saving a template, the system verifies that the Show Project Time option is selected and at least one project time field is added. If no project time field is added for display when the Show Project Time option is selected, then the timesheet template cannot be saved
- Select the following options that are within the Show Totals section, to display the totals for each in the timesheet:
Note: By default, all options are selected.
- Select Regular Time: to display the total regular time.
Note: The Regular Time check box is cleared and disabled if the Show Assignments and Show Non-working Time options are not selected.
- Select Overtime to display the total overtime.
- Select Double Overtime to display the total double overtime.
- Select Adjustments to display the total time adjustments.
- Select Regular Time: to display the total regular time.
- Select from the color chart to designate a color for each day of the week. The chosen color will be set as the background color for the day column on the Timesheet. For more information click here.