You can manage User-Defined Field (UDF) associations from a central location using the Associate User Defined Fields page, available under the User Defined Fields option in the Setup menu. This article explains how to
Example: Todd, the PSA Administrator, has been tasked with adding several User Defined Fields to several modules. He can accomplish this task more efficiently through the Associate User Defined Fields page, which is accessible directly from under Setup.
Associate User Defined Fields
- From the Icon Bar click Setup
 .
. - From the Navigation Menu select User Defined Fields to access the Associate User Defined Fields page.
Tip: The Menu will automatically hide (collapse or minimize), allowing for more space on the Associate User Defined Fields page. While the menu is minimized, click the blue Collapse/Expand arrow to turn it back on.
- Select an Object (module) from the list of available Associate to options such as: Business Units, Charges, Client Contacts, Client POs, Clients, Groups, Leave Requests, Milestones, Portfolios, Products, Programs, Projects, Roles, Tasks, Users, and Work Types.
Note: You must have access rights to at least one of the modules, listed here, to have access to the Associate User Defined Fields page, otherwise the User Defined Fields menu option will not display.
- Select an Tab where you would like to add the UDF.
Note: When you add UDFs to the General tab, the fields appear at the bottom of the General tab on the corresponding Edit page.
- Click the Edit button next to the tab name.
- Enter a new name for the tab.
- Click Save to apply the changes, or Cancel to discard them.
- Search for Available Fields (optional)
- Enter your search criteria keywords in the Search field.
- The Available Fields list will be refreshed with a list of all available Fields containing the text you searched for.
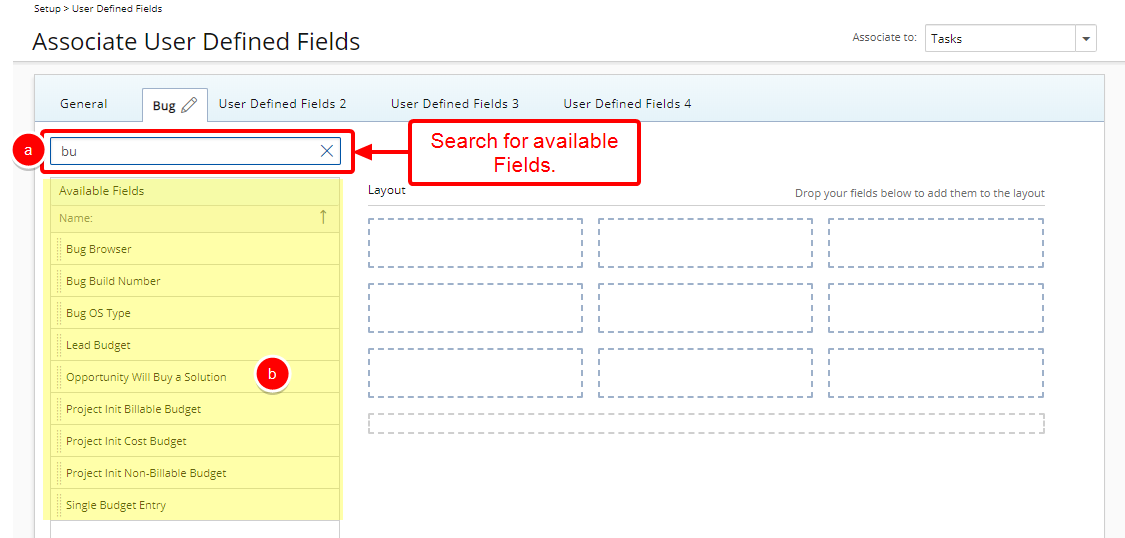
Example: Having entered the search value of "bu", PSA will look for available UDFs containing the text "bu".
- From the Available Fields section select the desired field.
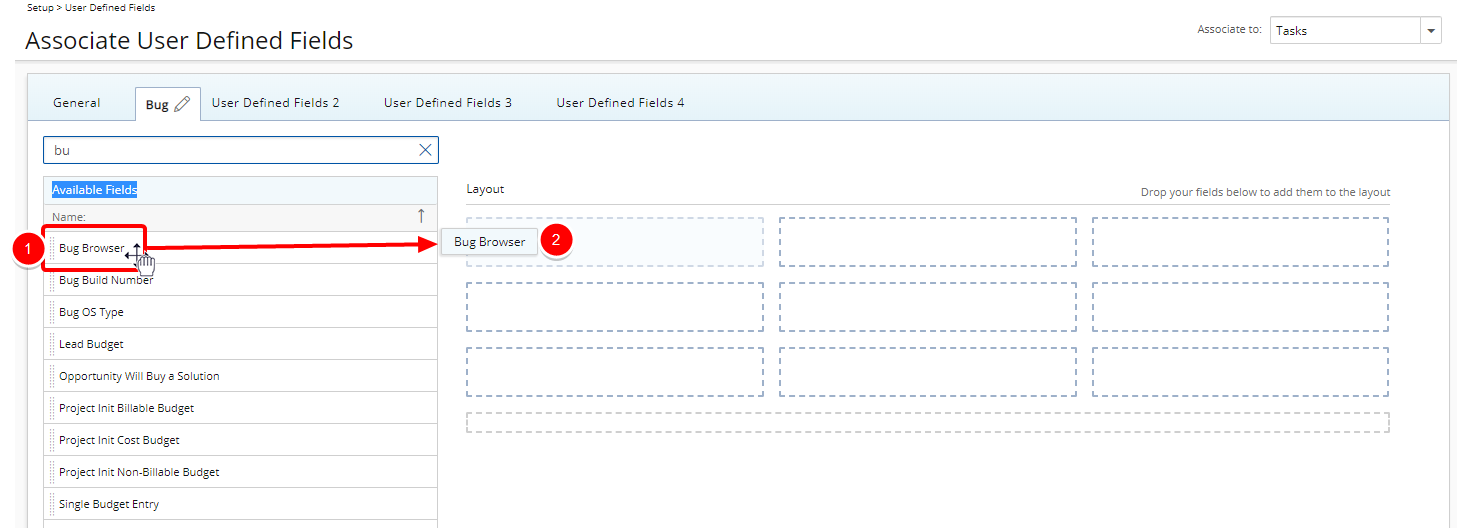
- Drop the selected Field in the Layout section.
Note: Repeat Steps 7-8 above to add as many UDFs as necessary.
Tips:
- You can simply double-click an available Field to add it to the Layout. The Layout will adjust automatically and your selected Field will be placed in the next available rectangle.
- To add more UDF layout areas, simply drag a Field into the gray doted rectangle. You will notice a new line with dotted rectangles will appear above the gray dotted rectangle. You can add more UDFs in the available slots.
-
When associating a User Defined Field for the first time to an item, the User Defined Field properties dialog box displays automatically allowing you to configure the UDF:
- Display Name: Allows defining a display name for the field in the selected language. By default, the Field Name will be used and system terminology will be applied
- Language: Allows selecting the language for which the display name will be set.
- Select the User Defined Field Type:
- Standard
- Calculated: Edit Field User Defined Fields of Type Integer, Number, Timespan, Currency and Percentage support calculations. For further details refer to Calculated User Defined Fields.
Note: Calculated User Defined Fields can be associated to: Charges, Client Contacts, Groups, Leave Request, Milestones, Roles, Portfolios, Products, Programs, Projects, Tasks, Work Types and Work Item Workflows
- Advanced: Allows you to define a calculation schedule, choose to manually recalculate the Field instantly, keep the historical values for reference and choose to associate it to only selected Projects based on a set filter criteria
Note:
- Advanced User Defined Fields can only be associated to Projects and Project Status Templates
- This Type of User Defined Field relies on database stored procedures to perform complex calculations on any category of record in PSA. To create the formula in an Advanced User Defined Field, contact your PSA Project Manager or Customer Success Manager to discuss your needs further.
Caution: The Type of a saved User Defined Field cannot be modified.
- Select whether the Field is:
- Required
- Unique
- Select if the UDF is Inherited or not.
Note: The Inherit From option is only available for UDFs of Type Selection. Project objects can inherit from Client UDFs and Task objects can inherit from Work type UDFs.
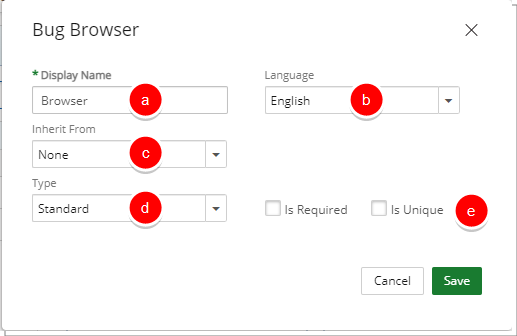
- Click Save to apply your changes or Cancel to return to Associate User Defined Fields page.
Caution: Once saved, the Type of the User Defined Field cannot be modified.
To Remove a User Defined Field Association
-
Click the Delete
 button to remove a UDF association.
 Note: Removing a UDF association will delete all related data. The deleted data is not recoverable.
- Click Yes to confirm deletion or No to cancel.
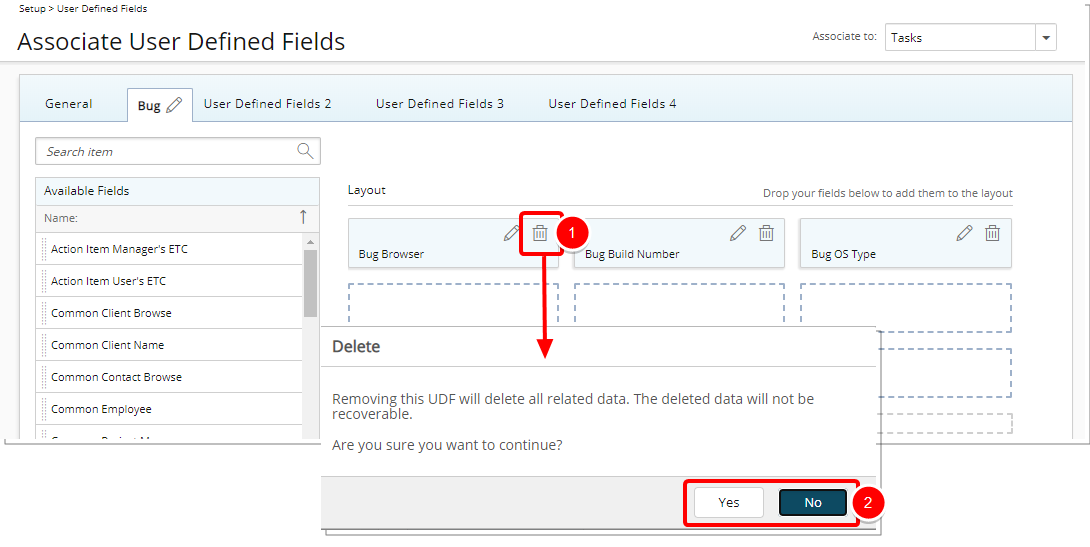
Note: Changes are saved automatically.
View Your Changes
- Create a new object to view your changes
- Alternately open an existing object to edit/view your changes.
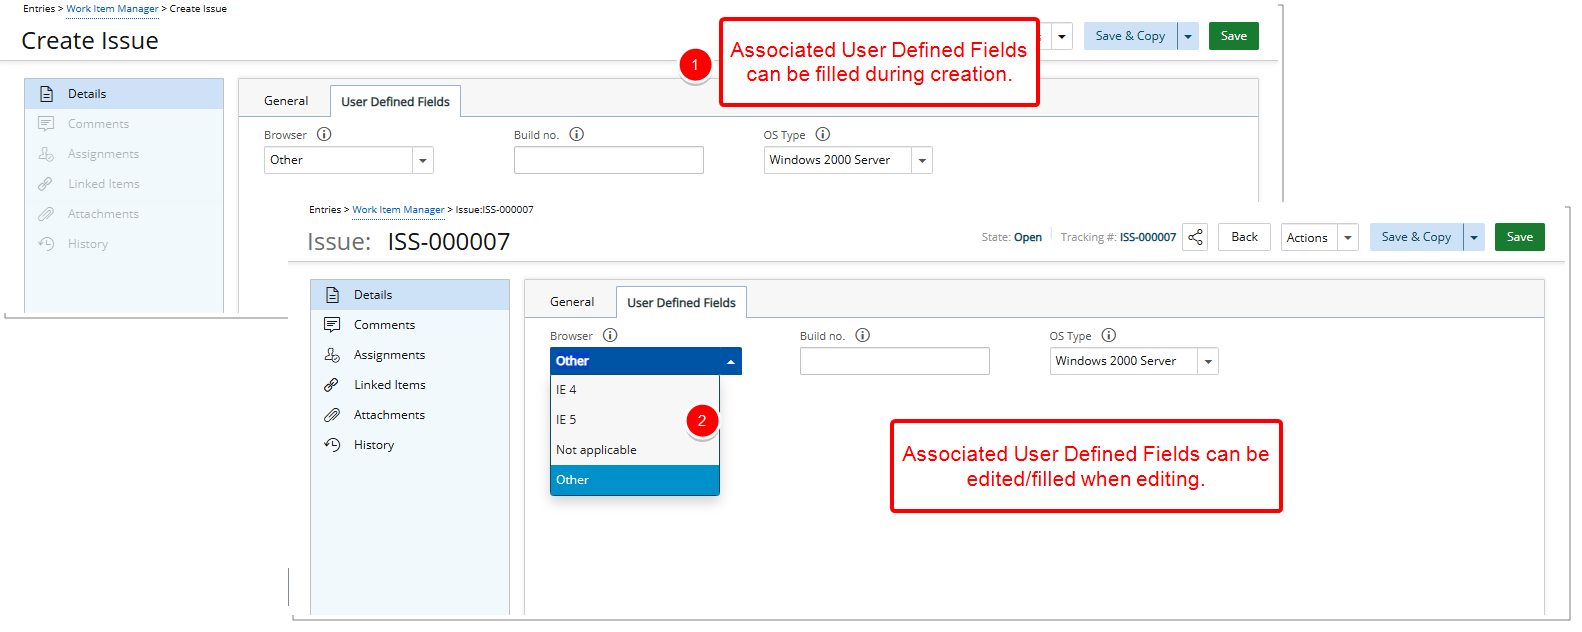
Note: Hover over the info icon ![]() next to a UDF field name to view additional details or guidance provided by your organization. This tool-tip is shown only if a description was added when the UDF was set up. If no tool-tip appears, it means no description is available for that field.
next to a UDF field name to view additional details or guidance provided by your organization. This tool-tip is shown only if a description was added when the UDF was set up. If no tool-tip appears, it means no description is available for that field.
For further details refer to: