You can pick your assignments by clicking the [+ ASSIGNMENT] button.
Depending on your Timesheet Display Settings you will either have:
- The Inline Assignment Mode: When Inline is chosen, upon clicking the +Assignment button you can pick your assignment directly from your Timesheet. Clicking Save
 will add the assignment to your Timesheet.
Or - Modal Window: When Modal Window is chosen, upon clicking the +Assignment button, a modal window will be displayed allowing you to pick your Assignment.
When using the Inline Assignment Mode, the Add Assignment drawer remains open when moving between open Timesheet periods. Additionally any selections made for Assignments and Adjustments are kept. However, the previously chosen Reason for Non-Working Time resets to the default value.
Note: The Add Assignment drawer is closed automatically when:
- Navigating to a read-only Period
- Navigating to a period having a different Timesheet Template
Furthermore, regardless of the chosen Assignment Mode, when an option is picked and there is dependency with another item, all higher level options are auto-selected and the next lower level selection box is filtered.
Note: To allow Users access to the new and improved My Timesheet in your Sandbox/Implementation/production environments, you must add them to the New Timesheet list. For further details refer to Adding users to the New Timesheet list. If you prefer, you can choose to enforce the use of New Timesheet for all Users at the global level.
Dependency exists between:
- Client -> Project -> Task
- Client -> Project -> Portfolio
- Client -> Project -> Project Work Type
All selection boxes are enabled by default and a lower level item (e.g. Task) can be picked without first selecting a higher level item (e.g. Project). On selection of an item, the remaining selection boxes are either filtered or auto-selected accordingly. See examples and scenarios listed below).
When picking an Assignment, the list of available Clients, Projects, or Tasks (as an example) displays the first 100 available options in alphabetical order. You can use the selection boxes’ scroll bar to load more options.
Example:
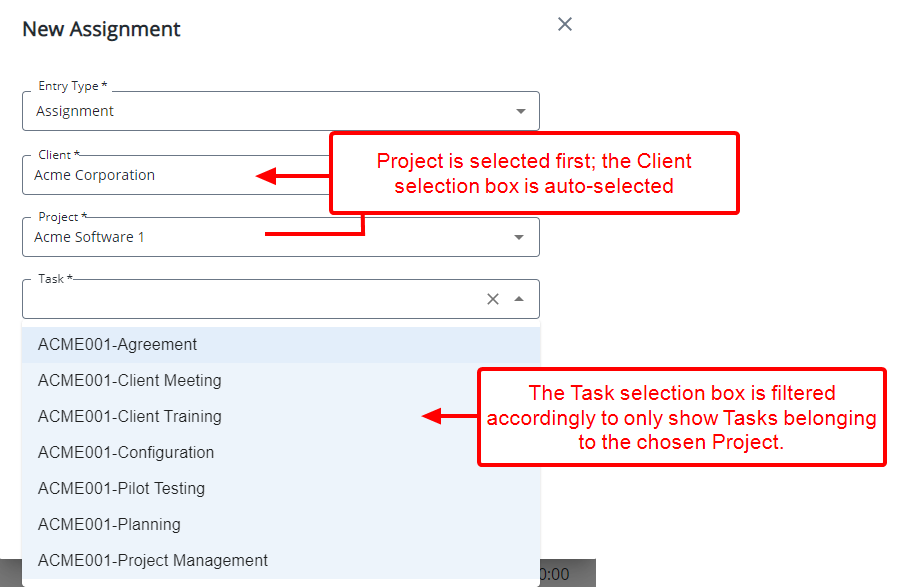
let's assume a Timesheet where you can pick Assignments based on Client, Project and Task.
If a Project is selected first; the Client selection box is auto-selected and the Task selection box is filtered accordingly to only show Tasks belonging to the chosen Project.
Tip: You can use the keyboard Tab key to move between selection boxes and then use your keyboard Up and Down arrows to select from the available options.
Scenarios:
Selection of lower level option
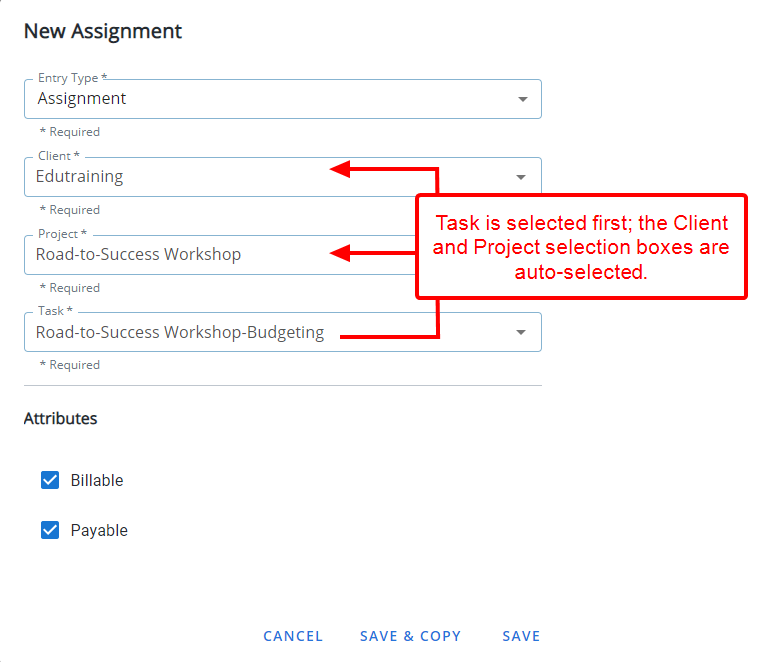
- Timesheet Template has Client | Project | Task
- Upon picking a Task
- Client and Project are auto-selected
Timesheet Template has Client | Project | Task
- Upon picking a Project
- Client is auto-selected
- Task list is filtered accordingly
Clearing of higher level selection
Timesheet Template has Client | Project | Task
- Upon picking a Task.
- Client and Project are auto-selected.
- Before entering time, User modifies the Assignment and clears the Project selection to choose a new one.
- As the previously selected Client is unchanged, the Project list is filtered to show only Projects belonging to the selected Client and the Task selection box is cleared.
- Upon choosing a different Project, the Task list is filtered to show only Tasks belonging to the selected Project.
Timesheet Template has Client | Project | Task
- Upon picking a Project
- Client is auto-selected
- Task list is filtered
- Before entering time, User modifies the Assignment and clears the Client selection box to choose a new one.
- Upon picking the Client, the Project list is filtered to show only Projects belonging to the selected Client and the Task selection box is cleared.
- Upon picking a Project, the Task list is filtered.
Auto-selection of higher level selection box
Auto-selection can happen if:
- Only one value is returned for the higher level option
AND - Filtering for the combination is available for the lower level selection box
Timesheet Template has Project | Project Work Type
There are 3 Projects with 3 Tasks
Each Task is to a different Work Type
- When the Project Work Type is picked first – there are 3 possible values for Project
- The Project is not auto-selected as any of the 3 Projects can be a possible value.
Timesheet Template has Project | Work Type
There are 3 Projects with 3 Tasks each
Each Task is to a different Work Type
- When the Work Type is picked first – there are 3 possible values for Project
- The Project is not auto-selected as auto-filtering doesn't exist for Project and Work Type condition