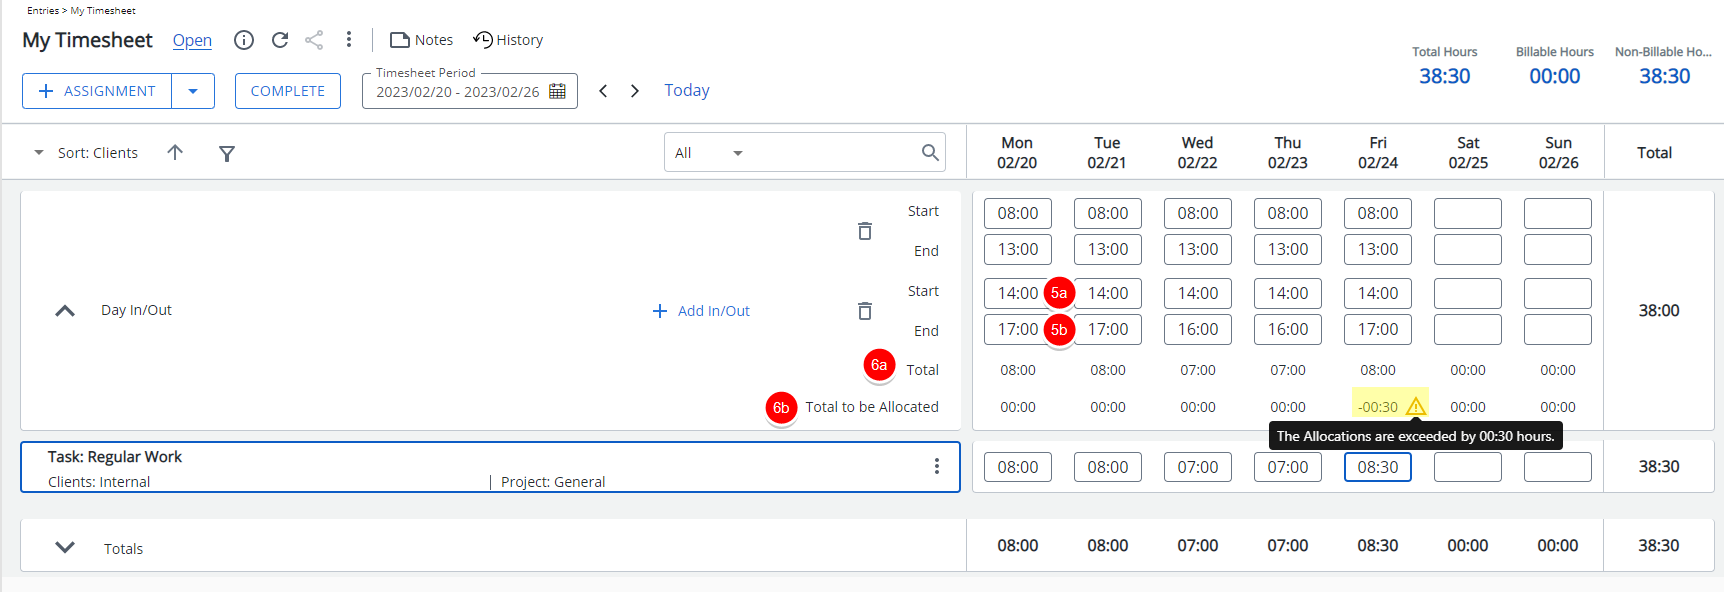
When the Show In/Out Timesheet option is selected within a Timesheet Template, user(s) assigned to it will have a new collapsible Day In/Out section available to them when accessing new My Timesheet.
Time can be entered against the Start and End boxes for each day. New In/Out Time rows can be added by clicking the + Add In/Out link.
This article details how to enter In/Out time entries.
Note: The Enforce Start and End Time setting is mutually exclusive with the In/Out Timesheet capability.
Caution: To allow Users access to the new and improved My Timesheet in your Sandbox/Implementation/production environments, you must add them to the New Timesheet list. For further details refer to Adding users to the New Timesheet list. If you prefer, you can choose to enforce the use of New Timesheet for all Users at the global level.
-
Access My Timesheet by doing either a or b:
- Click the Enter time link from the Home page.
- From the Icon Bar click Entries
 .
.
From the Navigation Menu click My Timesheet.
- Navigate to the Period you wish to enter Time for by following one of these steps:
- Click the Calendar button and select the appropriate period.
- Click the Next/Previous buttons to navigate to next/previous Period.
- Click Today to navigate to current Period.

- From the Day In/Out section
- Click the corresponding Start box against the weekday and enter the start time.
- Click the corresponding End box against the weekday and enter the end time.
- If the Automatically allocate default In/Out hours to User's default Task is turned on for your Timesheet Template; your entered time will be calculated and displayed against My Tasks: Default or Tasks: Default Assignment row.

Note: At the database level, Time Entries entered as 12:00 are automatically converted to 12:00 PM (noon) likewise Time Entries entered as 00.00 are automatically converted to 12:00 AM.
- Click the + Add In/Out link to add a new row. To delete a row click the Delete
 button.
- Click the corresponding Start box against the weekday and enter the start time.
- Click the corresponding End box against the weekday and enter the end time.

Note: The In/Out Timesheet only supports the 24-hour time format.
- Within the In/Out section:
- The sum of the In/Out Time Entries is displayed against the Total row
- The (sum of the In/Out Time Entries) – (total for the assignments of the day) is displayed against the Total to be Allocated row.
Note: If the Total to be Allocated is negative, a warning icon
 is displayed. Hovering over it, will trigger a tooltip where you can view more information.