Creating an Expense Report
Before any Expense Entries can be added, an Expense Report must first be created to contain the specific entries. The expense items can be associated to a client, project, and task in a user’s Expense Report. An organization also has specific approval processes in place to approve and reject the submitted expense reports. Depending on the type of expense, there may be several reviewers involved in the approval process.
A user enters the appropriate Expense Entries for the Expense Report and after submission, the report is then automatically removed from the user’s Expense Report List and assigned to the reviewer responsible for approving the report. This process is completely dependent on the Expense Workflow set up by the administrator.
This article details how to create a new Expense Report.
- From the Icon Bar click Entries
 .
. - From the Navigation Menu click Expense Manager.
- Click the Create Expense Report button, found at the top, far right of the Expense Manager page.
- Modify the Expense Report properties as required:
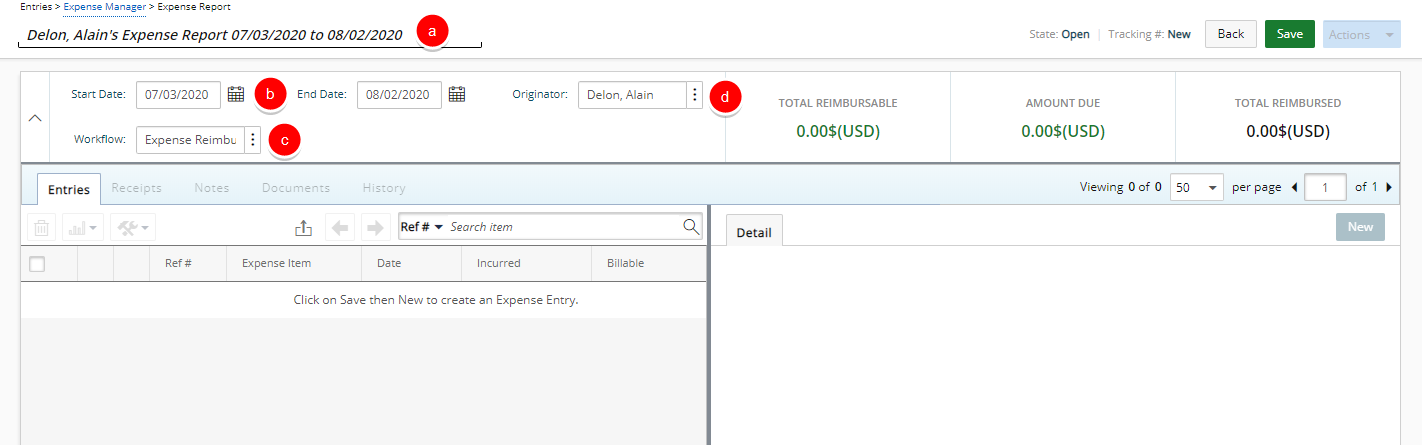
- Expense Report title: General description or summary of the nature of the expenses incurred in the report. The default naming convention of the title is as follows: [Originators Last name, First Name]'s Expense Report [Start Date] to [End Date].
- Specify the Expense Report period by selecting a Start and End Date from the calendar.
Note:
- The Start or End Date of an Expense Entry must be within the Expense Report period.
- If the Enforce cycle option box is selected, the chosen Reporting Cycle (monthly, semi-monthly, weekly and daily) will be enforced by the system.
- If the Allow only one Expense Report per cycle option box is selected, only one Expense Report can be created for the same cycle.
- Upon saving an Expense Report where the Start/End Date values are modified, a confirmation message is displayed that reads: The Originator, Start Date, and/or End Date have been changed, do you want to regenerate the Expense Report Title? Selecting Yes will lead to an automatic update of the Expense Report Title with the new values. Conversely, clicking No will maintain the Expense Report Title as is, without any updates.
- Workflow: The selected workflow through which this expense report will be processed . Click the Workflow browse button (
 ) to select a workflow from the Expense Workflow List page.
 - Originator: The user who actually incurred the expense, who could be you or another user for whom you are creating the expense report. Click the Originator browse button () to change the originator of the expense report; by default, the originator is the logged user.
Note: Upon saving an Expense Report where the Originator value is modified, a confirmation message is displayed that reads: The Originator, Start Date, and/or End Date have been changed, do you want to regenerate the Expense Report Title? Selecting Yes will lead to an automatic update of the Expense Report Title with the new values. Conversely, clicking No will maintain the Expense Report Title as is, without any updates.
- Project: The project to which the expense report is associated.
Note: This option will be available only when the Single Project per Expense Report is enforced.
- Click Save to apply your changes.
- Note the confirmation banner that the report has been successfully saved, which displays at the very top of the page.

- View the newly created Expense Report with the designated Tracking #.
Note: If you opted to copy an existing Expense Report, the Tracking # automatically generates upon the new Expense Report displaying without having to first save the page, as previously shown.
- You can now add an Expense Entry under a newly created Expense Report. For further details click here.