This article details the required and optional base information, under the General tab when creating a Project.
For step by step instructions on how to create a Project click here.
General Project Information
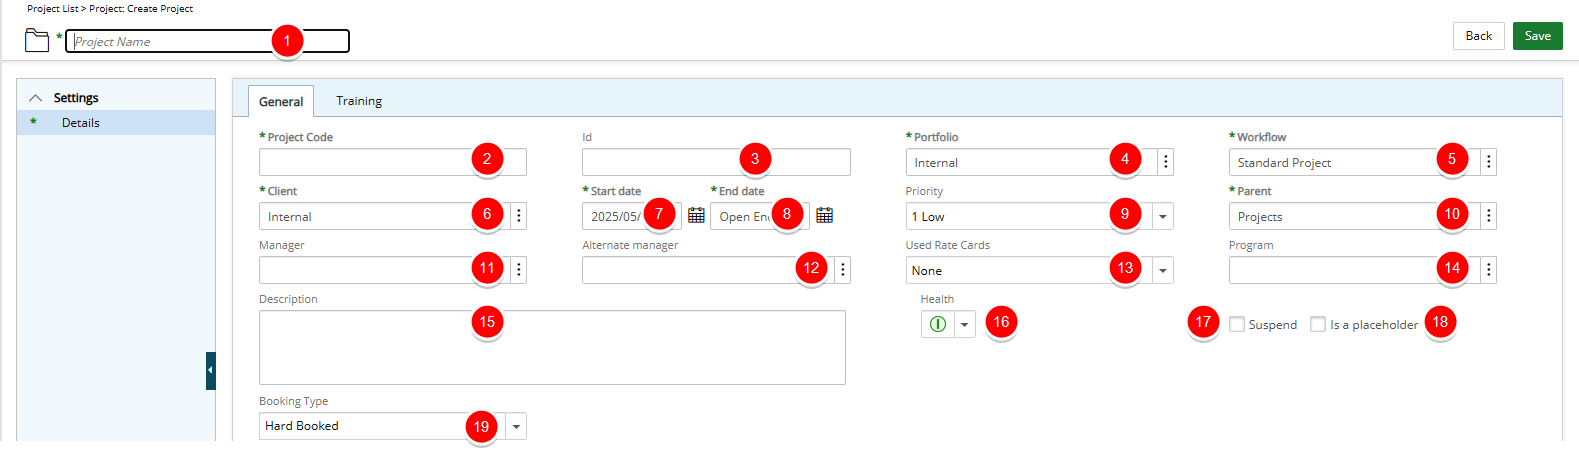
- Project Name *: Enter the project name.
- Project Code *: Enter a unique prefix, no longer than 32 characters, that is to be assigned to all tasks associated with the project.
Note: Project Code must be unique.
- Id: Enter a unique identifier assigned to the project (optional).
- Portfolio *: Click the browse button to select the portfolio, from the Portfolio List page, to be associated with the project.
- Workflow *: The system default workflow is selected by default. Click the browse button to select and change the workflow, from the Workflow List page, if different from this default selection. There are three out-of-box workflows: Immediate Execution, Selection Committee and Standard Project.
Note: The workflows displaying are the active project workflows in the system that the logged user has permission to view.
- Client *: Click the browse button to select the client, from the Client List page, to be associated with the project.
Note: Suspended Clients are hidden by default on the Clients List page. To display them, simply check the Show Suspended Clients box. However, please note that suspended clients cannot be selected when creating a Project.
- Start date *: Click the calendar icon to select the date that work on the project is to begin.
- End date *: Click the calendar icon to select the date of the last day of work on the project: if set up by the administrator, the system automatically suspends all project-related tasks after the end date is reached
Note: Modifying a project's start date and end date automatically updates the start date and end date of all the related assignments and tasks, for as long as they are exactly the same date.
- Priority: Select, from the drop-down list, the project’s priority level, with the options being: Low, Medium, High, Important and Urgent.
- Parent *: Click the browse button to select and designate, from the Project List page, under which placeholder the project is to be displayed.
- Manager: Click the browse button to select the manager, from the User List page, to be assigned to the project.
- Alternate manager: Click the browse button to select the alternate manager, from the User List page, to be assigned to the project;
- The Used Rate Cards field provides the option to select None, Client, or Project, offering flexibility in rate management:
- None: No specific rate card is applied, allowing the Project to proceed without predefined rates.
- Client Rate Card: You can apply an existing Client-level rate card, which inherits the rates set for the client associated to the Project, ensuring uniformity across all projects under that client.
- Project Rate Card: You have additional flexibility to either:
- Use an existing System-Level rate card, leveraging a standardised rate set at the financial level.
- Create a custom rate card specific to the Project, allowing you to define unique rates for that project alone.
- Program: Click the browse button to select a program, from the Program List page.
Note: A Project can only be associated to one Program.
- Description: Enter a brief description of this new project.
- Health: Select, from the drop-down list, the project’s state, with the options being: Active, Completed and Delayed
- Suspend: Check this option to remove all tasks associated with the project from the timesheets of all resources assigned to the project tasks.
Note: If users already have time entries for the tasks associated to the suspended projects, then those tasks are not removed. A suspended task shows in red font color on the Tasks List page.
- Is a Placeholder: Check this option to design a hierarchical project item tree for organizational purposes.
Note:
- If a project is marked as a placeholder, it cannot be used as a regular project.
- The Is a placeholder checkbox is unavailable (dimmed) when the project contains tasks. To enable the Is a placeholder option for a project, you must remove all associated tasks first.
- Booking Type: Select a default Booking Type (Hard Booked or Soft Booked) at the Project level. By default, Hard Booked is selected. When modifying this setting, your change will be applied to all future Bookings that are created.
Note: When creating a Booking from the Work Plans, the Default Booking Type is selected automatically based on the order of precedence as follows:
- Project
- Client
- System