Rate cards can be created at the System, Client, and Project levels, each serving different purposes based on organisational needs.
Project-level rate cards allow for unique rate definitions tailored to individual projects. When setting up a project, the Used Rate Cards field provides the option to select None, Client, or Project, offering flexibility in rate management:
- None: No specific rate card is applied, allowing the Project to proceed without predefined rates.
- Client Rate Card: You can apply an existing Client-level rate card, which inherits the rates set for the client associated to the Project, ensuring uniformity across all projects under that client.
- Project Rate Card: You have additional flexibility to either:
- Use an existing System-Level rate card, leveraging a standardised rate set at the financial level.
- Create a custom rate card specific to the Project, allowing you to define unique rates for that project alone.
Note: Rate Cards are recommended for new projects that do not currently utilize the existing PSA Rate Engine. Please be advised that associating a Rate Card to a Project that utilizes existing PSA Rate Engine introduces additional complexity, especially in the management of Forecast Billing Rates.
This article details how to:
- Access the Project Rate Cards list page from Project Edit
- Available options within the Project Rate Cards list page
For further details refer to:
To Access the Project Rate Cards list page
- From the Icon Bar click Project List
 .
. - From the Project List page, select the Project you wish to edit by following one of these steps:
- Click the Project context menu button
 to expand it. From the available options click Edit.
OR - Click the name of the Project you wish to access.
Tip: Use the search capability for an efficient way of finding the specific project. For further details refer to Searching for a Project within the Project List page.
- Click the Project context menu button
- Ensure that the Project option is selected for the Used Rate Cards field.
- From the Project Edit page, hover your mouse over the Manage tab and select Rate Cards from the available options.
- View the Project Rate Cards list page.
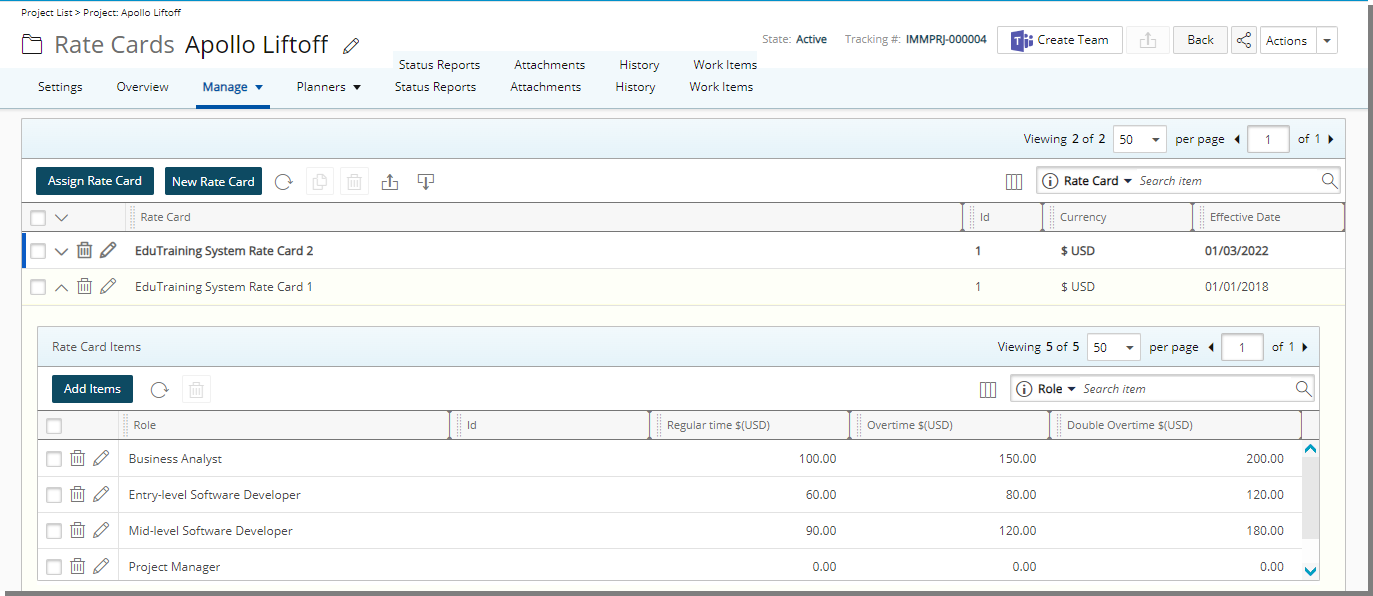
Tip: The Active Rate Card is highlighted in a bold font. Furthermore, a blue bar located at the beginning of the row also differentiates it from the other rate cards.
Available options within Project Rate Cards list page
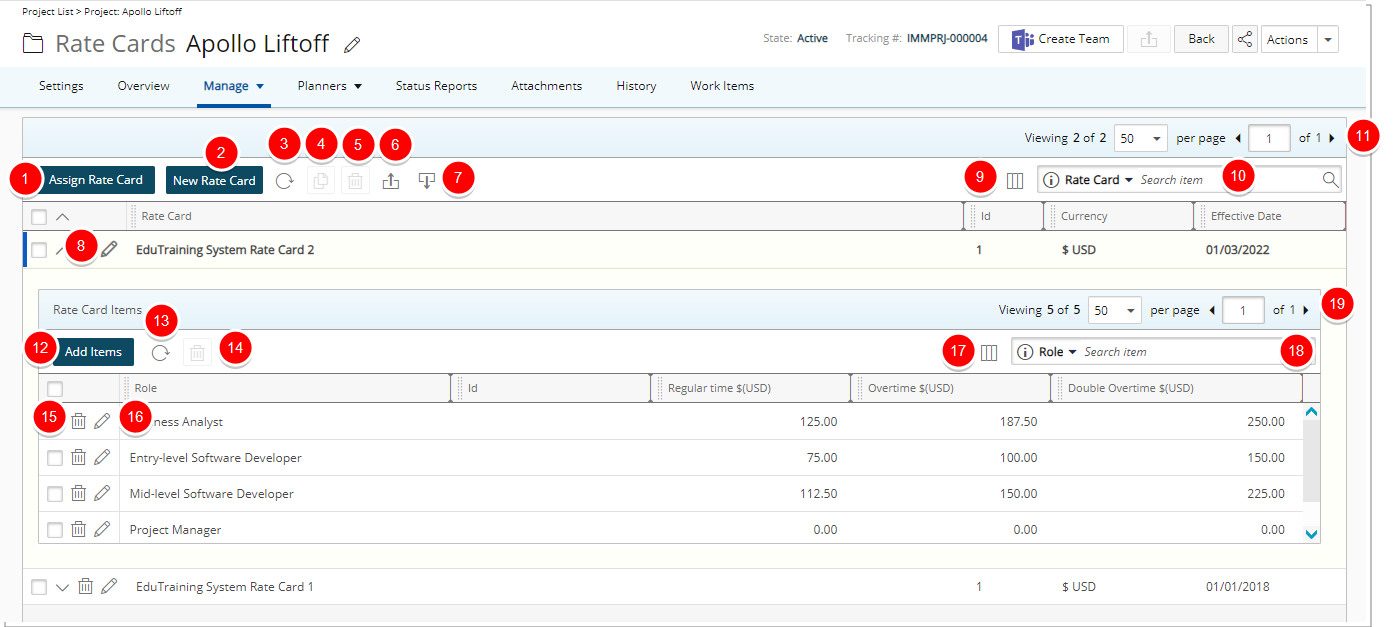
By default, the page lists all assigned Rate Cards in alphabetical order. You can:
- Assign a Rate Card.
- Create a New Rate Card for the current Project.
- Refresh
 the list.
 - Copy
 selected Rate Card.
 - Delete
 selected Rate Card.
 - Export
 the list of assigned Rate Cards to Excel
 - Import
 from Excel.
 - Modify
 associated Rate Card.
Note: The Active Rate Card is highlighted in a bold font. Furthermore, a blue bar located at the beginning of the row also differentiates it from the other rate cards.
- The following columns are displayed by default: Rate Card name, Currency and Effective Date. You can manage the columns from Column Selection
 .
. - By default, Search
 for assigned Rate Cards based on Name and Effective Date. You can choose to include the Currency criteria from Column Selection .
 - The Rate Card Items added/managed from the drawer by clicking the expand arrow (
 ).
). - Click Add Items to add Roles and their associated rates to the Rate Card.
- Refresh the list.
- Delete selected Rate Card Item.
- Delete Rate Card Item.
- Modify Rate Card Item.
- The following columns are displayed by default: Role, Id, Regular time, Overtime and Double Overtime. You can manage the columns from Column Selection .
- Search for Rate Card Items based on Role, Id, Regular time, Overtime and Double Overtime.
- Pagination is available at the top right corner to facilitate easy navigation across pages.
- From the table headers:
- Sort the columns by ascending or descending order simply by clicking a column header. Note that an arrow indicates the descending (
 ) or ascending (
 ) order applied to the column.
 - Click
 and move a column to the desired position.
 - Dynamically resize column(s), to your preferred width. Simply move your cursor to the column boundary (
 ) you want to resize. When the cursor becomes a resize cursor, click and drag the column accordingly