Accessing the Project Budget page is the first step toward effectively managing and allocating budgets across Tasks, Resources, and timelines within a Project. The Budget page provides a centralized interface where project managers and financial stakeholders can define, review, and adjust budget allocations based on evolving project needs. Whether you are initiating a new project or updating an existing one, knowing how to navigate to the Project Budget ensures you can make informed financial decisions and maintain visibility into project costs.
This article highlights how to access the Project Budget page and outlines the available options once the interface is open. Key considerations include navigating a Project Budget with Multi-Budgets versus a Single Budget setup. Understanding these differences is essential for effective budget management, ensuring resources are allocated efficiently and project costs are tracked accurately.
Accessing the Project Budget Page
- From the Icon Bar click Project List
 .
. - From the Project List page, select the Project you wish to edit by following one of these steps:
- Click the Project context menu button
 to expand it. From the available options click Edit.
OR - Click the name of the Project you wish to access.
Tip: Use the search capability for an efficient way of finding the specific project. For further details refer to Searching for a Project within the Project List page.
- Click the Project context menu button
- From the Project Edit page, hover your mouse over the Planners tab and select Budget from the available options.
- View the Project Budget:
- The left pane displays a view of the Project.
- You can Refresh
 the page
 - Choose Multiple Budgets.
- Apply a Filter
 .
. - Search
 for an object.
 - Clicking an item in the left pane refreshes the data in the right pane.
Note: Scoping is not applied on the left pane on Assigned Users.
- You can Refresh
- From the right pane you can:
- Access the Context Menu

- Access the Options dialog box. Available at the Project and Task levels.
- Create Budget
- Delete Budget (when a Budget exists)
- The available tabs are:
- Details tab. Available for Single-Budget type.
- Summary tab. Available at the project level for Multi-Budget type.
- Notifications tab. Available when a Budget exists.
- Access the Context Menu
- The left pane displays a view of the Project.
Single Budget
In a Single Budget setup, all financial planning and cost tracking for a project are consolidated into one unified budget. This approach is ideal for straightforward projects with a single funding source, a clear scope, and minimal complexity. A Single Budget provides a centralized view of estimated and actual costs across all tasks and resources, making it easier to monitor overall project spending and ensure alignment with financial goals. It simplifies reporting and reduces administrative overhead, as all budgeting activity occurs within one structure.
Left Panel
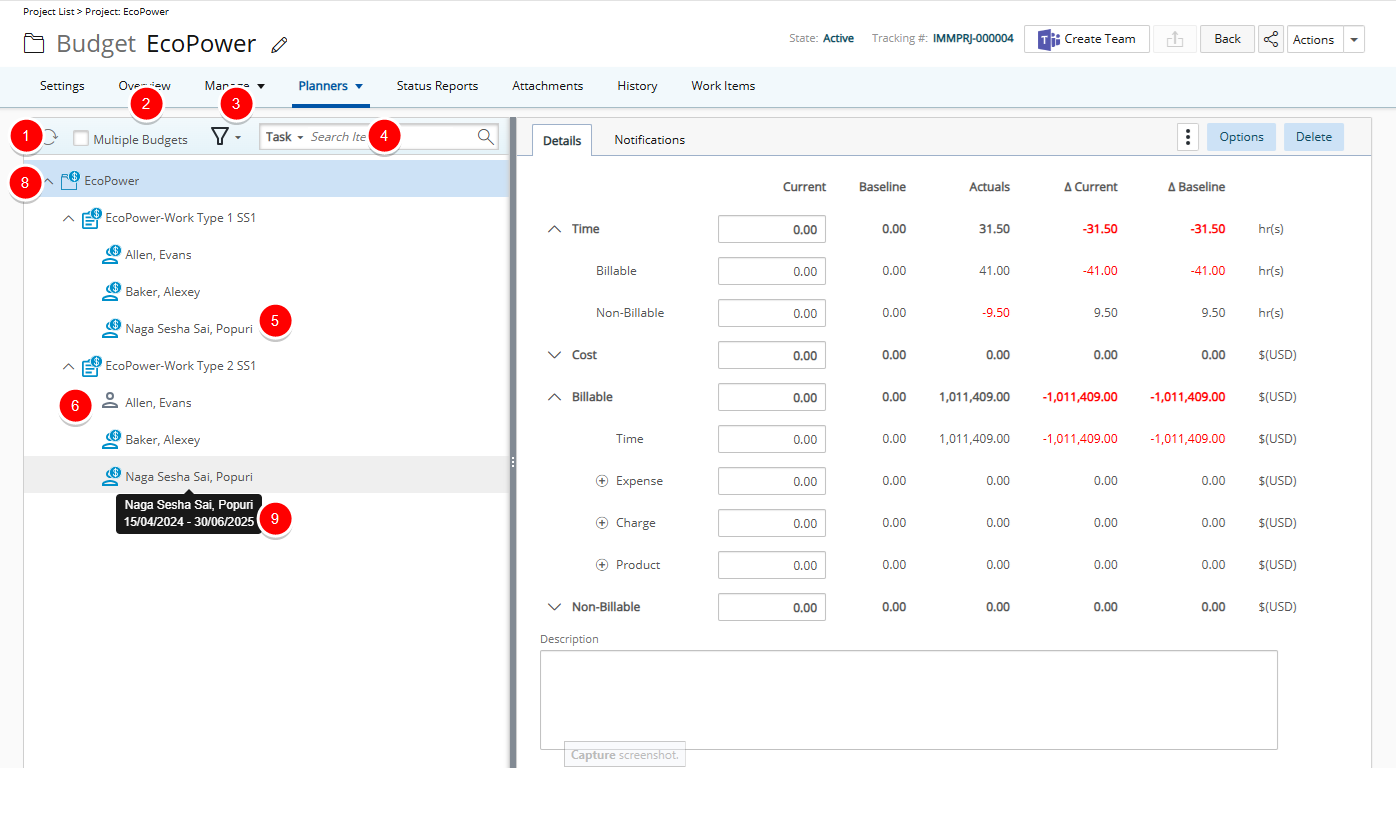
If a single budget is enforced, selecting the name of a Project, Task or Assignment in the left pane displays the corresponding budget in the right pane, provided that a budget already exists for the selected item.
- If the logged users have View rights on the Task component in their security profiles, the Project displays all its non-leave type Tasks that meet the selected filter criteria in ascending alphabetical order.
- If the logged users have View rights on the Assign Users to Task component in their security profiles, each Task is expandable, as long as an assignment is associated to it, and displays all its assigned users that meet the selected filter criteria in the format Last Name, First Name in ascending alphabetical order.
- Click Refresh to reload the page.
- Select Multiple Budgets to manage separate budget allocations within a single project.
- By default the list is Filtered
 to display only Active Tasks or Assignments when suspended or decommissioned ones are present (/).
- When the Decommissioned checkbox is checked, Decommissioned Tasks and Assignees are displayed in gray.
- When the Suspended checkbox is checked, Suspended Tasks and Assignees are displayed in red.
- If none of the three options are checked, only the Project Budget is shown.
Note: The selected Filter is saved per browser per user, ensuring preferences persist across sessions.
- Search by Task or User.
- The icons representing Projects, Tasks, and Assignments in the tree structure visually indicate whether a budget has been defined. When a budget is present, the icons appear blue. If no budget is defined, the icons remain gray..
- Project (
 /
/ )
) - Task (
 /
/ )
) - Assignment (
 /
/ )
)
- Project (
- Click the Expand
 button located against an object to expand the list in the left pane.
 - Clicking on an item that has a Budget will display the related budget on the right panel.
Note: If a Budget does not exist, a message indicates that no Budget is associated to the selected item and to create a Budget.
- When multiple child items are open, you can collapse them all at once using the collapse button at the Project level. Expanding the Project again will keep all child items collapsed by default.
- Hovering over an item displays a tooltip with relevant details such as Start Date, End Date and, if available, a Description.
Right Panel
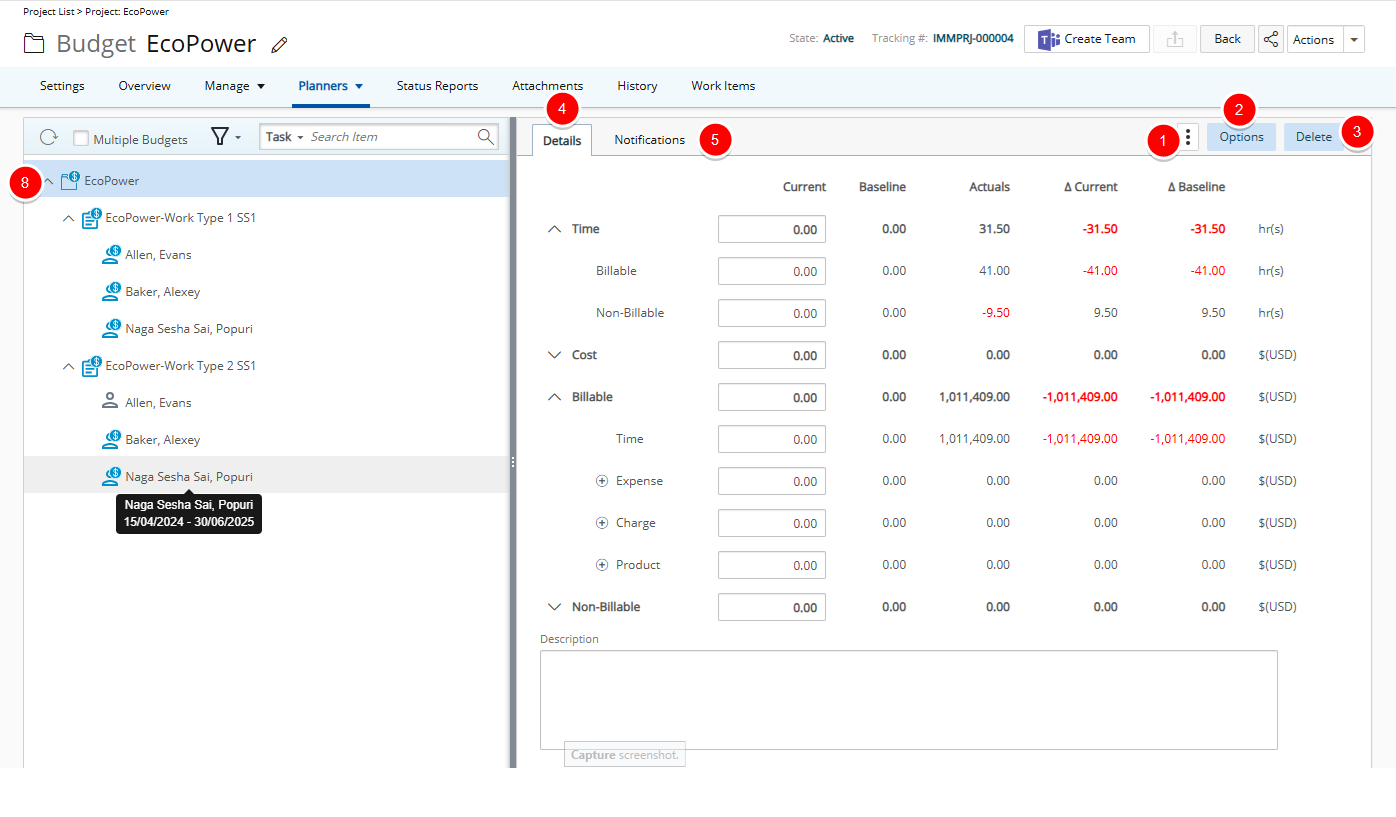
- The Context menu
 allows you to access:
- Reports: Includes Project, Task, and Assignment Budget-type RDLC reports, displayed as a dialog box.
- Manage Baselines.
- View Budget History.
- Generate Rollup Budget
Note: The Generate Roll-Up Budget option is available at the Task and Project levels only.
-
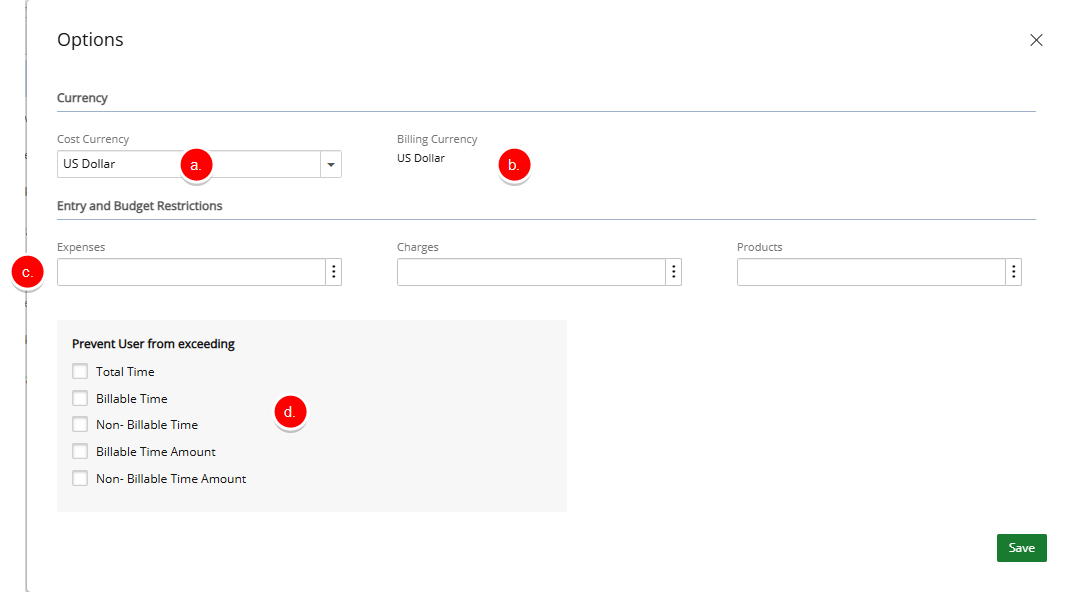
Click Options to open the Options dialog box. From there, you can configure settings related to cost and billing, as well as define budget and entry restrictions. Available options include:
- The Cost Currency can be modified to align with project-specific financial requirements.
- Billing Currency is fixed and cannot be changed
- Manage the Entry and Budget Restrictions such as
- Expenses
- Charges
- Products
-
Time and Amount Limits to prevent users from exceeding:
- Total Time
- Billable Time
- Non- Billable Time
- Billable Time Amount
- Non- Billable Time Amount
- Click Delete to remove the budget. This button is available only when a Budget has been created.
- The Details tab is where you will find all the details of your Budget such as:
- The four main expandable/collapsible sections: Time, Cost, Billable and Non-Billable
Note:
- The Time category has two subcategories: Billable and Non-Billable.
- The Cost, Billable, and Non-Billable categories each have four subcategories: Time, Expense, Charge, and Product. For the Expense, Charge, and Product subcategories, you can click the Add
 button to add items. When an item exists, you can use the Delete
  button located next to it to remove it.
- There are five columns for each row:
- Current
- Baseline
Note: You can manage Baselines using the Baselines link in the Context menu
. - Actuals
- Delta Current
- Delta Baseline
- The four main expandable/collapsible sections: Time, Cost, Billable and Non-Billable
- From the Notifications tab, which is available for Project and Task budgets, you can set up notifications to be sent to various stakeholders when changes are made to the budget that effect users.
Multiple Budgets
Multi-Budgets allow a project to be divided into multiple budget segments, each with its own financial parameters. This approach is particularly useful for large-scale or complex projects involving multiple phases, departments, funding sources, or subcontractors. Each budget can be managed independently while still contributing to the overall project financials. Multi-Budgets offer greater flexibility and control, enabling more granular tracking and reporting. However, they may require more coordination and oversight to ensure that all budget components are properly aligned and managed.
Note: Task and Assignment level budgets are not available in the Multi-Budget feature.
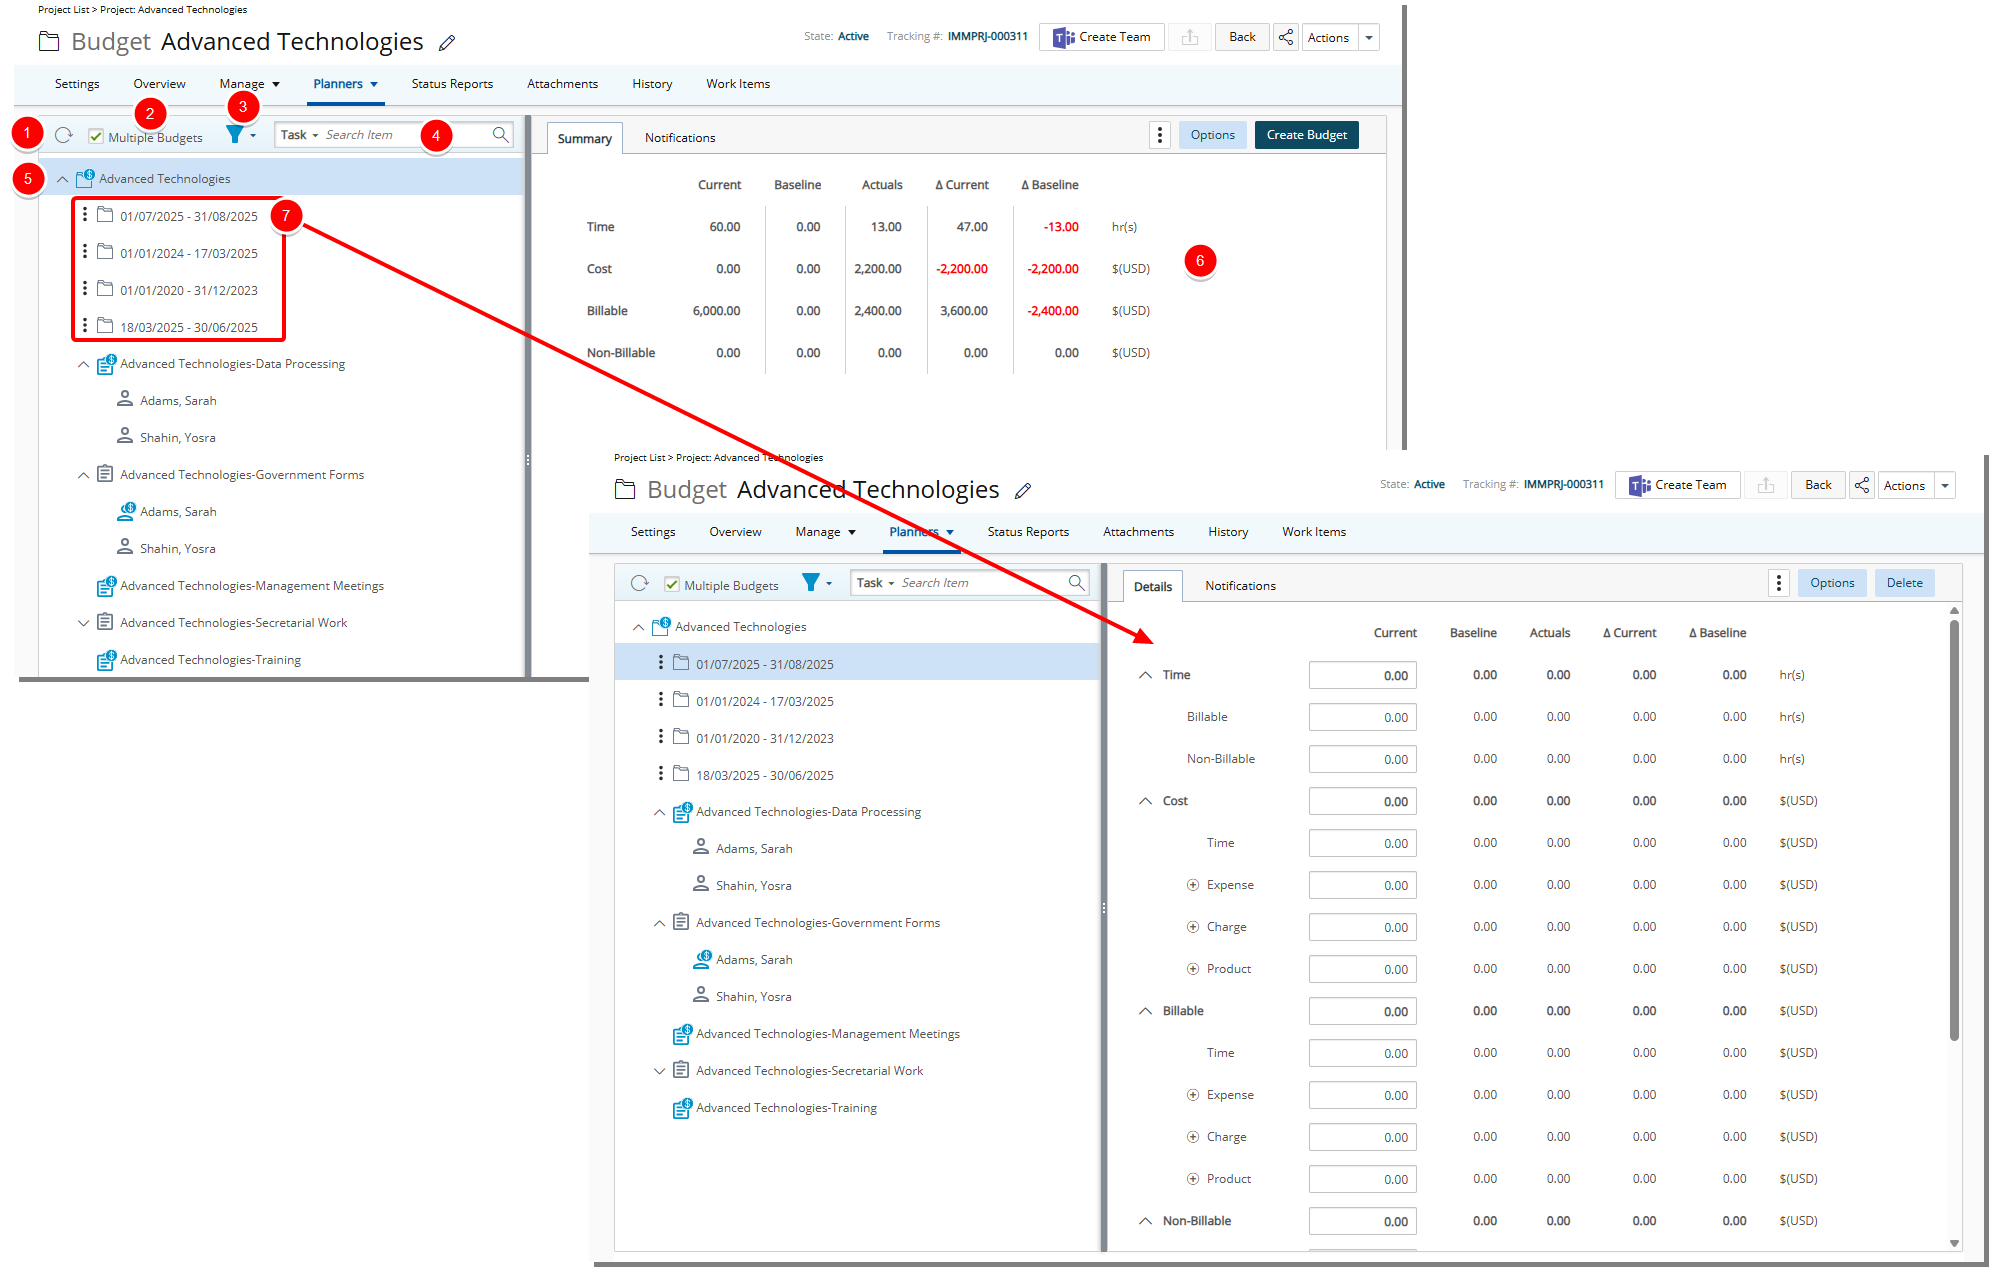
Left Panel
- Click Refresh to reload the page.
- Clear the Multiple Budgets selection box to switch the project to a Single Budget mode.
- By default the list is Filtered to display only ActiveTasks or Assignments when suspended or decommissioned ones are present (/).
- When the Decommissioned checkbox is checked, Decommissioned Tasks and Assignees are displayed in gray.
- When the Suspended checkbox is checked, Suspended Tasks and Assignees are displayed in red.
- If none of the three options are checked, only the Project Budget is shown.
Note: The selected Filter is saved per browser per user, ensuring preferences persist across sessions.
- Search by Task, User or Date.
- The icons representing Projects, Tasks, and Assignments in the tree structure visually indicate whether a budget has been defined. When a budget is present, the icons appear blue. If no budget is defined, the icons remain gray..
- Project (/)
- Task (/)
- Assignment (/)
- Project (
- Click the Expand button located against an object to expand the list in the left pane.
- Click the Context menu button located next to the Project Budget to access options for editing, copying the budget.
- The Budgets can be accessed by simply clicking on their respective dates in the left panel. This allows for quick navigation to the relevant budget details, making it easier to manage and view budgets based on their specific timeframes.
Note: Administrators can select Multiple Budgets as the default project budget at the Work System level (under Setup > Work > System). Additionally, administrators have the option to Display Budgets by name, allowing custom names to be assigned to each Project Budget. If this option is not enabled, Project Budgets will be named using the format "Project Budget Start Date – Project Budget End Date." When hovering over the budget name, the Project Budget Description (if defined) will appear, providing more context without the need for further clicks..
- Clicking on an item that has a Budget will display the related budget on the right panel.
Note: If a Budget does not exist, a message indicates that no Budget is associated to the selected item and to create a Budget.
- When multiple child items are open, you can collapse them all at once using the collapse button at the Project level. Expanding the Project again will keep all child items collapsed by default.
- Hovering over an item displays a tooltip with relevant details such as Start Date, End Date and, if available, a Description.
Right Panel
- The Context menu allows you to access:
- Reports: Includes Project, Task, and Assignment Budget-type RDLC reports, displayed as a dialog box.
- The Baselines option is available only when a Budget has been defined.
- The Generate Rollup Budget option is available at the Project level.
-
Click Options to open the Options dialog box. From there, you can configure settings related to cost and billing, as well as define budget and entry restrictions. Available options include:
- The Cost Currency can be modified to align with project-specific financial requirements.
- Billing Currency is fixed and cannot be changed
- Manage the Entry and Budget Restrictions such as:
- Expenses
- Charges
- Products
-
Time and Amount Limits to prevent users from exceeding:
- Total Time
- Billable Time
- Non- Billable Time
- Billable Time Amount
- Non- Billable Time Amount
Note: The Prevent User from exceeding section located within the Options dialog box is unavailable at the Project Summary level.
- Click Delete to remove the budget. This button is available only when a Budget has been created.
Budget Summary tab

The Budget Summary provides a read-only overview of all budgets associated with a project, displaying key financial details in an organized table format. This summary is divided into four rows, each representing the aggregated values for Time, Cost, Billable, and Non-billable budgets.
Each row is divided into five columns, reflecting different budget categories: Current, Baseline, Actuals, and D Current and D Baseline.
- Current: This column shows the total of all current budgets, including Time, Total Cost, Total Billable, and Total Non-billable budgets.
- Baseline: This column displays the aggregate baseline values for Time, Total Cost, Total Billable, and Total Non-billable budgets.
- Actuals: Here, the total actuals are shown, calculated based on the project, task, or assignment dates.
- D Current: This column indicates the difference (delta) for current budgets across Time, Total Cost, Total Billable, and Total Non-billable budgets.
- D Baseline: This column represents the difference (delta) for baseline budgets across Time, Total Cost, Total Billable, and Total Non-billable budgets.
The Budgets can be accessed by simply clicking on their respective dates in the left panel. This allows for quick navigation to the relevant budget details, making it easier to manage and view budgets based on their specific timeframes.
Budget Details tab

The Details tab is where you will find all the details of your Budget such as:
- The four main expandable/collapsible sections: Time, Cost, Billable and Non-Billable
Note:
- The Time category has two subcategories: Billable and Non-Billable.
- The Cost, Billable, and Non-Billable categories each have four subcategories: Time, Expense, Charge, and Product. For the Expense, Charge, and Product subcategories, you can click the Add button to add items. When an item exists, you can use the Delete button located next to it to remove it.
- There are five columns for each row:
- Current
- Baseline
Note: You can manage Baselines using the Baselines link in the Context menu
. - Actuals
- Delta Current
- Delta Baseline
Budget Notifications tab

From the Notifications tab, which is available for Project and Task budgets, you can set up notifications to be sent to various stakeholders when changes are made to the budget that effect users.