From the PSA Mobile Home screen you can choose to enter time through one of the following:
- Enter time for the current date/period
- Access the current period to choose a date and then enter time
- Access the list of Timesheet periods, choose a period, choose a date and then enter time
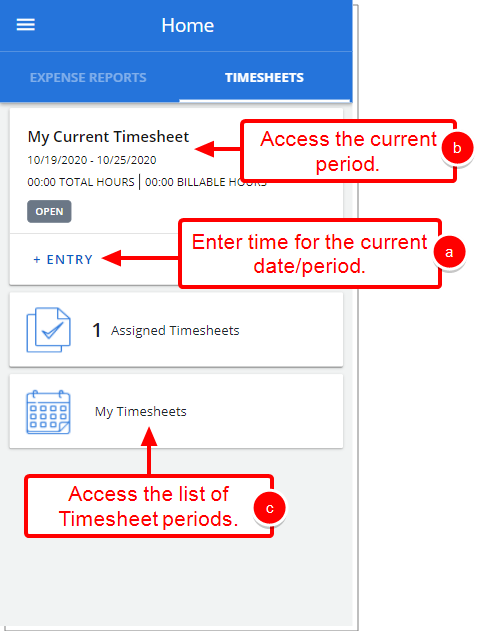
Enter time for the current date/period
Note: The options and/or format in which the page(s) is/are shown in this article may differ from yours as your organization may have required a different set up altogether.
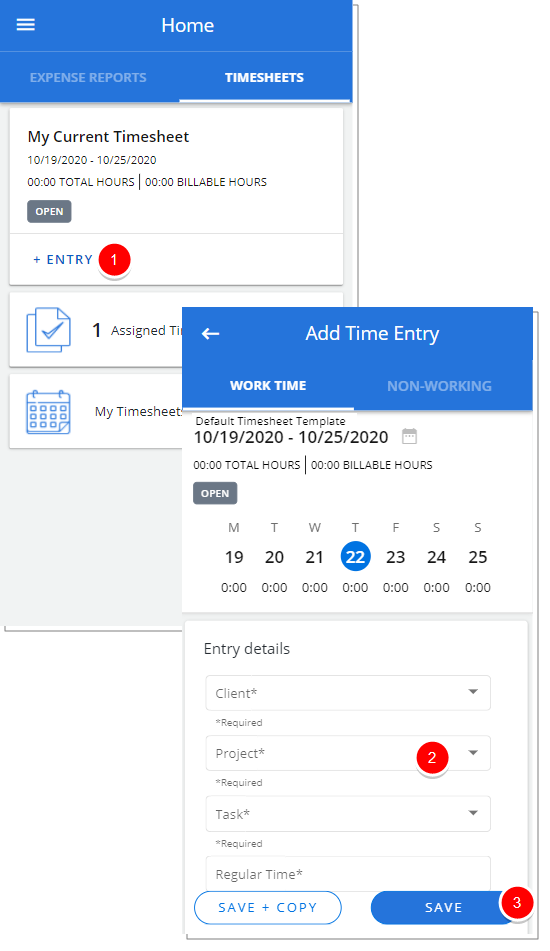
- From the Home page, select + Entry which will open the Add Time Entry screen for the current period/date.
- Upon the Add Time Entry screen displaying, tap each time entry detail box and select from the available options:
- Select a Client: Tap Client to access the Search Client screen, where you can search and select a Client from the list of available options.
- Select a Project: Tap Project to access the Search Project screen, where you search and select a Project from the list of available options.
Note:
The search by Assigned Projects, Project or Client options are available only when Project is selected to display in the Timesheet Template.
Your search term is cleared when the page is reloaded either by selecting a Project or by tapping the Cancel button.
If the logged User has Assignments with no Time Entries
- The Task Assignments will be preloaded and available in the Select Task screen along with returned results based on User’s Search value, if the Display only Assignments with Time Entries option is not selected within the Timesheet Template Options tab.
- The Task Assignments will be not be Preloaded within the Select Task screen, if the Display only Assignments with Time Entries option is selected within the Timesheet Template Options tab.
- Select a Task: Tap Task to access the Search Task screen, where you can and select a Task from the list of available project tasks.
Tip: Selecting a Task first will auto-populate the Project and Client boxes. When you select a Task, an information icon
 will appear next to the Task selection box. Tap the icon to access a tool-tip that displays the complete Task name for your reference.
 - Enter Time:
- Tap the Regular Time box to access the time picker.
- Scroll using the up or down arrows or enter the Hours and Minutes.
- Tap Set to enter the Regular Time or Cancel to close the time picker and return to Add Time Entry screen.
- Enter Note:
- If required select Add Note to access the Entry Note screen.
- From the Note Type list select a note type.
- After entering a note tap Done to save your changes.
Tip: You can tap the Back arrow to discard your changes and return to the previous screen.
- Save your changes:
- Choose Save to save your changes.
- Choose Save + Copy to save your changes and create a copy of the Time Entry. Selecting this option will result in the Add Time Entry screen to remain open where you can make changes to the copied Time Entry. For more information click here.
Tip: You can tap the Back arrow to discard your changes and return to the previous screen.
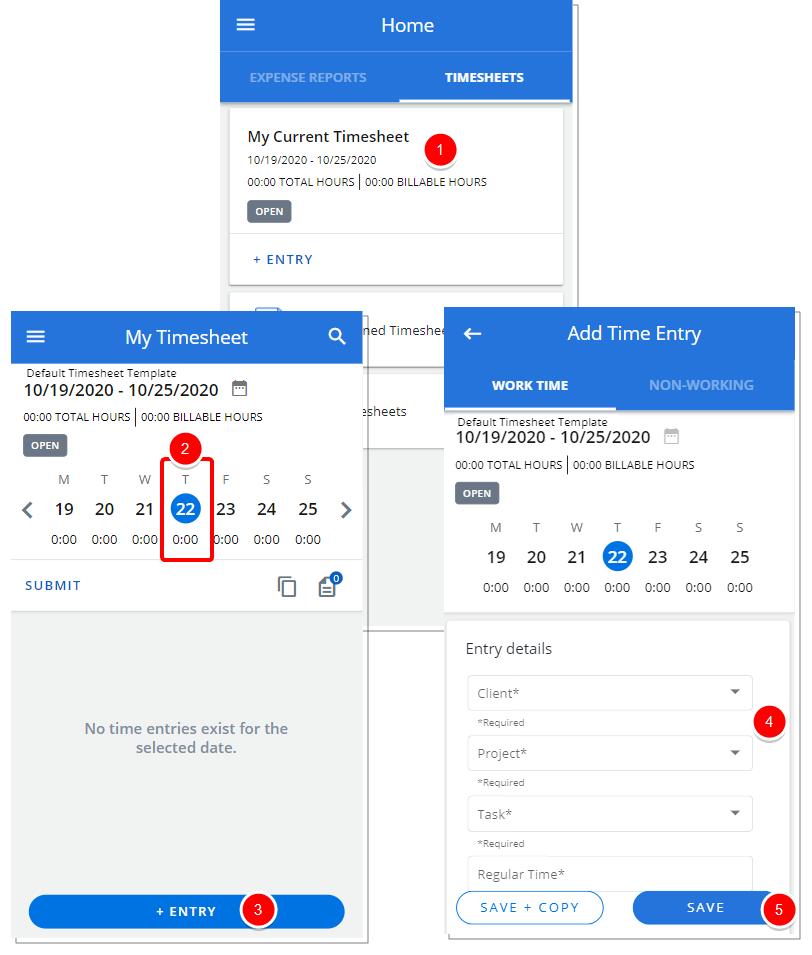
Access the current period to choose a date and then enter time
- From the Home page, select My Current Timesheet which will open the My Timesheet screen with the current period/date selected.
- Choose a date:
- If required use the arrows to navigate to a different period
- Select the date where you wish to make a time entry
- Select + Entry which will open the Add Time Entry screen for the chosen period/date.
- Upon the Add Time Entry screen displaying, tap each time entry detail box and select from the available options:
- Select a Client: Tap Cliens to access the Search Client screen, where you can search and select a Client from the list of available options.
- Select a Project: Tap Project to access the Search Projecs screen, where you search and select a Project from the list of available options.
Note:
The search by Assigned Projects, Project or Client options are available only when Project is selected to display in the Timesheet Template.
Your search term is cleared when the page is reloaded either by selecting a Project or by tapping the Cancel button.
If the logged User has Assignments with no Time Entries
- The Task Assignments will be preloaded and available in the Select Task screen along with returned results based on User’s Search value, if the Display only Assignments with Time Entries option is not selected within the Timesheet Template Options tab.
- The Task Assignments will be not be Preloaded within the Select Task screen, if the Display only Assignments with Time Entries option is selected within the Timesheet Template Options tab.
- Select a Task: Tap Task to access the Search Task screen, where you can and select a Task from the list of available project tasks.
Tip: Selecting a Task first will auto-populate the Project and Client boxes
- Enter Time:
- Tap the Regular Time box to access the time picker.
- Scroll using the up or down arrows or enter the Hours and Minutes.
- Tap Set to enter the Regular Time or Cancel to close the time picker and return to Add Time Entry screen.
- Enter Note:
- If required select Add Note to access the Entry Note screen.
- From the Note Type list select a note type.
- After entering a note tap Done to save your changes.
Tip: You can tap the Back arrow to discard your changes and return to the previous screen.
- Save your changes:
- Choose Save to save your changes.
- Choose Save + Copy to save your changes and create a copy of the Time Entry. Selecting this option will result in the Add Time Entry screen to remain open where you can make changes to the copied Time Entry. For more information click here.
Tip: You can tap the Back arrow to discard your changes and return to the previous screen.
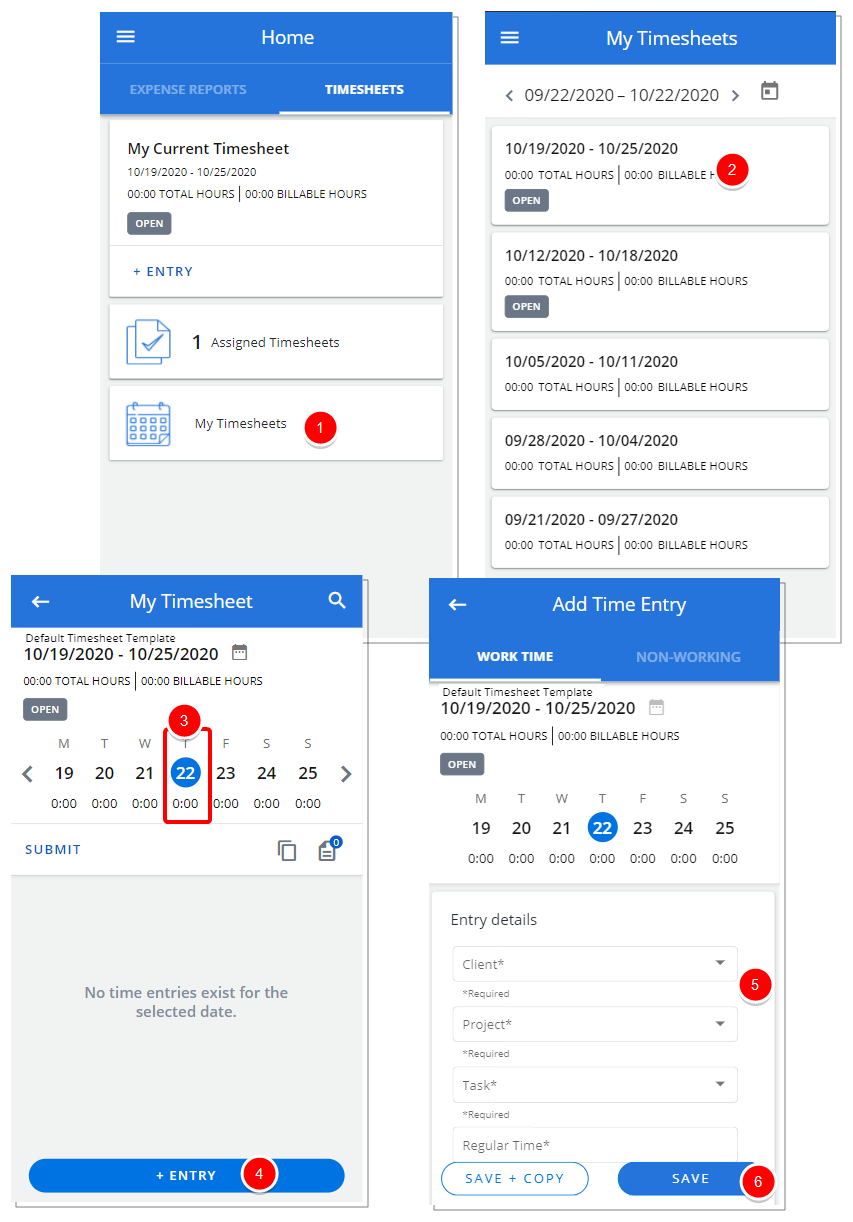
Access the list of Timesheet periods, choose a period, choose a date and then enter time
- From the Home page, select My Timesheets which will open the My Timesheets list.
- Choose a Timesheet which will open the My Timesheet screen.
- Choose a date:
- If required use the arrows to navigate to a different period
- Select the date where you wish to make a time entry
- Select + Entry which will open the Add Time Entry screen for the chosen period/date.
- Upon the Add Time Entry screen displaying, tap each time entry detail box and select from the available options:
- Select a Client: Tap Client to access the Search Client screen, where you can search and select a Client from the list of available options.
- Select a Project: Tap Project to access the Search Project screen, where you search and select a Project from the list of available options.
Note:
The search by Assigned Projects or the Project options are available only when Project is selected to display in the Timesheet Template.
The search by Client option is available only when Client is selected to display in the Timesheet Template.
Your search term is cleared when the page is reloaded either by selecting a Project or by tapping the Cancel button.
If the logged User has Assignments with no Time Entries
- The Task Assignments will be preloaded and available in the Select Task screen along with returned results based on User’s Search value, if the Display only Assignments with Time Entries option is not selected within the Timesheet Template Options tab.
- The Task Assignments will be not be Preloaded within the Select Task screen, if the Display only Assignments with Time Entries option is selected within the Timesheet Template Options tab.
- Select a Task: Tap Task to access the Search Task screen, where you can and select a Task from the list of available project tasks.
Note: Selecting a Task first will auto-populate the Project and Client boxes
- Enter Time:
- Tap the Regular Time box to access the time picker.
- Scroll using the up or down arrows or enter the Hours and Minutes.
- Tap Set to enter the Regular Time or Cancel to close the time picker and return to Add Time Entry screen.
- Enter Note:
- If required select Add Note to access the Entry Note screen.
- From the Note Type list select a note type.
- After entering a note tap Done to save your changes.
Tip: You can tap the Back arrow to discard your changes and return to the previous screen.
- Save your changes:
- Choose Save to save your changes.
- Choose Save + Copy to save your changes and create a copy of the Time Entry. Selecting this option will result in the Add Time Entry screen to remain open where you can make changes to the copied Time Entry. For more information click here.
Tip: You can tap the Back arrow to discard your changes and return to the previous screen.