The Upland Qvidian and Salesforce.com integration can automatically populate data from any Salesforce custom or standard related list object into a document type’s structured content. The related list is selected, and field codes from the related list are included in the structured content Project or Created Document that is uploaded to the Structured Content component.
You can edit and delete related list rows directly in your Project Structured Content component, which cannot be done in Created Documents. You can also sync and refresh the Salesforce data directly from your Structured Content component within your Upland Qvidian Project(s); when this is done any Salesforce data will overwrite any data within your Project Structured Content component.
Note: In order for Related List Mapping to work, the Always Use checkbox (Upland Qvidian > Administration > Salesforce > Connection Information) must be selected.
Example: When selecting a related list keep in mind that the Type field dictates the Salesforce object that required to pull the data. For example, selecting Cases from Account will only pull data into custom documents that are linked directly to a Salesforce Account. If the custom document is linked to a sale opportunity, then this structured content will not be populated.
Pull the related list data from Salesforce into a Structured Content component
- Navigate to a new or existing QvidianDocument Type.
- Add a new Structured Content component or open an existing one. Build the rest of your Structured Content component as you normally would, with the exception of the Fields to Display section, where you will add your Salesforce Related List.
-
Click Add Salesforce Related List in the Fields to Display section.
Note: If you do not see the Add Salesforce Related List option, it may because you do not have any Salesforce Connection entries defined in Administration > Salesforce > Connection Information, or the structured content page Fields to Display section has already been populated.
Note: If you have more than one entry in the Administration > Salesforce > Connection Information page you will have the option to Choose a Salesforce Instance. If you only have one entry, that option box will not be displayed.
-
Select a Related List from the left panel. The Related List fields will display in the right panel. Any available custom objects will appear at the bottom of the list.
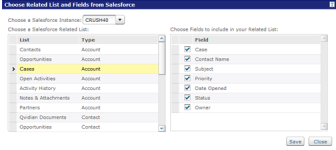
Note: When selecting a Related List, you can only select the ones that are native to the Salesforce object you're generating the document from [i.e. the Related List(s) that are local to the standard and custom objects].
Example: Selecting Cases from Account will only pull data into Custom Documents that are linked directly to a Salesforce Account. If the Custom Document is linked to a Salesforce Opportunity, then this structured content will not be populated.
- Choose the fields you want to appear in your structured content by selecting the Field checkboxes in the right pane.
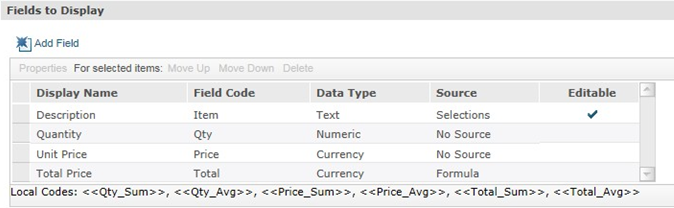
- Click Save to save your selections. The fields will populate under Fields to Display.
- Click Save to save the Structured Content page.
- Select Upload Document from the Actions menu within the Properties section.
- Enter a DisplayTitle for the content, upload a Word file that includes merge codes, and then click Save.

Adding field codes for a related list in Microsoft Word
The Field Code column in Fields to Display section has values that can be used to pull data from the related list into a table. The Field Codes, contained in two sets of angled brackets, are included in a Word document (e.g. <<Item>>).
Example: The Word document in which you include field codes can be in any format. However, if you use a table, it should be set up as such:
| Description | Quantity | Unit Price | Total Price |
|---|---|---|---|
| <<Item>> | <<Qty>> | <<Price>> |
<<Total>> |
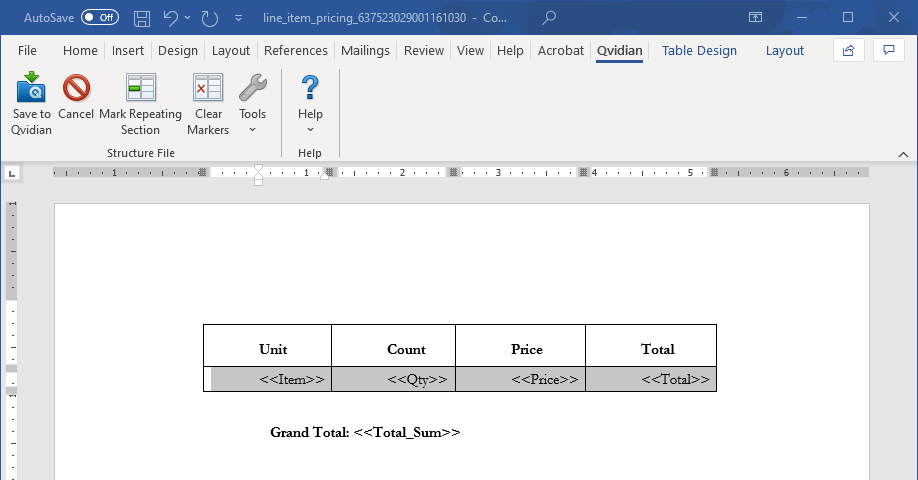
- If using Microsoft Word, click in the row or paragraph that includes the field code(s).
- Click Mark Repeating Section on the Qvidian toolbar. Click Mark Repeating Section in the Qvidian toolbar. This option is only available if the document is uploaded to the structured content Create a Structured Content component and then edited using the Edit option in the File Actions menu.

- Click Save to Qvidian.
Tip: If you are repeating paragraph sections, you must add a paragraph, ¶ , space after the section you wish to repeat
Tip: If you do not intend on using the Qvidian toolbar to create repeating table rows or paragraphs for your Structured Content, when you are Create a Structured Content component using Microsoft Word, apply a Word bookmark to the section(s) you would like to repeat. Select the section(s) you would like to repeat and click Insert > Bookmark and name the selection: “ss_repeat_1”. If you require additional repeating sections in the same file, select those and increment the Bookmark number: “ss_repeat_2”. Once you have completed bookmarking all your repeating Word sections, upload the file as usual. If you need assistance bookmarking repeating information, please contact customer support.
Create a table that will expand based on the number of rows being mapped from a Salesforce Related List
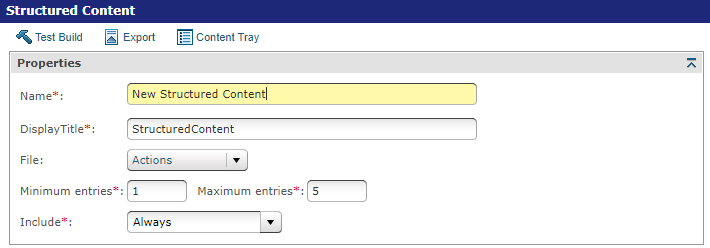
- Specify the maximum entries in the Structured Content Properties section.
- In Microsoft Word, click in the row that includes the field codes.
- Set the row to repeat by doing one of the following:
- Word Bookmark Method: Click in the row that includes the Field Codes, and then click Bookmark, located on Word’s Insert tab. An Add Bookmark dialog box will display. In the Bookmark Name field, enter ss_repeat_1.
- Qvidian Toolbar Method: Click in the row that includes the Field Codes, then click the Mark Repeating Section button in the Qvidian toolbar. This option is only available if the document is uploaded to the structured content and then edited using the Edit option in the Actions menu.