Feedback
You can submit general and content feedback to Content Managers and Subject Matter Experts (SMEs) to help improve your organization’s library. Users can notify owners using content feedback that a content record needs an update. For example, to fix a typo in the file or the content does not show a product name change. General feedback, which is not for a specific record, can be used to request a new content record.
Note: Once created, replies to the content feedback displays on the Feedback panel as feedback threads. You can access the Feedback in the Details panel of the Library. For more information, see the Feedback in the Content Record Details Panel page.
To view all the feedback in one location, navigate to My Work > Feedback.
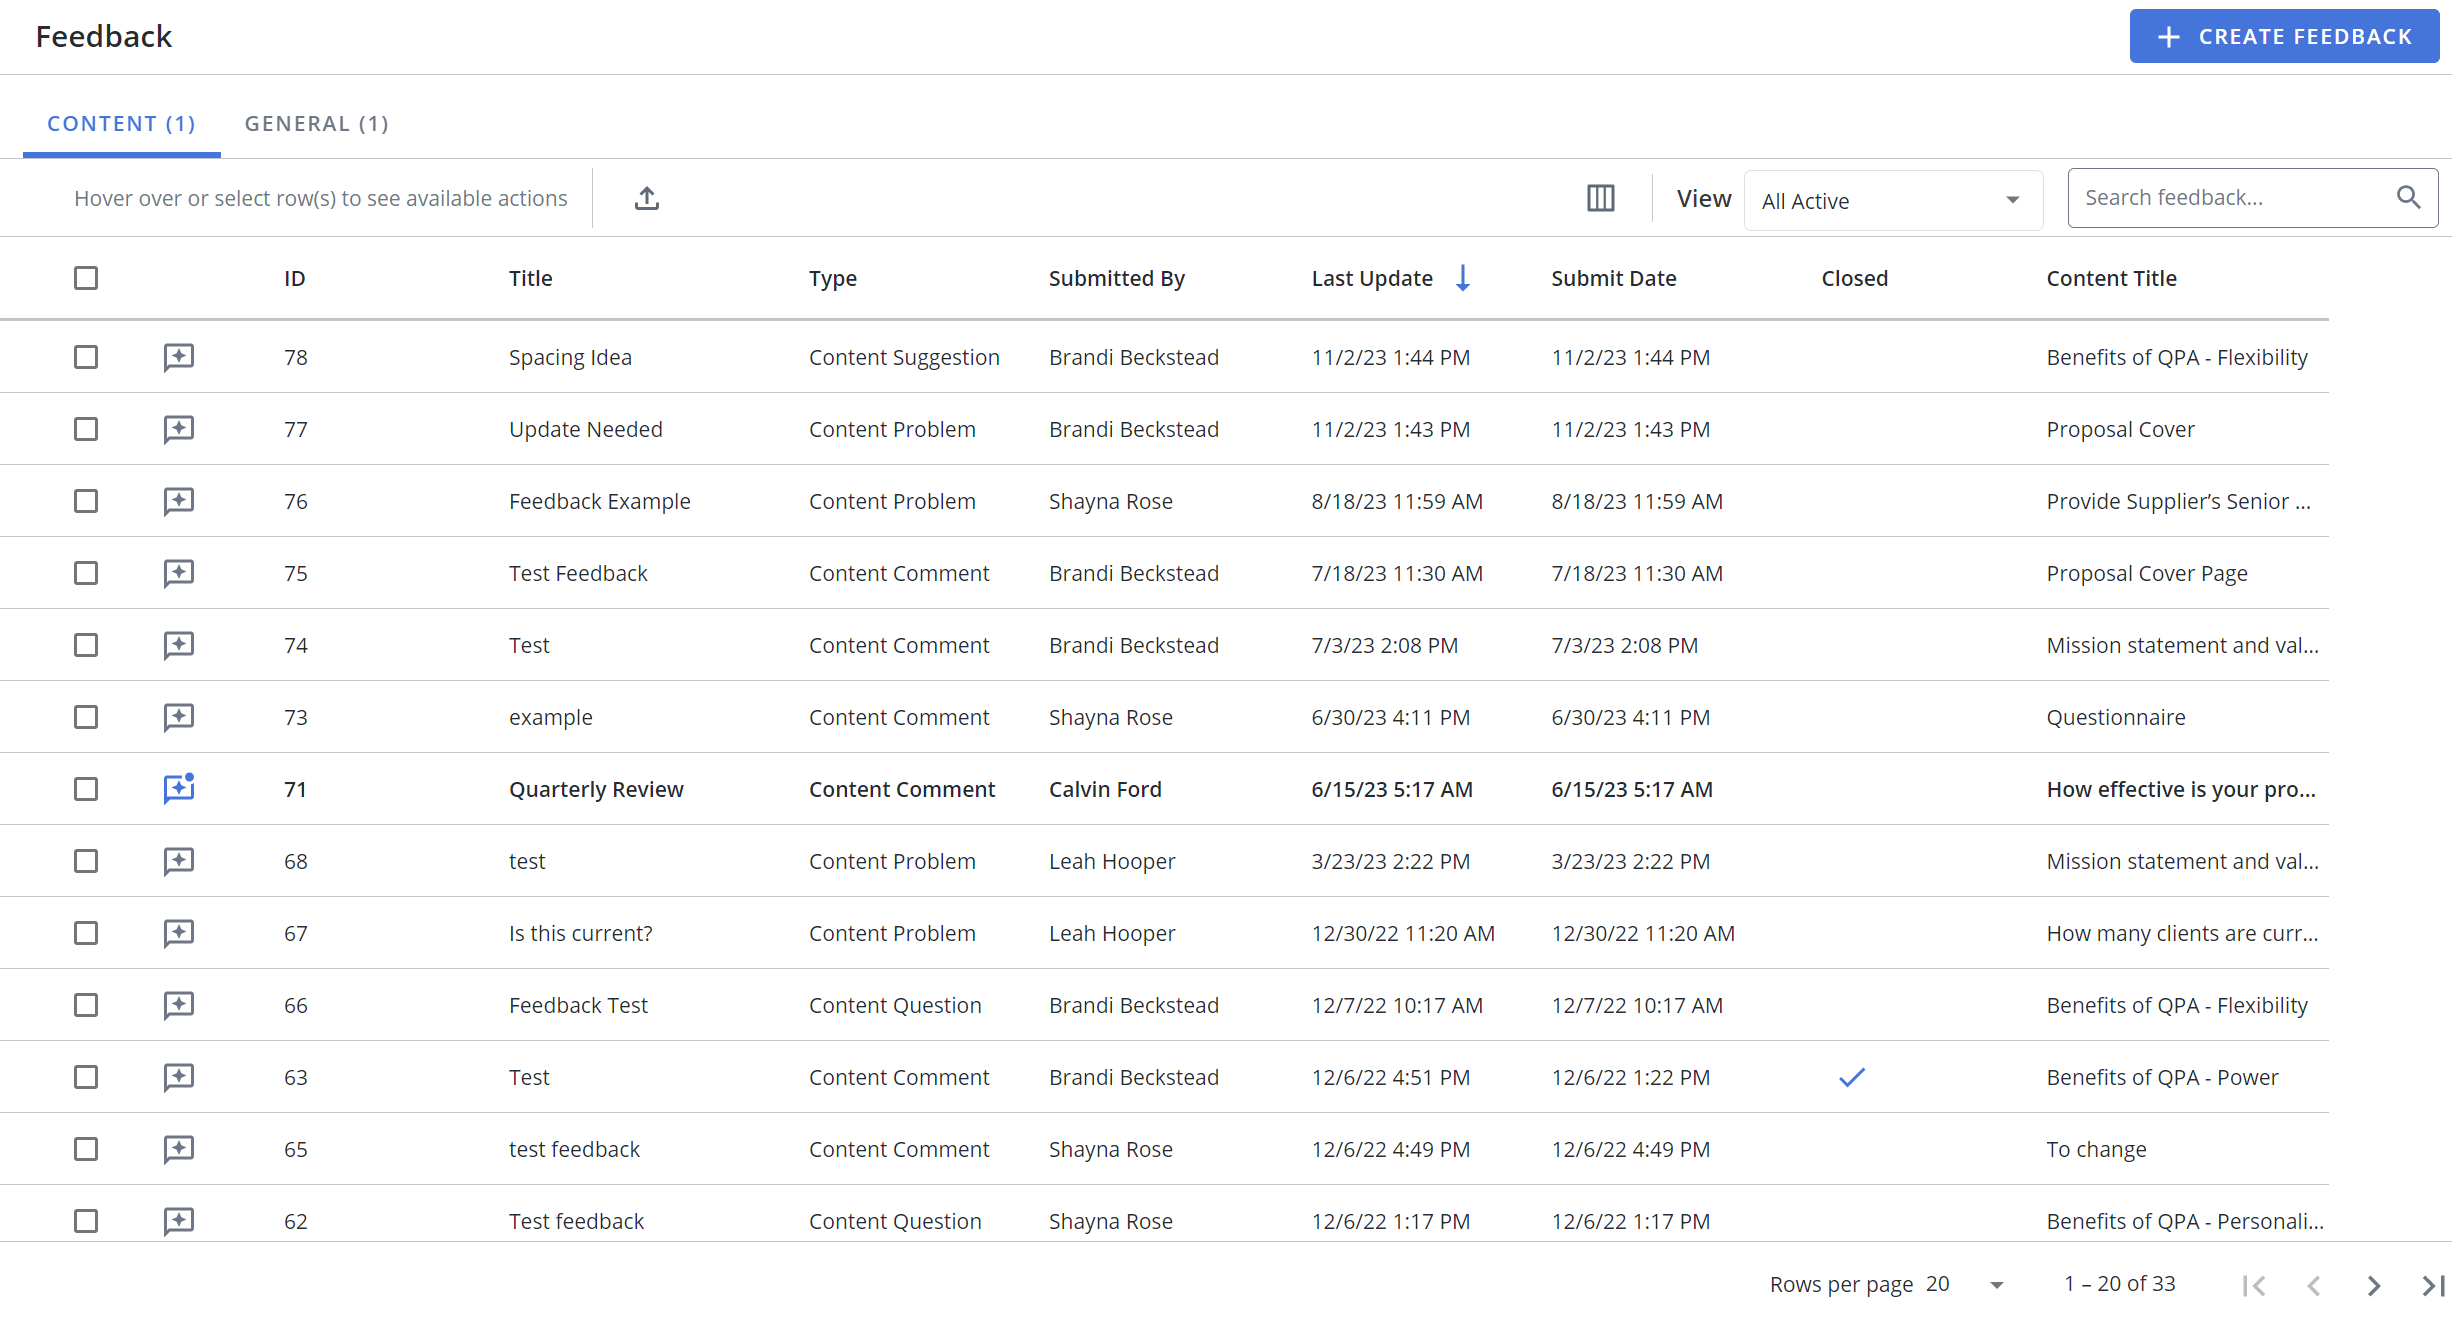
The My Work > Feedback page.
Search feedback
- To search for specific feedback, enter text into the search box at the top right of the grid, and click the Search
 icon or Enter.
 - To re-display all feedback in the grid, delete the entire entry in the box by clicking the X.
Filter the grid
Use the advanced filters to display specific feedback quickly on the grid.
- Hover over the column header until you see the
 icon appear.
 - Click to display the following dialog to set filtering parameters:
- Text Columns: Select either Contains All, Contains Any, Matches Any, Matches Exactly, Starts with, Ends with, Is Empty, Is Not Empty, or Does Not Contain from the Operator dropdown menu. The Contains All, Contains Any, Does Not Contain, and Matches Any operators allows you to enter more than one value by pressing the Enter key after each value. The Starts with and Ends with operators allow you to enter a text value to find. The Is Empty and Is Not Empty operators do not require a value.
- True/False Columns: Select either the Is True or Is False radio button.
- Numeric Columns: Select either Equals, Greater than, Less than, Greater than or equal to, Less than or equal to, Not Equal to, Between, Matches Any, Is Empty, or Not Empty from the Operator dropdown menu. The Between operator shows two fields for the starting and ending values of the range you want to find. Is Empty and Not Empty operators do not require a value. All other operators require a single value.
- Date Columns: Select either On, After, Before, Between, Is Empty, or Not Empty from the Operator dropdown menu. The Between operator shows two fields for the starting and ending dates of the range you want to find. Is Empty and Not Empty operators do not require a value. All other operators require a single value.
- Click Apply.
Tip: To clear the filter, click the  on the header, and then click Clear. You can also click out of the filter dialog to close it.
Sort columns
- To sort columns chronologically or alphabetically, click the column header name. The feedback will display in ascending order.
- To switch from ascending to descending order, click the selected column header name again.
Customize columns
You can show, hide, and order columns to display on the grid.
- Click the Customize Columns
 icon in the top right corner of the grid to display the Columns dialog. The "Manage Columns" dialog will appear.
 - To filter the column list, enter text into the Available Columns search box.
- Select your desired column(s) using the checkboxes or by clicking the rows and using CTRL+CLICK or SHIFT+CLICK to select multiple records. Select the Select All option from the More Options
 menu to enable all the columns and use the Left
  and Right
  icons to move the columns between the Available and Selected columns to determine which columns will be displayed on the grid.
 - To determine grid order: drag and drop any Selected Columns, select specific column checkboxes and use the Move to Top or Move to Bottom options from the More Options menu, or select specific column checkboxes and use the Up
 and Down
  icons to order the columns.
 - Click Restore Default to return to the default settings.
- Click Save to save the changes and close the dialog box or Cancel to close without saving changes.
Navigate pages
- At the bottom right of the grid, use the page scrolling controls (First page, Previous page, Next page, Last page) to move between pages in the grid.
Display grid rows
- At the bottom right of the grid, use the "Rows per page" dropdown menu to select the number of rows that you want to display on the grid.
Select grid rows
- Select your desired grid row(s) using the checkboxes or by clicking the rows and using CTRL+CLICK or SHIFT+CLICK to select multiple records.
View active / archived feedback
- To only view your active feedback, select My Active from the View dropdown menu.
- To only view your archived feedback, select My Archived from the View dropdown menu.
- To view all active feedback, select All Active from the View dropdown menu.
- To view all archived feedback, select All Archived from the View dropdown menu.
View "Content" or "General"
- To view content feedback, select the "Content" toggle. For more information, see the Feedback in the Content Record Details Panel page.
- To view general feedback, select the "General" toggle.
Default v Compact column mode
You can switch between the default and compact column modes. Unless updated, the grid will remain in default mode. Compact mode shortens the height of the grid rows.
- To switch between the modes, go to My Preferences within the header Profile menu and select the Default and/or Compact radio buttons.
Create general feedback
You can create general feedback from this page.
- Click the Create Feedback button. The "Create General Feedback" dialog displays.
- Click the Edit
 icon to choose which Recipients will receive the feedback. The "Edit Recipients" dialog displays.
 - Filter the list of recipients that are displayed: All, Selected, or Unselected.
- Enter text into the Type to find and manage recipients.... search field, and click the Search icon or Enter.
- Select the desired recipients by clicking their name. Once selected, the name will be highlighted blue and contain a blue checkmark. Click the recipient again to remove the recipient from the list.
- Click Done.
- Select the feedback Type from the dropdown list: Comment, Problem, Question, or Suggestion.
- Enter a Title.
- Enter any Comments.
- Upload any attachments by clicking Browse Files or dragging and dropping the desired files into the area.
- If you do not wish to receive a notification email about this feedback, select the Do not send me a notification email checkbox.
- Click Save.
Tip: New, unread feedback will display the Unread Feedback  icon.
icon.
Note: The "Use Product Feedback" User / Role permission allows users that are content consumers to submit Feedback on library content.
Export to Microsoft Excel
Once you click export, the file will automatically begin downloading. You can create an Excel report containing the grid columns on the Feedback page.
- To export a Microsoft Excel report on a particular piece of feedback: Hover over the desired row and click the Export
 icon.
icon. - To export a Microsoft Excel report on specific feedback: Select the checkboxes of the desired feedback and click the Export
 icon.
icon. - To export a Microsoft Excel report on all feedback: Click the Export icon at the top of the grid without selecting any checkboxes.
Reply to Feedback
- Hover over the desired feedback, and click the Reply
 icon. The "Reply" dialog will display.
 - Select the feedback Type from the dropdown list: Comment, Problem, Question, or Suggestion.
- Enter any Comments.
- Upload any attachments by clicking Browse Files or dragging and dropping the desired files into the area.
- Click Reply.
View Feedback Thread
- Hover over the desired feedback, and click the View Thread
 icon. The feedback thread will appear in a panel to the right of the grid.
 - To reply to the feedback thread, click the Reply button.
- To close the feedback thread, click Mark as Closed.
- Click the X to hide the feedback thread.
Note: To perform other available actions, see Feedback Actions.
Feedback Actions
Depending on the type of feedback and your permissions, different actions can be performed.
Content Feedback
This can be done if you are listed as a feedback recipient.
- Hover over the desired row and click the More Options
 menu.
menu. - Select Forward. The "Forward To" dialog displays.
- Filter the list of recipients that are displayed: All, Selected, or Unselected.
- Enter text into the Type to find and manage recipients.... search field, and click the Search icon or Enter.
- Select the desired recipients by clicking their name. Once selected, the name will be highlighted blue and contain a blue checkmark. Click the recipient again to remove the recipient from the list.
- Click Forward.
This can be done if you are listed as a feedback recipient.
- Hover over the desired row and click the More Options menu.
- Select Remove Me. The "Remove Me" dialog displays.
- Click Yes.
- Hover over the desired row and click the More Options menu.
- Select Edit Recipients. The "Edit Recipients" dialog displays.
- Filter the list of recipients that are displayed: All, Selected, or Unselected.
- Enter text into the Type to find and manage recipients.... search field, and click the Search icon
 or Enter.
 - Select the desired recipients by clicking their name. Once selected, the name will be highlighted blue and contain a blue checkmark. Click the recipient again to remove the recipient from the list.
- Click Done.
- Hover over the desired row and click the More Options menu.
- Select Content Preview.The content preview will display.
- Use the Zoom In and Zoom Out icons to view the content.
- Click the Download icon in the right corner to download the content.
- Click the Back icon in the left corner to return to the Feedback page.
- Hover over the desired row and click the More Options menu.
- Select Edit Properties.The "Edit Content Properties" page will display.
- Edit the content properties as desired. For more information, see Content Record Properties.
- Hover over the desired row and click the More Options menu.
- Select Download Content.
- Hover over the desired row and click the More Options menu.
- Select Mark As Closed.The "Mark As Closed" dialog will display.
- Click the Edit icon to choose which Recipients will be notified. The "Edit Recipients" dialog displays.
- Filter the list of recipients that are displayed: All, Selected, or Unselected.
- Enter text into the Type to find and manage recipients.... search field, and click the Search icon or Enter.
- Select the desired recipients by clicking their name. Once selected, the name will be highlighted blue and contain a blue checkmark. Click the recipient again to remove the recipient from the list.
- Click Done.
- If desired, update the feedback Type from the dropdown list: Comment, Problem, Question, or Suggestion.
- Select the Closure Reason.
- Enter any Comments.
- Upload any attachments by clicking Browse Files or dragging and dropping the desired files into the area.
- If you do not wish to receive a notification email about this feedback, select the Do not send me a notification email checkbox.
- Click Mark As Closed.
Note: Once closed, a blue checkmark will appear in the Closed grid column. Once closed, you can reopen or archive the feedback.
Unread feedback will display the Unread Feedback icon.
- Hover over the desired row and click the More Options menu.
- Select Mark As Read.
Tip: Once read, the Read Feedback  icon will display.
This can be done after a feedback thread has been closed.
- Hover over the desired row and click the More Options menu.
- Select Reopen Feedback. The "Reopen Feedback" dialog will display.
- Click the Edit icon to choose which Recipients will be notified. The "Edit Recipients" dialog displays.
- Filter the list of recipients that are displayed: All, Selected, or Unselected.
- Enter text into the Type to find and manage recipients.... search field, and click the Search icon or Enter.
- Select the desired recipients by clicking their name. Once selected, the name will be highlighted blue and contain a blue checkmark. Click the recipient again to remove the recipient from the list.
- Click Done.
- If desired, update the feedback Type from the dropdown list: Comment, Problem, Question, or Suggestion.
- Enter a Title.
- Enter any Comments.
- Upload any attachments by clicking Browse Files or dragging and dropping the desired files into the area.
- If you do not wish to receive a notification email about this feedback, select the Do not send me a notification email checkbox.
- Click Submit.
This can be done after a feedback thread has been closed.
- Hover over the desired row and click the More Options menu.
- Select Archive.
Note: The feedback thread will be visible in the "All / My Archived" view.
- Hover over the desired row and click the More Options menu.
- Select Delete. The "Confirm Deletion" dialog will display.
- Click Delete.
General Feedback
This can be done if you are listed as a feedback recipient.
- Hover over the desired row and click the More Options menu.
- Select Forward. The "Forward To" dialog displays.
- Filter the list of recipients that are displayed: All, Selected, or Unselected.
- Enter text into the Type to find and manage recipients.... search field, and click the Search icon or Enter.
- Select the desired recipients by clicking their name. Once selected, the name will be highlighted blue and contain a blue checkmark. Click the recipient again to remove the recipient from the list.
- Click Forward.
This can be done if you are listed as a feedback recipient.
- Hover over the desired row and click the More Options menu.
- Select Remove Me. The "Remove Me" dialog displays.
- Click Yes.
- Hover over the desired row and click the More Options menu.
- Select Edit Recipients. The "Edit Recipients" dialog displays.
- Filter the list of recipients that are displayed: All, Selected, or Unselected.
- Enter text into the Type to find and manage recipients.... search field, and click the Search icon or Enter.
- Select the desired recipients by clicking their name. Once selected, the name will be highlighted blue and contain a blue checkmark. Click the recipient again to remove the recipient from the list.
- Click Done.
- Hover over the desired row and click the More Options menu.
- Select Mark As Closed.The "Mark As Closed" dialog will display.
- Click the Edit icon to choose which Recipients will be notified. The "Edit Recipients" dialog displays.
- Filter the list of recipients that are displayed: All, Selected, or Unselected.
- Enter text into the Type to find and manage recipients.... search field, and click the Search icon or Enter.
- Select the desired recipients by clicking their name. Once selected, the name will be highlighted blue and contain a blue checkmark. Click the recipient again to remove the recipient from the list.
- Click Done.
- If desired, update the feedback Type from the dropdown list: Comment, Problem, Question, or Suggestion.
- Select the Closure Reason.
- Enter any Comments.
- Upload any attachments by clicking Browse Files or dragging and dropping the desired files into the area.
- If you do not wish to receive a notification email about this feedback, select the Do not send me a notification email checkbox.
- Click Mark As Closed.
Note: Once closed, a blue checkmark will appear in the Closed grid column. Once closed, you can reopen or archive the feedback.
Unread feedback will display the Unread Feedback icon.
- Hover over the desired row and click the More Options menu.
- Select Mark As Read.
Tip: Once read, the Read Feedback icon will display.
This can be done after a feedback thread has been closed.
- Hover over the desired row and click the More Options menu.
- Select Reopen Feedback. The "Reopen Feedback" dialog will display.
- Click the Edit icon to choose which Recipients will be notified. The "Edit Recipients" dialog displays.
- Filter the list of recipients that are displayed: All, Selected, or Unselected.
- Enter text into the Type to find and manage recipients.... search field, and click the Search icon or Enter.
- Select the desired recipients by clicking their name. Once selected, the name will be highlighted blue and contain a blue checkmark. Click the recipient again to remove the recipient from the list.
- Click Done.
- If desired, update the feedback Type from the dropdown list: Comment, Problem, Question, or Suggestion.
- Enter a Title.
- Enter any Comments.
- Upload any attachments by clicking Browse Files or dragging and dropping the desired files into the area.
- If you do not wish to receive a notification email about this feedback, select the Do not send me a notification email checkbox.
- Click Submit.
This can be done after a feedback thread has been closed.
- Hover over the desired row and click the More Options menu.
- Select Archive.
Note: The feedback thread will be visible in the "All / My Archived" view.
- Hover over the desired row and click the More Options menu.
- Select Delete. The "Confirm Deletion" dialog will display.
- Click Delete.