SME Jobs
The Jobs page displays the Individual Files or Composite jobs that have been sent to a SME. The SME Job will contain its content records, and the Composite job will display its single document. As an approver, you can work with the job on the grid or open the job to work with its content records. When a job and all its content records are ready for review, the Completed column will be checked. You can view your jobs in the SME panel on the Home page, which displays the most recent jobs, or the Jobs page, which displays all jobs . To access the Jobs page, click the My Work  icon and then select My SME Jobs.
You can send an email of one or more content records to a SME for editing. The recipient does not have to be a licensed Upland Qvidian user to view or edit the job via email. When the SME clicks the link, the SME Edit page displays the records. The SME edits the records and then returns it. Once returned, the record is moved here to be approved, rejected, or edited. When the selected content records are sent, they are Checked Out in the library. When the records are approved here, they will be checked back in.
SME Jobs Page
Note: The SME Jobs, My Expired Content, All Expired Content, My Expiring Content, All Expiring Content, and Submitted Content options within My Work are hidden from users who do not have the "Allow user to see features related to content management" permission granted.
Search jobs
- To search for a review job, enter text into the search box at the top right of the grid, and click the Search
 icon or Enter.
 - To re-display all records in the grid, delete the entire entry in the box by clicking the X.
Filter the grid
Use the advanced filters to display specific records quickly on the grid.
- Hover over the column header until you see the Filter
 icon appear.
 -
Click the Filter
icon to display the following dialog to set filtering parameters:- Text Columns: Select either Contains All, Contains Any, Matches Any, Matches Exactly, Starts with, Ends with, Is Empty, Is Not Empty, or Does Not Contain from the Operator dropdown menu. The Contains All, Contains Any, Does Not Contain, and Matches Any operators allows you to enter more than one value by pressing the Enter key after each value. The Starts with and Ends with operators allow you to enter a text value to find. The Is Empty and Is Not Empty operators do not require a value.
- True/False Columns: Select either the Is True or Is False radio button.
- Numeric Columns: Select either Equals, Greater than, Less than, Greater than or equal to, Less than or equal to, Not Equal to, Between, Matches Any, Is Empty, or Not Empty from the Operator dropdown menu. The Between operator shows two fields for the starting and ending values of the range you want to find. Is Empty and Not Empty operators do not require a value. All other operators require a single value.
- Date Columns: Select either On, After, Before, Between, Is Empty, or Not Empty from the Operator dropdown menu. The Between operator shows two fields for the starting and ending dates of the range you want to find. Is Empty and Not Empty operators do not require a value. All other operators require a single value.
- Click Apply.
Tip: To clear the filter, click the Clear Filter  icon in the header, and then click Clear. You can also click out of the filter dialog to close it.
Sort columns
- To sort columns chronologically or alphabetically, click the column header name. The records will display in ascending order.
- To switch from ascending to descending order, click the selected column header name again.
Customize columns
You can show, hide, and order columns to display on the grid.
- Click the Customize Columns
 icon in the top right corner of the grid to display the Columns dialog. The "Manage Columns" dialog will appear.
 - To filter the column list, enter text into the Available Columns search box.
- Select your desired column(s) using the checkboxes or by clicking the rows and using CTRL+CLICK or SHIFT+CLICK to select multiple records. Select the Select All option from the More Options
 menu to enable all the columns and use the Left
  and Right
  icons to move the columns between the Available and Selected columns to determine which columns will be displayed on the grid.
 - To determine grid order: drag and drop any Selected Columns, select specific column checkboxes and use the Move to Top or Move to Bottom options from the More Options menu, or select specific column checkboxes and use the Up
 and Down
  icons to order the columns.
 - Click Restore Default to return to the default settings.
- Click Save to save the changes and close the dialog box or Cancel to close without saving changes.
Note: The "Files Complete" column for a job displays how many content records have been completed (for example, 4 of 4 Files Complete).
Navigate pages
- At the bottom right of the grid, use the page scrolling controls (First page, Previous page, Next page, Last page) to move between pages of records in the grid.
Display grid rows
- At the bottom right of the grid, use the "Rows per page" dropdown menu to select the number of rows that you want to display on the grid.
Select grid rows
- Select your desired grid row(s) using the checkboxes or by clicking the rows and using CTRL+CLICK or SHIFT+CLICK to select multiple records.
View in progress / ready jobs
- To only view in progress review jobs , select In Progress from the View dropdown menu.
- To only view ready review jobs, select Ready from the View dropdown menu.
- To view both in progress and ready review jobs, select Both from the View dropdown menu.
View "My Jobs" or "All Jobs"
- To only view your jobs, select the "My Jobs" toggle.
- To view all jobs, select the "All Jobs" toggle.
Default v Compact column mode
You can switch between the default and compact column modes. Unless updated, the grid will remain in default mode. Compact mode shortens the height of the grid rows.
- To switch between the modes, go to My Preferences within the header Profile menu and select the Default and/or Compact radio buttons.
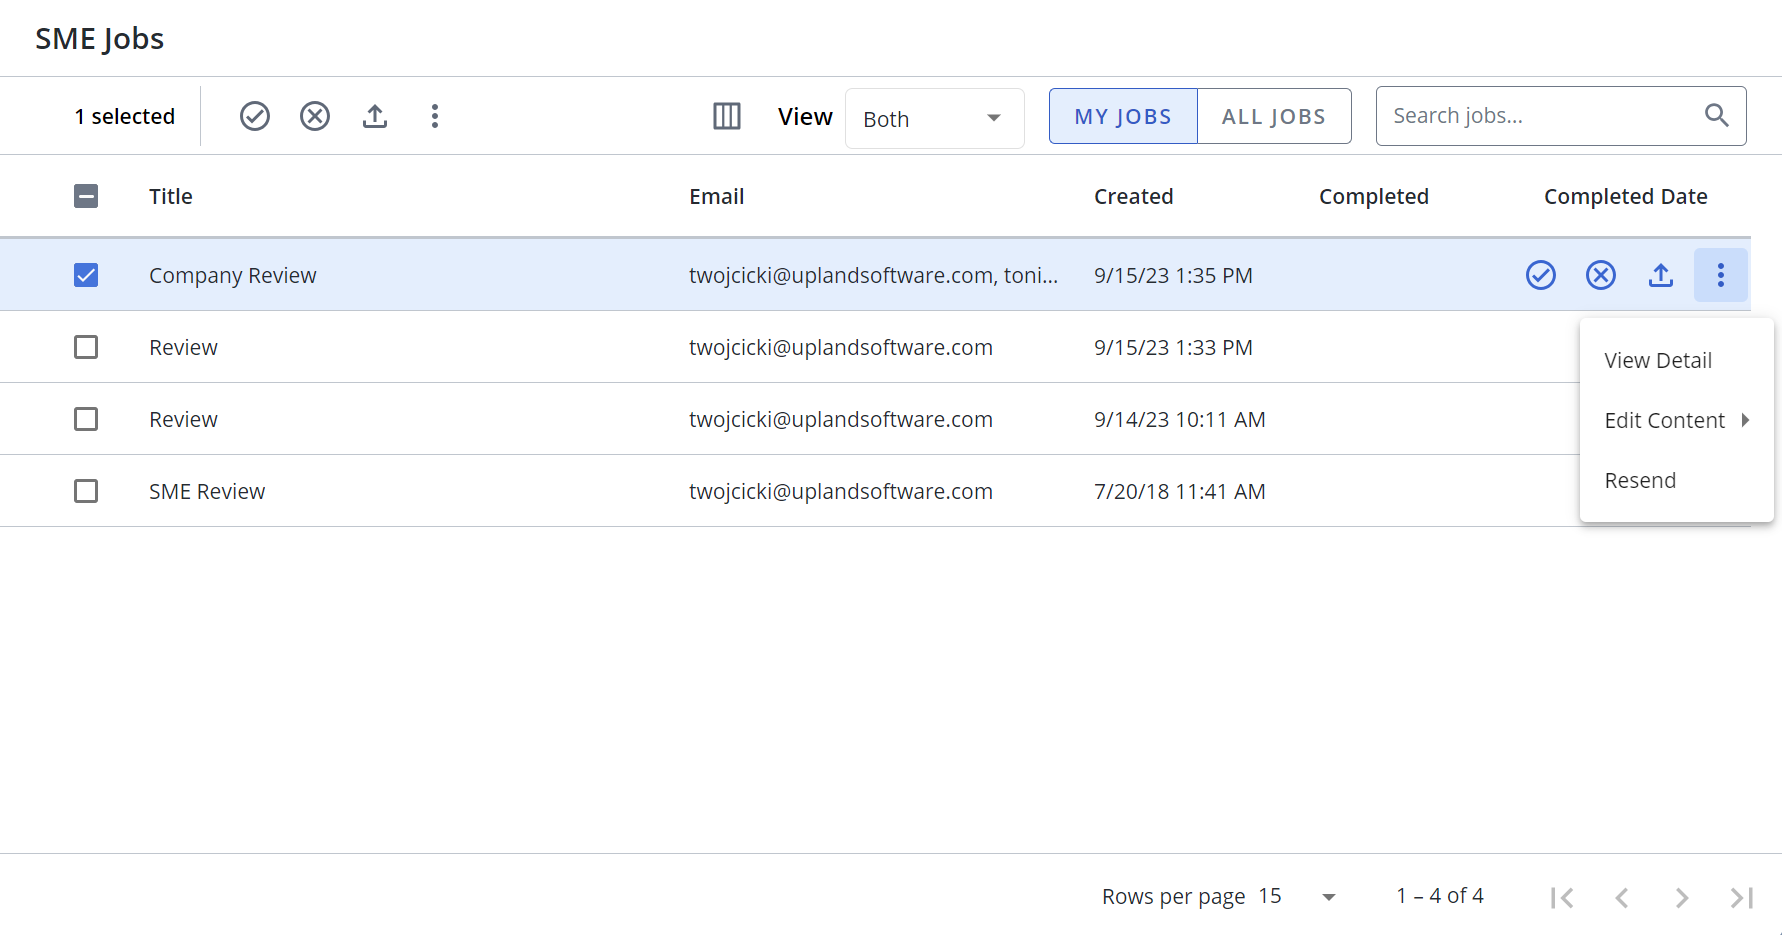
Open a job
To open an individual job and work with its content records:
- Double-click the desired row in the SME Jobs grid.
- Hover over the desired review job, click the More Options
 menu, and select View Detail.
Tip: This is most useful when individual content records are returned for review from an SME and you want to work on them one at a time. For more information on working with Jobs, see Work with SME jobs.
Edit Content
- Hover over the desired review job, click the More Options menu, and select Edit Content > Advanced Edit. The "Edit Content" dialog will appear.
- Select one of the following Edit Options:
- Edit in Word: This opens the selected record(s) in a single Microsoft Word document. Incremental changes will be saved when you click the "Save" button in Word and will be finalized when you close the document.
- Edit in Office for the Web: This opens the selected record(s) in a single document in Office for the Web. Incremental changes will automatically be saved and will be finalized when you close the document.
- Choose your Sorting Options:
- Select one of the Sort by options: Content ID, Content Title, Content Type, Date Created, Date Last Modified, Date Last Used, Date Expires, Display Order, Folder Name, or Times Used Counter.
- Choose whether to sort in Ascending or Descending order.
- Select any of the following Page Break Options:
- Include a page break between content to preserve section formatting
- Include a page break between properties and content
- (Optional) Select the Disable content while checked out checkbox to disable any content when it is being edited. This content will be re-enabled on "Save" or "Cancel".
- (Optional) Select any of the following Include Properties checkboxes for the content: Alert Enabled, Alert Message, Comments, Contact Info, Date Expires. The "Content Title" property will always be included.
- Click Edit to apply your changes.
Note: The legacy Qvidian Legacy add-ins for Microsoft Office toolbar does not work with the current SME Job functionality.
Cancel Checkout
Content managers can cancel the edit by the SMEs.
- Hover over the desired review job.
- Click the More Options menu.
- Select Edit Content > Cancel Checkout.
Resend
Resend allows you to send a reminder to someone or send the job to a different SME.
- Hover over the desired review job, click the More Options menu, and select Resend.
- Enter the email address of the SME in the To field.
- Enter the Subject of the email.
- Enter the Body of the email. Do not edit the <<SMEUrl>> code. The code is used to provide access to the files via URL.
- Click Send. The email is sent to the SME and the sent records will display on the Jobs page so you can reference and monitor this activity.
Note: If you re-send the email to yourself, you must ensure that Upland Qvidian is closed before clicking the URL to open the records on the Edit SME page.
Approve
You can approve the jobs containing all content records that have been completed by SMEs. Once these jobs are approved, they are promoted back to their library folders along with any property changes that may have been applied. Once a job is approved, it is removed from the grid.
- To approve a single review job: Hover over the desired job and click the Approve
 icon.
icon. - To approve multiple review jobs: Select the desired job checkboxes and click the Approve
 icon at the top of the page.
 - To approve all review jobs: Select the checkbox at the top of the grid column and click the Approve icon at the top of the page.
Note: The "Files Complete" column on the grid indicates how many content records have been completed (for example, 4 of 4 Files Complete).
Reject
You can reject the jobs containing all content records. Once these jobs are rejected, they are removed from the grid. The reviewer will not be notified of the rejection and all their edits will be lost.
- To reject a single review job: Hover over the desired job and click the Reject
 icon.
icon. - To reject multiple review jobs: Select the desired job checkboxes and click the Reject
 icon at the top of the page.
 - To reject all review jobs: Select the checkbox at the top of the grid column and click the Reject icon at the top of the page.
Export to Microsoft Excel
Once you click export, the file will automatically begin downloading. You can create an Excel report containing the grid columns on the SME Jobs page.
- To export a Microsoft Excel report on one job: Hover over the desired job and click the Export
 icon.
icon. - To export a Microsoft Excel report on specific jobs: Select the checkboxes of the desired users and click the Export
 icon.
icon. - To export a Microsoft Excel report on all jobs: Click the Export icon at the top of the grid without selecting any checkboxes.