Navigating the Dashboard - Messages
To learn more about Messages, watch the demo video here.
The message ticker shows your ten most recent feedback messages, one at a time across the top of the Dashboard. This section can be relocated within the dashboard when you click and drag the  icon.
icon.

Select the Messages tab to view your messages in a table with information about each piece of feedback.

To apply additional filters to the message panel, click the Filters button. The filters applied here will also be reflected on the dashboard and displays on the top of the page.
Select the![]() icon next to an item of feedback. This opens a feedback options menu, where you can:
icon next to an item of feedback. This opens a feedback options menu, where you can:
Note: Users must have Recover module in order to create or view recover tasks within this menu.
-
Create a task - This takes you to the Recover page
-
Delete the feedback
-
Tune analysis - Open a message summary that allows you to view and tune your feedback
-
View recover task - This takes you to the Recover page
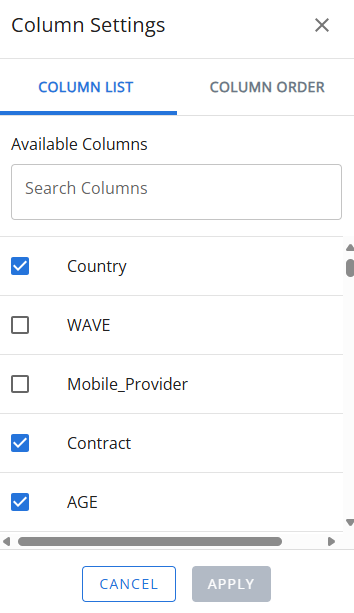
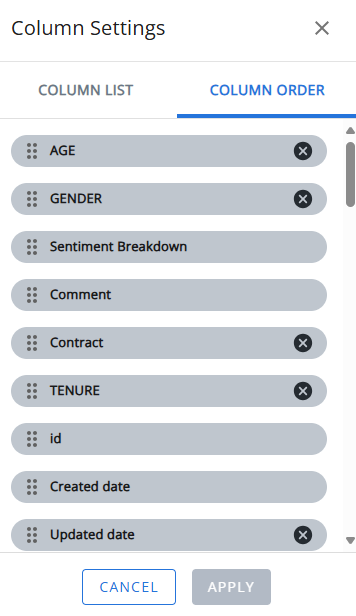
Configure Columns
Users can configure which columns are displayed and also determine their order.
-
Click on the
 icon to open the Column Settings panel.
 -
In the Column List tab, select or deselect the checkboxes to include or exclude specific columns.
-
In the Column Order tab, drag and drop the columns to rearrange the columns in the desired order for display in the message panel.
-
To remove a column, click the X icon next to the column name.
-
Click Apply to save the changes.
Export Messages
Messages can be exported to an Excel file for a selected date range, including all configured columns.
Tip: For best results, ensure all columns are configured before exporting the messages.
-
Click on the
 icon in the messages panel.
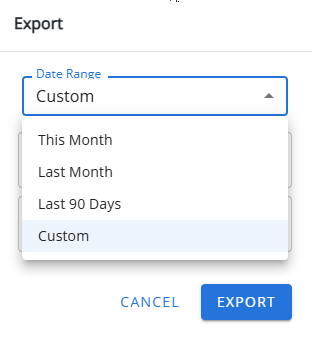
-
In the Date Range drop-down, select one of the following:
-
This Month - Export messages from the current month
-
Last month - Export messages from the previous month
-
Last 90 Days - Export messages from the past 90 days
-
Custom - Specify a start and end date
-
-
Click Export to download the file.
Message summary
Click on each piece of feedback to open the message summary panel on the right side of the screen.
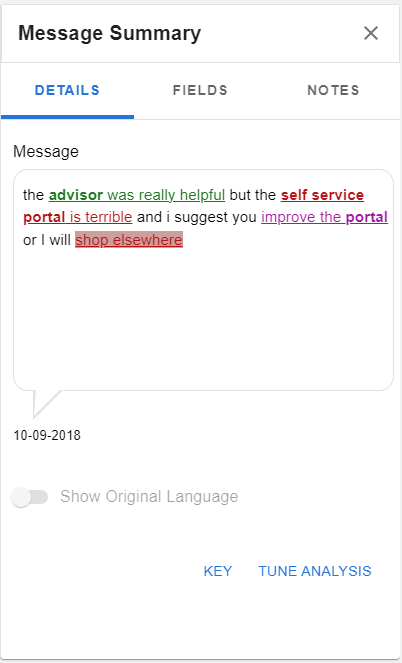
Details Tab
The details tab displays the feedback verbatim with color-coded highlights.
-
Neutral insights are blue and bold
-
Positive insights are green and bold
-
Negative insights are red and bold
-
Mixed insights are multi-coloured and bold
-
Ambiguous insights are yellow and bold
-
Business and legal threats are red with a red highlight/background
-
Suggestions and requests are purple and bold
Selecting a highlighted item will filter for messages with similar topics.
Tip: Selecting the key button at the bottom of the pane opens a window with a detailed description of each type of highlight.
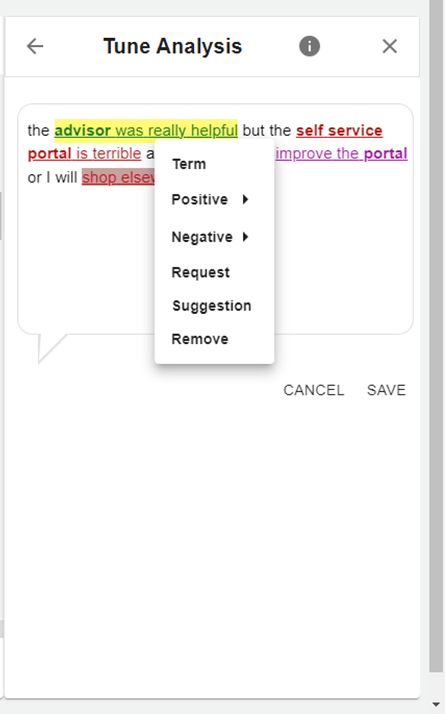
From the message tab, you can also tune your analysis. If you review a message and notice a sentiment is incorrectly categorized or a topic is missing, you can edit the categorization by pressing the Tune Analysis button in the message summary or selecting Tune Analysis from the feedback options menu.
Tip: Tuning is intended for infrequent edits to your message sentiment. If you find you need to make regular edits, you should review and update your taxonomy.
Selecting either option opens the tune analysis pane.
Note: In the past, Upland maintained profiles to limit TuneAnalysis updates. However, in Dashboard 2.0, profiles are no longer utilized to manage these settings, allowing all users to make changes.
-
Select a word or phrase in your feedback you wish to recategorize.
-
Items that are already categorized will be color-coded as per the message summary, e.g. green indicates a positive sentiment.
-
Items that are not yet categorized will appear as black text.
-
-
Select an option from the drop-down menu.
-
Term
-
Positive - change the sentiment of a topic to either positive or very positive
-
Negative - change the sentiment of a topic to either negative or very negative
-
Request
-
Suggestion
-
-
Click Save to save your changes.
Fields Tab
The fields tab provides a list of fields relating to the message, e.g. sentiment score, session ID, etc.
You can use the search function to filter and find fields. The list updates as you type.
Note: In the past, Upland maintained profiles to limit metadata field updates. However, in Dashboard 2.0, profiles are no longer utilized to manage these settings, allowing all users to make changes.

To edit a field's content, e.g. correct an error in contact details:
-
Select the pencil icon next to the field that needs updating.
-
Overwrite the content in the text box.
-
Click Save to save your changes.
Note: You can only edit structured fields, e.g. the agent ID linked to the message.
Notes Tab
The Notes tab displays all notes captured for the message. Click on each note to view details such as who added the note and when it was added.
You can sort the notes in ascending or descending order by selecting the Sort icon.
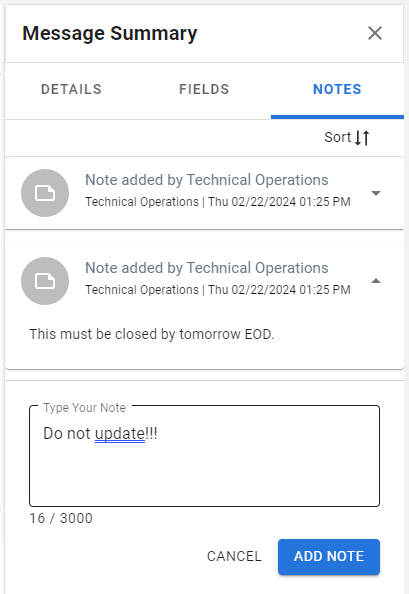
To add a note:
-
Click on + Note button.
-
Type you note.
-
Click Add Note to save the changes.