Recover
Each item of feedback that requires action (task) can be assigned to a team member for resolution.
Note: The Recover module is an additional module that is available for Fast Feedback.
If you have access to the Recover module:
-
From the menu bar at the bottom of the Fast Feedback Dashboard, click Recover.
The Recover page opens.

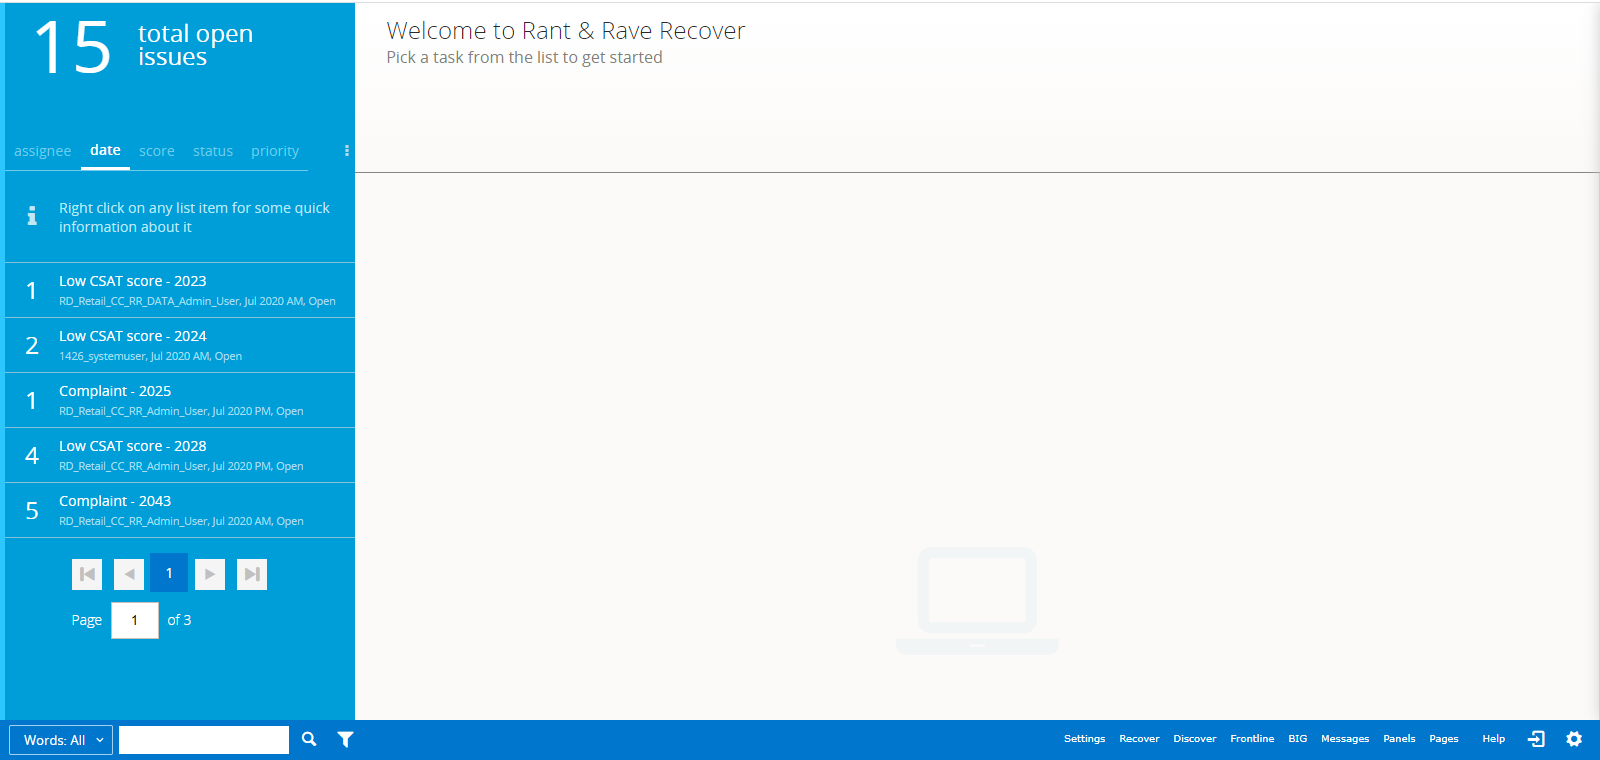
The left pane contains the Info pane and the task list.
The following key statistics scroll across the top of the Info pane:
- The total number of tasks (of all types) visible in the task list
- The total number of open tasks
-
The total number of high priority tasks
You can browse through the tasks using page navigation buttons below the list.
The blue menu bar at the bottom of the page contains the Fast Feedback search and filter options and access to settings, additional modules, and other menu options.
The Recover settings determine the actions you can take. For more information, see Managing Recover module settings.
-
You can do the following:
Sorting and filtering tasks
You can prioritise the order in which you need to communicate with your customers—or which tasks are handled first. For example, you might prioritise the age of a task over the Sentiment score.
When you open the Recover page, the task list opens in the left pane in order by due date (that is, the date by which the task should be resolved).
Note: Tasks with a high priority are marked with a white exclamation icon.
You can sort the list by the options in the menu bar above the task list.
From the Recover page:
-
To sort the task list, select an option from the menu bar:
- assignee sorts the tasks in alphabetical order by the name of the person who is progressing the task.
- date (default) sorts the tasks by due date.
- score sorts the tasks by sentiment score, which appears in the left column.
- status sorts the tasks by status, in the following order: Open, In Progress, Closed, and Reopened.
- priority sorts the tasks by priority, in the following order: High, Medium, and Low.
- To reverse the sort order, click the option in the menu bar again.
-
To filter the task list to restrict the number of tasks displayed, click the menu (
 ) button at the end of the menu bar, and then select a filter:
- To show only the tasks assigned to you, click only mine.
-
To show only the tasks that match the filters currently applied to the Fast Feedback Dashboard, click use filters.
-
To remove tasks with Closed status from the current view, click hide closed.
Note: Selected filters are highlighted. You can apply more than one filter to the task list.
-
To remove a filter, click it again.
The filter is no longer highlighted.
Viewing task details
When you open the Recover page, the task list opens in the left pane in order by due date (that is, the date by which the task should be resolved).
From the Recover page:
-
View the task list in the left pane. The task descriptions include the Sentiment score in the left column and, in right column, the task title, assignee who is progressing the task, and task status.
Note: Tasks with a high priority are marked with a white exclamation icon.
-
To view additional details for a task, right-click the task description.

The task description includes the communication channel used to submit the feedback, due date, status, and priority.
- To return to the full description, right-click the task again.
-
To show the full details of a task, click the task description.

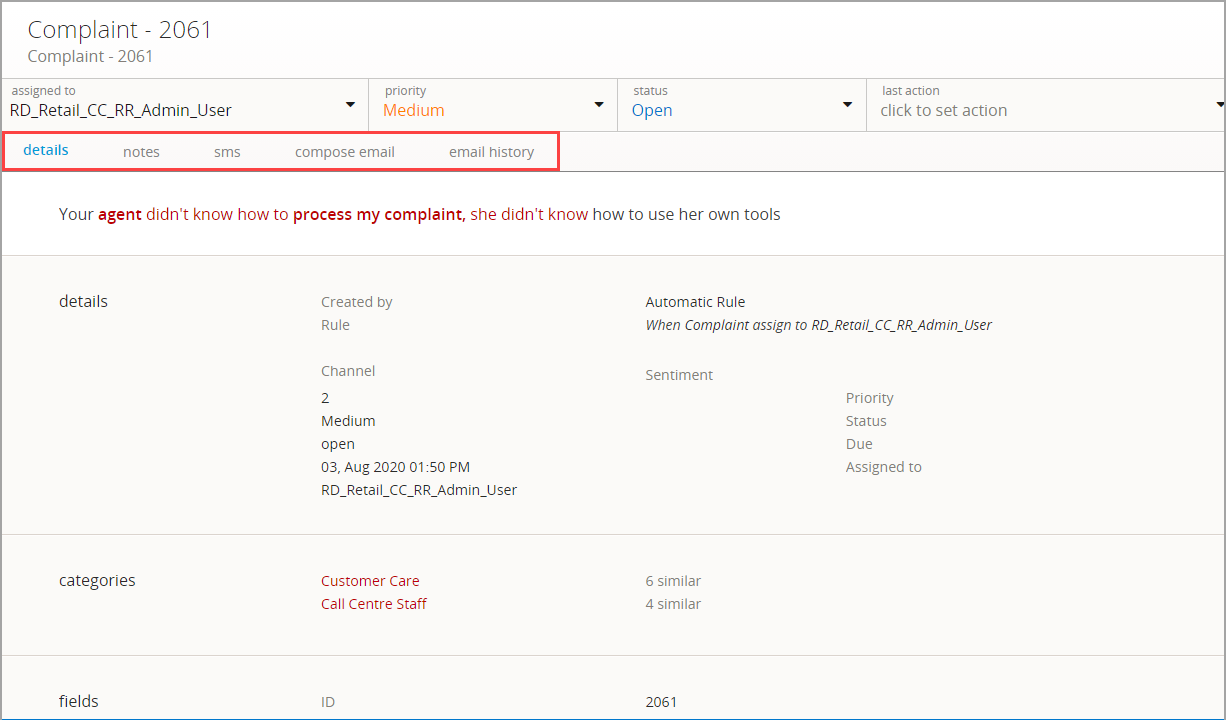
The task description opens to the details tab, which includes:
- The task title at the top of the page.
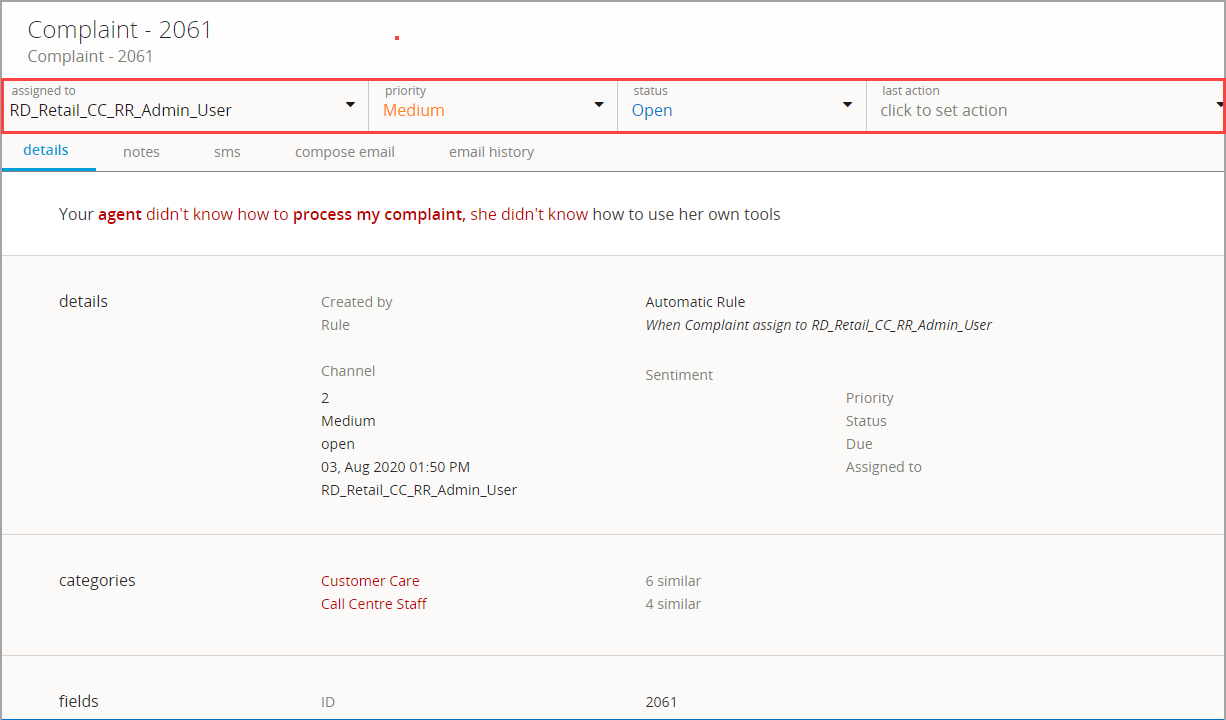
- Drop-down lists, where you can change the assignee, priority, status, and last action at the top of the page.
- The task tabs with the view options.
- The feedback item (verbatim) appears.
- The full details of the task, including the verbatim analysis and the structured fields.
Adding a note to a task
You may want to add notes about the task that are not directly linked to an interaction with the customer. For example, you may want to say that you tried to call them back or sent a voucher code.
Notes are also automatically generated by the Recover module, so you can review how a task is progressing.
From the Recover page:
-
To open a task, click the task description in the left pane.
The task description opens to the details tab.

-
To view a list of notes related to the task, click the notes tab.
You see a list of all the actions associated with the task, starting with the most recent note. This includes notes written by users and system-generated notes automatically added by the Recover module.
-
To remove system-generated notes from the list, click hide system notes.
Notes added by users remain in the list.
To restore system-generated notes to the list, click hide system notes again.
-
To add a note, enter your note in the write a note field, and then click Add note.
The note is added to the top of the notes page, which includes the name of the author and the time and date when the note was created.
Assigning tasks to other members of your team
If you have a role with sufficient permissions, such as Team Leader or Manager, you can assign a selected task to another user from within your team. The new assignee is automatically sent an email containing the title of the task, and who it was assigned by.
The Recover settings determine the rules for assigning feedback to users. For more information, see Managing rules for assigning feedback.
From the Recover page:
-
In the left pane, click the description of the task you want to reassign.
The task description opens to the details tab.
-
Review the details of the task.

-
From the drop-down lists at the top of the page, click the assigned to arrow and select a team member from the drop-down list.
The task is automatically updated.
-
To review, click the notes tab.
The most recent note, at the top of the list, is a system-generated note confirming the new assignee for the task.
Changing the priority of a task
You can change the priority (low, medium, or high) of a task to represent the level of urgency and importance.
From the Recover page:
-
In the left pane, click the description of the task you want to reprioritise.
The task description opens to the details tab.
-
Review the details of the task.

-
From the drop-down lists at the top of the page, click the priority arrow and select Low, Medium, or High from the drop-down list.
The task is automatically updated.
-
To review, click the notes tab.
The most recent note, at the top of the list, is a system-generated note confirming the new level of priority for the task.
Changing the status of a task
Once you have opened a task, you will want to track its progress and keep its status up to date. For example, you may wish to close a resolved task or re-open one that was previously closed.
From the Recover page:
-
In the left pane, click the description of the task you want to update.
The task description opens to the details tab.
-
Review the details of the task.

-
From the drop-down lists at the top of the page, click the status arrow and select Open, In Progress, Closed, or Reopened from the drop-down list.
The task is automatically updated.
-
To review, click the notes tab.
The most recent note, at the top of the list, is a system-generated note confirming the new status for the task.
Changing the last action of a task
You can change the last action of a task (for example, Sent to Legal team, or Referred to Region Manager) in order to show that certain processes are being followed (or for auditing purposes).
Note: These actions are segmented by team, so each team is presented with only the actions that are relevant to their role.
For information on defining the stages that items of feedback must pass through before being resolved, see Creating Recover action list steps.
From the Recover page:
-
In the left pane, click the description of the task for which you want to change the last action.
The task description opens to the details tab.
-
Review the details of the task.

-
From the drop-down lists at the top of the page, click the last action arrow and select an action from the drop-down list.
The task is automatically updated.
-
To review, click the notes tab.
The most recent note, at the top of the list, is a system-generated note confirming the new last action for the task.
Responding to feedback
If the feedback that is assigned to you contains a valid mobile phone number or email address, you can send a reply using the appropriate channel.
Note: You cannot respond to feedback unless it is assigned to you.
From the Recover page:
-
In the left pane, click the description of the task for which you want to sent a response.
The task description opens to the details tab.
-
Review the details of the task.

-
You can respond by SMS text or email:
-
To respond to the feedback via SMS text message, click the sms tab.
If the task does not contain a mobile phone number, you will see a message that you cannot send an sms message. Try sending an email.
Enter your response in the message field, and then click Send SMS.
-
To respond to the feedback via email, click the email history tab to review any previous communications, stating with the most recent messages. When you are ready to send your message, click compose email.
If the task does not contain an email address, you will see a message that you cannot send an sms message. Try sending an sms.
Tip: You can create email templates for routine or frequently used messages.
Fill in the email form, in plain text only, and then click Send email.
-
Manually creating a task
You can create a Recover task from an item of feedback that can then be assigned to a user for action.
From the Fast Feedback Dashboard:
-
Click Messages in the main panel.
In the messages panel, each row represents a message.
- Select the message to which you want to add a task.
-
From the Message Summary box, click More.
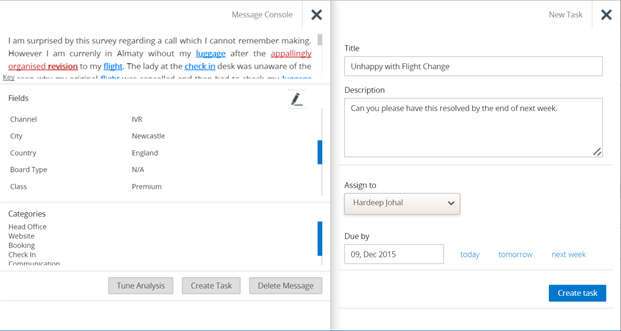
The Message Console contains detailed information about the selected customer message. If the message does not have a task assigned to it, you can create one.
-
Click Create Task.
The New Task form opens on the right:

- Fill in the following information:
Title: Enter a high-level summary of the task.
Description: Provide additional detail instructions for the task
Assignee: Select a team member from the drop-down list.
- Due Date: Specify the deadline when the task should be completed:
- Click the Due by field and select a date from the calendar.
- Click today to fill in today's date.
- Click tomorrow to fill in tomorrow's date.
- Click next week to fill in the date one week from today.
-
When you are done, click Create task.
The task is created and the Recover module opens.