Note: Upland Software has made the decision to discontinue Rant & Rave’s Proactive Communications (Pro Comms) solution. We will continue to support all current Pro Comms functionality for customers with active agreements until our End-of-Support date, December 31, 2023.
Customers will be given the option to use a new Messaging API solution that will enable a more modern and robust messaging capability for our customers. Please contact your Customer Support Manager if you require more information.
Lists are a way of managing a group of contacts that you want to repeatedly send messages to. For example, at the end of each quarter, you may want to invite all managers to give feedback on the performance or their team.
It is possible to combine lists with text templates to inform certain people of specific information.
Creating a contact list
You can create a list of contacts manually without having to export them from an existing Proactive Communication contact database.
All named recipients must be in the contact database before they can be added to a distribution list. If your contact(s) are not in the database, see Adding a person.
From the Proactive Communication home page:
- Click Lists in the left pane.
-
Click Create/Update Lists.
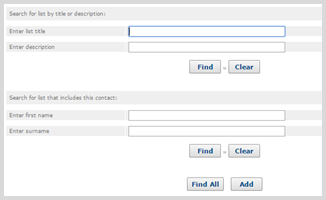
You see the list search screen.

-
Click Add.
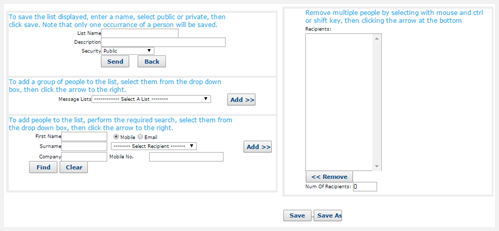
You see the contact list form.

- Fill in the following fields:
List Name: Enter a unique name for the list.
Description: Provide a brief description.
Security: Select an option from the drop-down list.
- Private to Self: Only the user who created the list can see it.
- Private to Group: Any user in your company can see it.
- Public: Any user with access to your company can see it.
-
Enter the search criteria for each contact to add to the list:
-
First Name
-
Surname
-
(Optional) Company
-
-
To locate the contact in the contact database, click Find.
If the contact is located, they are added to the drop-down list on the right.
-
Select a contact name from the drop-down list, and click Add to move the name to the Recipients list in the right pane.
- Continue adding contacts to the list, until it is complete.
-
When you are done, click Save.
You see a confirmation screen.

- Click Continue.
Importing a contact list
Importing a contact list lets you provide Rant & Rave with a set of relevant business contacts drawn from your contact management database.
Before you begin, create a CSV (comma-separated values) file with the list of contact telephone numbers and names, in the following format:
07700 900442 Ian Banks
07700 900815 Jonathan Kershaw
The first column contains the mobile number, with a leading zero. The second column contains the contact name. Make sure that the entries do not contain any commas.
Note: Be sure to save the list as a CSV (comma-separated values) file.
From the Proactive Communication home page:
- Click Lists in the left pane.
-
Click Import List.

- Click Choose file, browse to locate the .csv file containing the contact information to import, and then click Open.
-
Click Continue.
The system will check the imported .csv file.
-
If there are any errors, you will see a message.

The last entry on the error notification is the blank line below the data on your spreadsheet. If you want to review the errors in the .csv file, click Back. Review the .csv file, make any corrections, and repeat this procedure.
-
If there are no errors, or if you accept the errors in the message, click Continue.
When you have accepted the imported list, the import form opens.

-
- Fill in the following fields:
List Name: Enter a unique name for the list.
Description: Provide a brief description.
Security: Select an option from the drop-down list.
- Private to Self: Only the user who created the list can see it.
- Public: Any user in your company can see it.
-
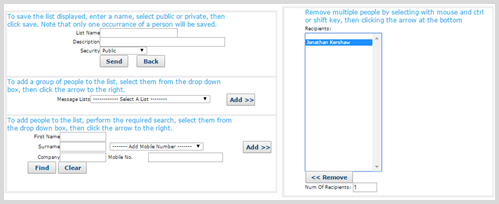
Review the Recipients list of contacts to import in the right pane.
-
When you are done, click Save.
You will see a confirmation screen.

- Click Continue.
Updating a list
As your business changes, you will need to update your contact lists, for example:
- Edit the list information.
- Add contacts to the list.
- Remove contacts from the list.
From the Proactive Communication home page:
- Click Lists in the left pane.
-
Click Create/Update Lists.
You see the list search screen.

You can search for lists either by the business contacts that they contain or by the list name or description. You can search using just part of a name. For example, "ter" will find "water" and "terrain".
Tip: As a best practice, search by the whole word.
-
Enter the search criteria in one or more fields and then click Find.
You see the search results.

-
Click the name of the list to update.

-
Click the Edit (
 ) icon.
-
Make your changes to one or more of the following fields:
-
List Name: Enter a unique name for the list.
-
Description: Provide a brief description.
-
Security: Select an option from the drop-down list.
- Private to Self: Only the user who created the list can see it.
- Private to Group: Any user in your company can see it.
- Public: Any user with access to Proactive Communication within your company can see it.
-
-
To add a contact to the list:
-
Fill in the following fields:
-
First Name
-
Surname
-
(Optional) Company
-
-
To locate the contact in the contact database, click Find.
If the contact is located, they are added to the drop-down list on the right.
- Select a contact name from the drop-down list, and click Add to move the name to the Recipients list in the right pane.
- Continue adding contacts to the list, until it is complete.
-
- To remove a contact from the list, select the name from the Recipients list and then click Remove
-
When you are done, click Save.
You see a confirmation screen.

- Click Continue.
Deleting a list
When you have finished sending messages to a specific list, for example, when the business unit is no longer relevant, you can delete it.
From the Proactive Communication home page:
- Click Lists in the left pane.
-
Click Create/Update Lists.
You see the list search screen.

You can search for lists either by the business contacts that they contain or by the list name or description. You can search using just part of a name. For example, "ter" will find "water" and "terrain".
Tip: As a best practice, search by the whole word.
-
Enter the search criteria in one or more fields and then click Find.
You see the search results.

- Tick the box next to one or more lists to delete.
-
Click Delete, and then click OK to confirm.
You see a confirmation screen.

- Click Continue.
Combining lists
It is good practice to maintain lists at business-unit level, for example, store managers in a specific region. However, you may need to combine these lists to make an announcement to a larger or parent group. This creates a new list based on existing business contacts.
From the Proactive Communication home page::
- Click Lists in the left pane.
-
Click Create/Update Lists.
You see the list search screen.

-
Click Add.

- To define a new, combined list, fill in the following fields:
List Name: Enter a unique name for the list.
Description: Provide a brief description.
Security: Select an option from the drop-down list.
- Private to Self: Only the user who created the list can see it.
- Private to Group: Any user in your company can see it.
- Public: Any user with access to Proactive Communication within your company can see it.
-
For the first list to combine, select the list from the Select a List down-down list and then click Add.
The contacts in the selected list are added to the Recipients list in the right pane.
-
For each of the remaining lists to combine, select the list from the Select a List down-down list and then click Add.
The Recipients list in the right pane displays all of the contacts in the combined lists.
- You can refine the Recipients list by removing individual contacts. Select the user name from the Recipients list and then click Remove.
-
When you are done, click Save.
You will see a confirmation screen.

- Click Continue.