A cornerstone of the RO Platform, nominations are the submission of contacts to participate in a reference program. For example, a client contact can be nominated to the reference program because that individual has expressed interest in being an advocate for Upland RO Innovation and is willing to speak directly to other clients via phone.
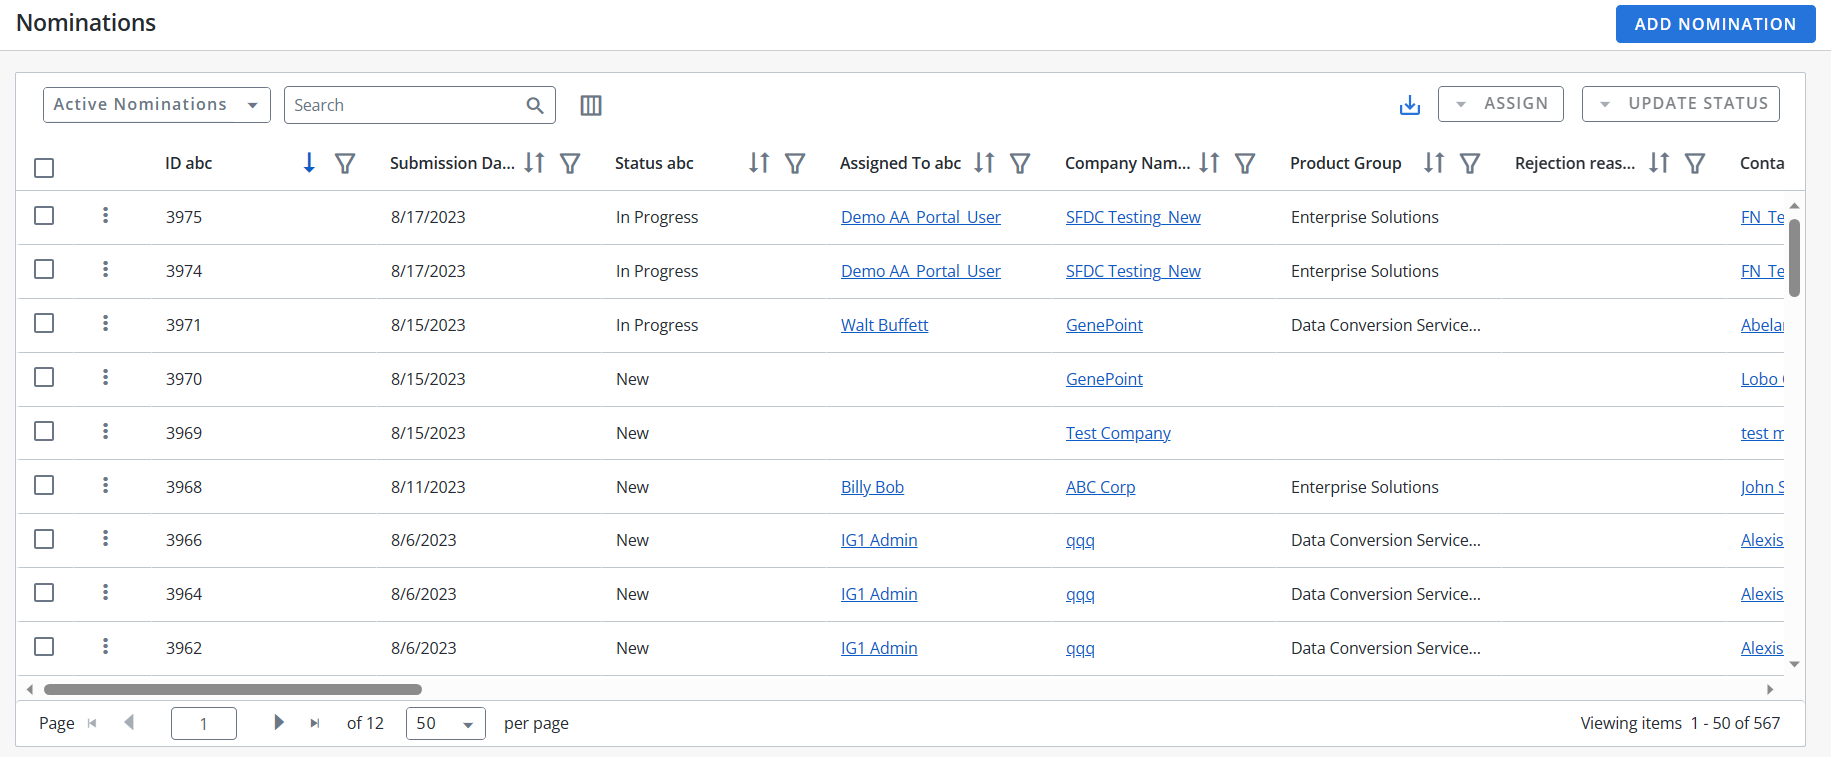
Viewing Nominations
- Navigate to the Nominations page using the navigation bar icon,
 .
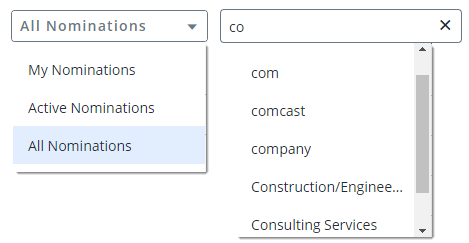
. - (Optional) Select a preferred View:
- My Nominations: Nominations that you have submitted.
- Active Nominations: New and in-progress nominations that have been submitted by all users.
- All Nominations: All nominations in the system, including approved and not approved nominations.
Note: The RO Platform will remember your View selection. The next time you open the Nominations grid, your selected View will be displayed as the default.
- To perform a search, enter two or more characters into the search bar and click the
 button or Enter. Results begin populating below the search bar once text is entered. Click the X to clear your search bar.
 - (Optional) Click the
 button next to the column headers to sort the column from either top-to-bottom or bottom-to-top: chronologically for dates, sequentially for numbers, alphabetically for text, and from Approved to Rejected for Status. Your sort selections will be remembered as your default preference.
 - (Optional) Click the
 button next to the column headers (e.g. Nomination URL, Submission Date, Status, Company Name, etc.) to filter what appears in the columns. To save the filters, refer to Using the Saved Filter.
 - (Optional) Click the
 button to export all the records or the filtered records to excel. The exported records will follow the sorting order and the columns customized in the grid.
 - (Optional) Use the page scrolling controls at the bottom left of the grid to view Nominations on other pages. To go to a specific page, click in the field, type the page number, then press Enter or Tab. Select the number of rows you want to display in the grid.
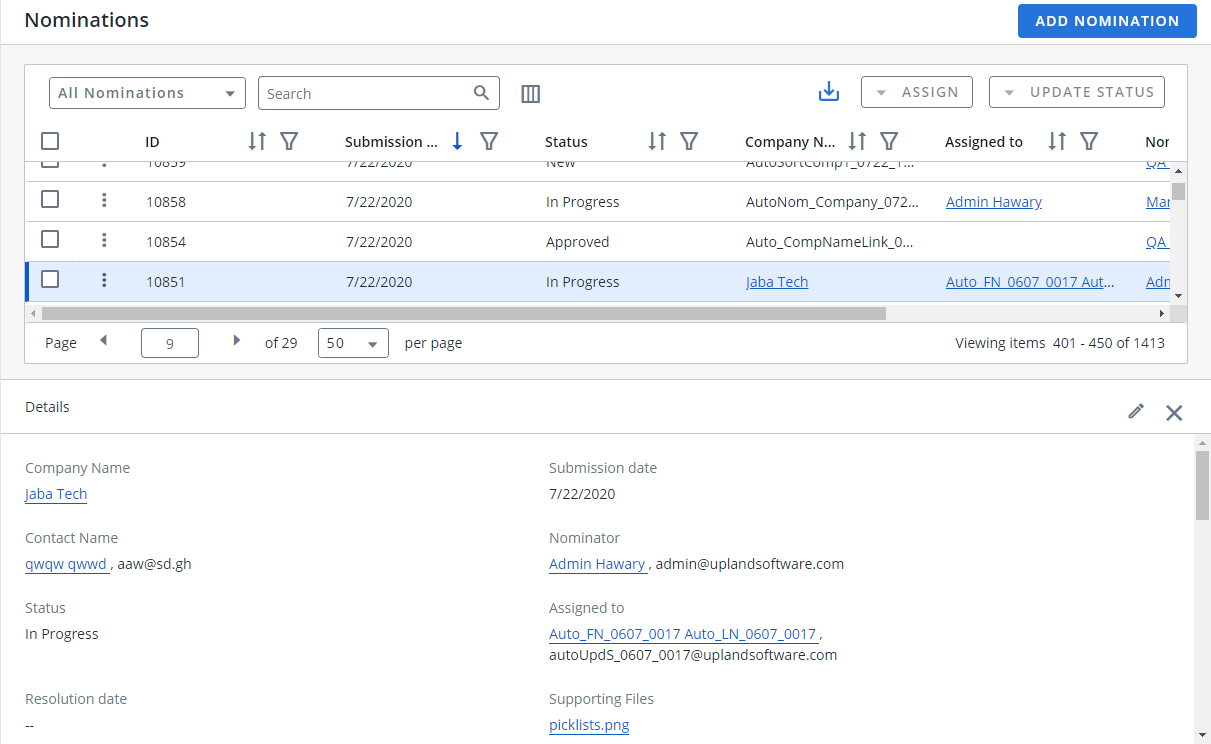
- Click a row to view nomination details below the grid. Click
 to edit the nomination. Click X to close the Details panel.
Note: If multiple words are entered into the search, the RO Platform treats them as phrases and only returns results that contain the entire search phrase. Wildcards and quotation marks are not recognized by the search.
Note: The RO platform will remember your Filter selection even if you leave the Nominations page and return to it later.
Note: Click the More Actions button, ![]() , and select Edit from the menu or select Copy Link to copy the Nominations link and send to other Reference Managers or Administrators. Click the Company Name to view the Customer Record or click the Contact Name, Nominator, or Assigned To name(s) to open a draft email.
, and select Edit from the menu or select Copy Link to copy the Nominations link and send to other Reference Managers or Administrators. Click the Company Name to view the Customer Record or click the Contact Name, Nominator, or Assigned To name(s) to open a draft email.
Note: You can customize how the columns appear in the Nominations grid. For more information, see Customizing the Nominations Grid Columns.
- Click the button next to the column headers (e.g. ID, Submission Date, Status, Company Name, etc.) to filter what appears in the columns using the following filtering parameters:
- Number Filter: Select either Equals, Greater than, or Less than from the drop-down menu. In the corresponding field, enter the number(s) you want to locate and display.
- Date Filter: Select either Before, After, or Range from the drop-down menu. In the corresponding field, click to select the date(s) you want to locate and display.
- Text Filter: Select either Starts with, Contains, or Matches from the drop-down menu. In the corresponding field, enter the text value(s) you want to locate in records and display.
- Multiselect Filter: Select one or more values from the drop-down menu or start entering text into the available field to locate the desired values faster. To remove a selected value, click X.
- Checkbox Filter: Select one or more values from the drop-down menu. To remove a selected value, click the checkbox again.
Note: The Before and After date filters do not include the selected Before or After dates. The Range date filter includes the selected start and end dates
- Click Apply. The records will display in ascending order from the column filter. Once applied, the filter icon will appear filled in,
 .
. - To clear a specific filter, click the button next to the column header of the filter you want to clear and click Clear. Once cleared, the filter icon will return to its default state, .
Note: The "Clear All Filters" button, ![]() , will display once a filter has been applied. Click the icon to clear all applied filters.
, will display once a filter has been applied. Click the icon to clear all applied filters.
Users can filter the columns based on their requirements and save the filters for future use. This allows users to quickly access the information they need and eliminates the need to manually filter columns every time they use the grid.
To create a saved filter:
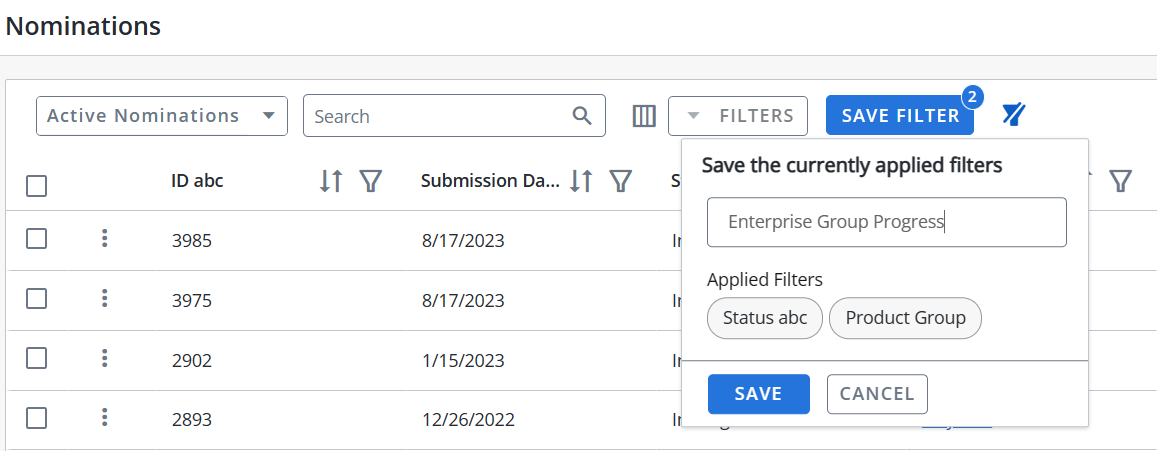
-
Filter the columns in the grid as desired. The Save Filter button is displayed next to Filters along with the number of filters applied.
- Click Save Filter and enter a filter name. This dialog displays the column names of the applied filters.

- Click Save to save the filter.
Note: The "Clear All Filters" button,
 , will display once a filter has been applied. Click the icon to clear all applied filters.
 - To find the saved filter, open the Filters drop-down menu and select the desired saved filter.

- To delete the saved filter, open the Filters drop-down menu and click
 icon.
icon.

Note:
-
It is not possible to create saved filters with the same filter name.
-
The RO platform will remember your Save Filter selection even if you leave the page and return to it later.
You can show, hide, and order columns to display on the grid.
- Click the
 button to display the Configure Columns dialog.
 - (Optional) Select your desired column(s) and use the
 and
and  buttons to move the columns between the Available and Current columns to determine which columns will be displayed on the grid.
 - (Optional) Drag and drop the desired column(s) to determine the grid order.
- (Optional) Click Reset to Default to return to the default settings.
- Click Save to save the changes and close the dialog box or Cancel to close without saving changes.
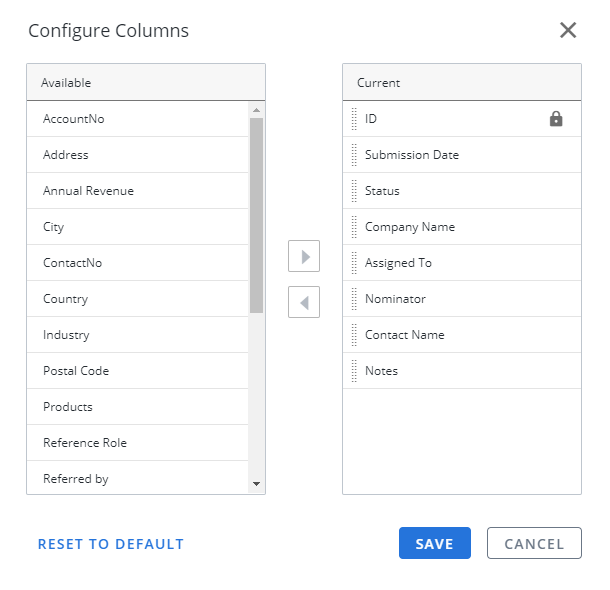
Note: The ID column cannot be removed from the Current column list, but can be reordered within the grid.
Note: If your system administrator has updated the grid configuration, the grid will reset to your company's default Platform Configuration. For more information on setting the default Platform Configurations, system administrators should see Administration.
Note: Resize your columns by hovering over the column header until the resizing tooltip appears. Drag your column left and/or right to your desired size (max column width = 400 px; min column width = 134 px).
Adding Nominations
When a user submits a Nominations in the RO Platform, they will receive an email confirmation.
- Navigate to the Nominations page.
- Click Add Nomination. The Add a Nomination page will appear.
- Add your nomination details. Please note, the fields below are examples and may not be reflective of what is in your specific system form. Fields marked with an asterisk are required.
- Submission Date: Enter the submission date of this nomination.
- Status: Select a status using the drop-down menu to inform sales users where they are with a particular nomination.
- Assigned To: Select the individual to whom this nomination will be assigned.
- Nominated By: Enter the email of the nominator. If integrated with a CRM, use the lookup to search your CRM account record contacts. Once selected, information will be auto-populated from your integrated CRM system.
- Company Name: Enter the name of the company being nominated. If integrated with a CRM, use the lookup to search your CRM account record contacts. Once selected, information will be auto-populated from your integrated CRM system.
- Product Group: Select the check boxes corresponding to the product group where your customer belongs. Click the blue check icon to select all check boxes. Click the X icon to deselect all check boxes.
- Address: Enter address details in the Address 1, Address 2, City, Postal Code, Country, and State fields.
- Customer Contact Email: Enter the customer contact's email.
- Title: Enter the customer contact's title.
- Role: Enter the role of the customer contact. This field is used to clarify the meaning of a customer Title and maintain consistency throughout your company (e.g. your contact's official title is "Director of Finances", which correlates to your company's "CEO" role).
- Name: Enter the First Name and Last Name of the customer contact.
- Phone: Enter the Phone number and Extension of the customer contact.
- Reference Manager's Nomination Notes: Enter any nomination notes from the reference manager.
- Industry: Select the check boxes corresponding to the industry where your customer belongs. Click the blue check icon to select all check boxes. Click the X icon to clear all check boxes. If integrated with a CRM, Industry information will be auto-populated from your CRM system.
- Products: Select the check boxes corresponding to your customer's products. Click the blue check icon to select all check boxes. Click the X icon to clear all check boxes. If integrated with a CRM, product information will be auto-populated from your CRM system.
- Why would this contact be a good reference for our company: Enter reason for the nomination and examples of why this contact would be a good reference.
- Willing To Do: Designate the activities your contact is willing to do. Click the blue check icon to select all check boxes. Click the X icon to clear all check boxes. Once an activity is confirmed and the nomination is approved, add the activity to the Reference Participation tab within the customer record for contacts.
Note: Contact matching for external nominations allows external nomination forms to match a nominated client with an existing CRM contact. Once matched, you can add the contact as a reference contact here.
- Click Submit. Your newly created nomination will appear in the My Nominations.
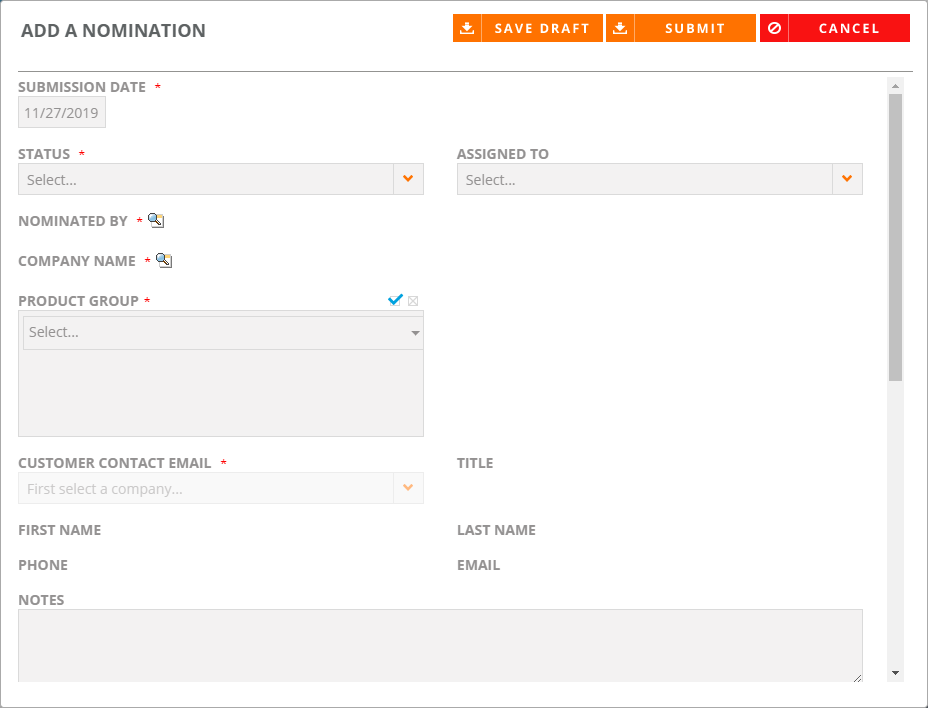
Note: Click Save Draft to save the nomination in its current state and submit at a later time (contact support to enable this feature). Click Cancel if you no longer wish to create a nomination.
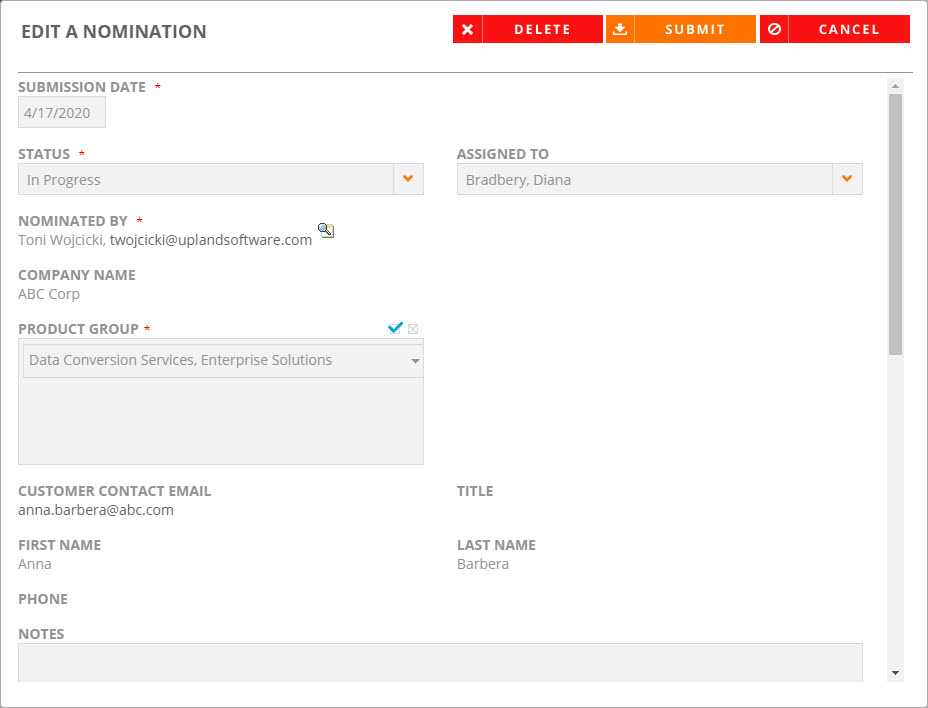
Editing Nominations
Once the status of a nomination is changed to Approved, a new customer and contact will be created, or an existing customer record will be updated. Once created, these Nominations can be edited. The Nominations grid allows you to assign Nominations and update status in bulk.
- Navigate to the Nominations page.
- Locate your desired nomination using view setting, searching, filtering, or sorting.
- Click a row to view nomination details below the grid.
- Click to edit the nomination. Click X to close the Details panel.
- Edit your nomination details. Fields marked with an asterisk are required.
- Click Submit. Click Cancel if you no longer wish to create a nomination. Click Delete to remove the nomination. If applicable, click Save Draft to save the nomination in its current state and submit at a later time (contact support to enable this feature).
Note: Click the More Actions button, ![]() , and select Edit, Clone, or select Copy Link to copy the Nominations link and send to other Reference Managers or Administrators. Click the Company Name to view the Customer Record or click the Contact Name, Nominator, or Assigned To name(s) to open a draft email.
, and select Edit, Clone, or select Copy Link to copy the Nominations link and send to other Reference Managers or Administrators. Click the Company Name to view the Customer Record or click the Contact Name, Nominator, or Assigned To name(s) to open a draft email.
Note: The reference team will assign nominations to the appropriate reference manager for qualification. Once nomination qualification has been completed, change the Status field to Approved and click Submit. You will be directed to the Customer tab to edit customer information. Whether a nomination is approved or not, the RO Platform will send an email alert to the nominator. See Approving Nominations for more information on performing a "Quick Nomination Approval."
Note: The default Program Status and Contact Status on Nomination approval will be set to Recruiting. Once all details are confirmed, the reference manager can change these statuses to Active within the Customer Record or set them to be Active upon approval.
Note: Contact matching for external nominations allows external nomination forms to match a nominated client with an existing CRM contact. Once matched, you can add the contact as a reference contact here.
Assigning Nominations in Bulk
To assign nominations in bulk:
- Select one or more checkboxes to enable the desired Nominations for bulk actions.
- Click Assign. Available assignees will appear in the dropdown menu.
- Choose the user that will be reassigned to the selected Nominations.
Note: Select the checkbox in the header to enable all Nominations for bulk actions.
Updating Status in Bulk
To update status in bulk:
- Select one or more checkboxes to enable the desired Nominations for bulk actions.
- Click Update Status. Available statuses will appear in the dropdown menu.
- Apply one of the following status to selected Nominations:
- In Progress
- New
- On-Hold
Note: If a record status fails to update, it is most likely caused by incomplete information in required fields or because the selected record has already been approved or rejected. Nominations cannot be approved or rejected in bulk due to downstream workflows that must be performed one Nomination at a time.
Note: Select the checkbox in the header to enable all Nominations for bulk actions.
Cloning Nominations
To clone a nomination:
- Click the More Actions button,
 , and select Clone from the menu. This opens the duplicated nomination form.
Note: Reach out to your CSM to turn On the Clone option in order to be displayed in the grid.
- (Optional) Update the fields as desired and click Submit. This will create a new nomination which will appear in My Nominations.
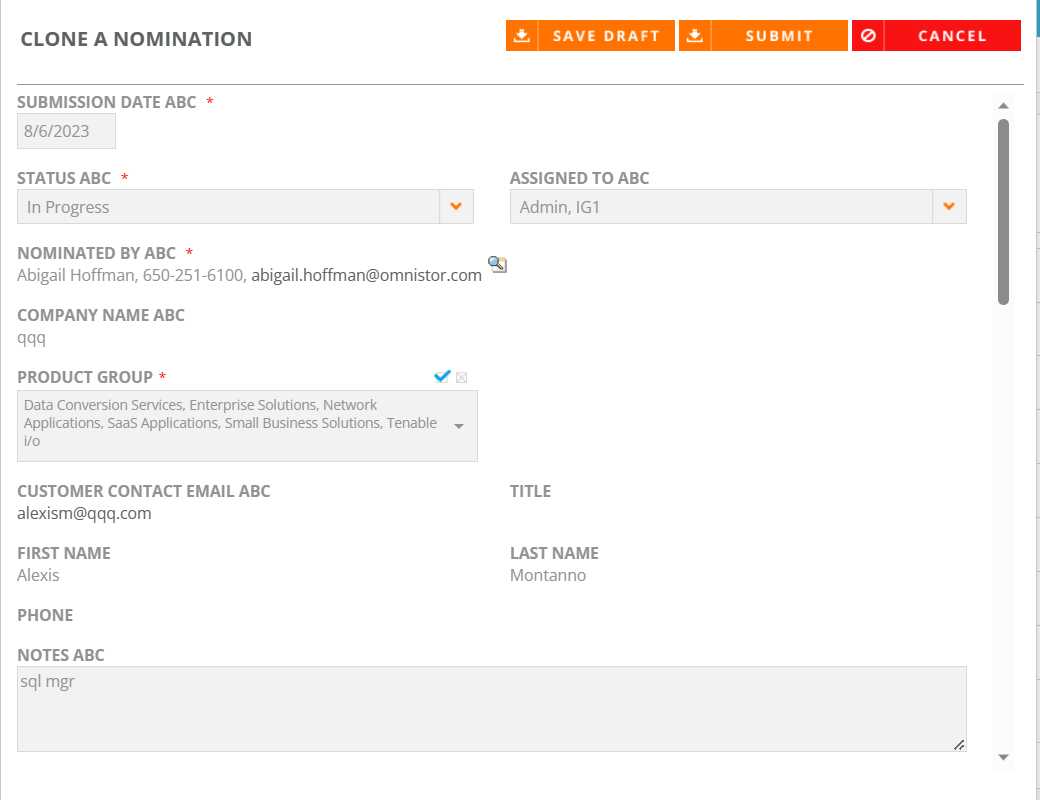
Note: Click Save Draft to save the nomination in its current state and submit at a later time (contact support to enable this feature). Click Cancel if you no longer wish to clone a nomination.
Approving Nominations
You can perform a "Quick Nomination Approval" by selecting a single nomination from the grid and using the Update Status drop-down to approve it immediately. This is a more efficient and streamlined approach to approving Nominations compared to the Editing Nominations method where you must open the Nomination's details, select an assignee, and complete any required fields prior to approving the Nomination.
- Select a row's checkbox to enable the desired Nomination for approval.
- Click Update Status. Available statuses will appear in the drop-down menu.
- Select Approved. An email notification will be sent to the nominator submitter alerting them that their nomination was approved.
- Repeat for each Nomination you wish to approve.
Note: Only 1 row can be approved at a time. If more than 1 row is selected, the "Approved" Update Status will be grayed out.
Note: Blank assignee and required fields do not need to be completed to perform a Quick Nomination Approval.