Administration
Users
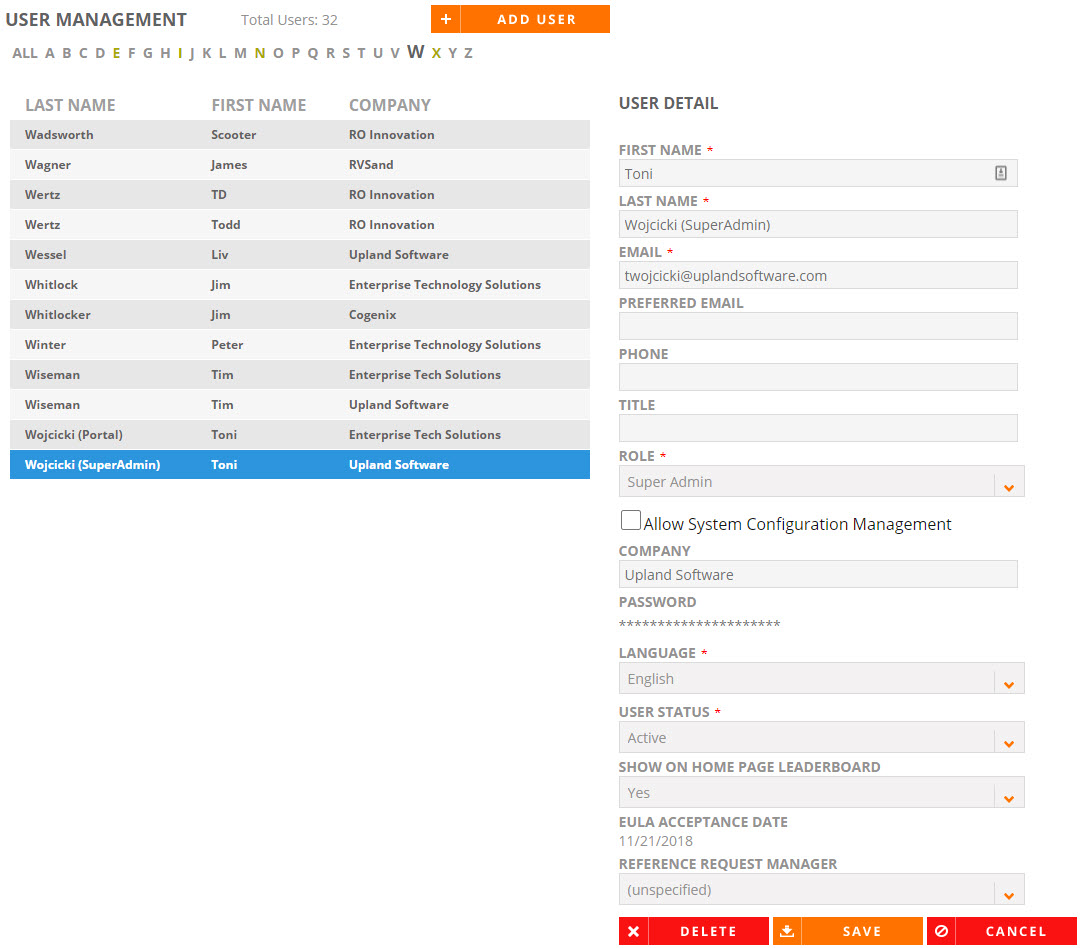
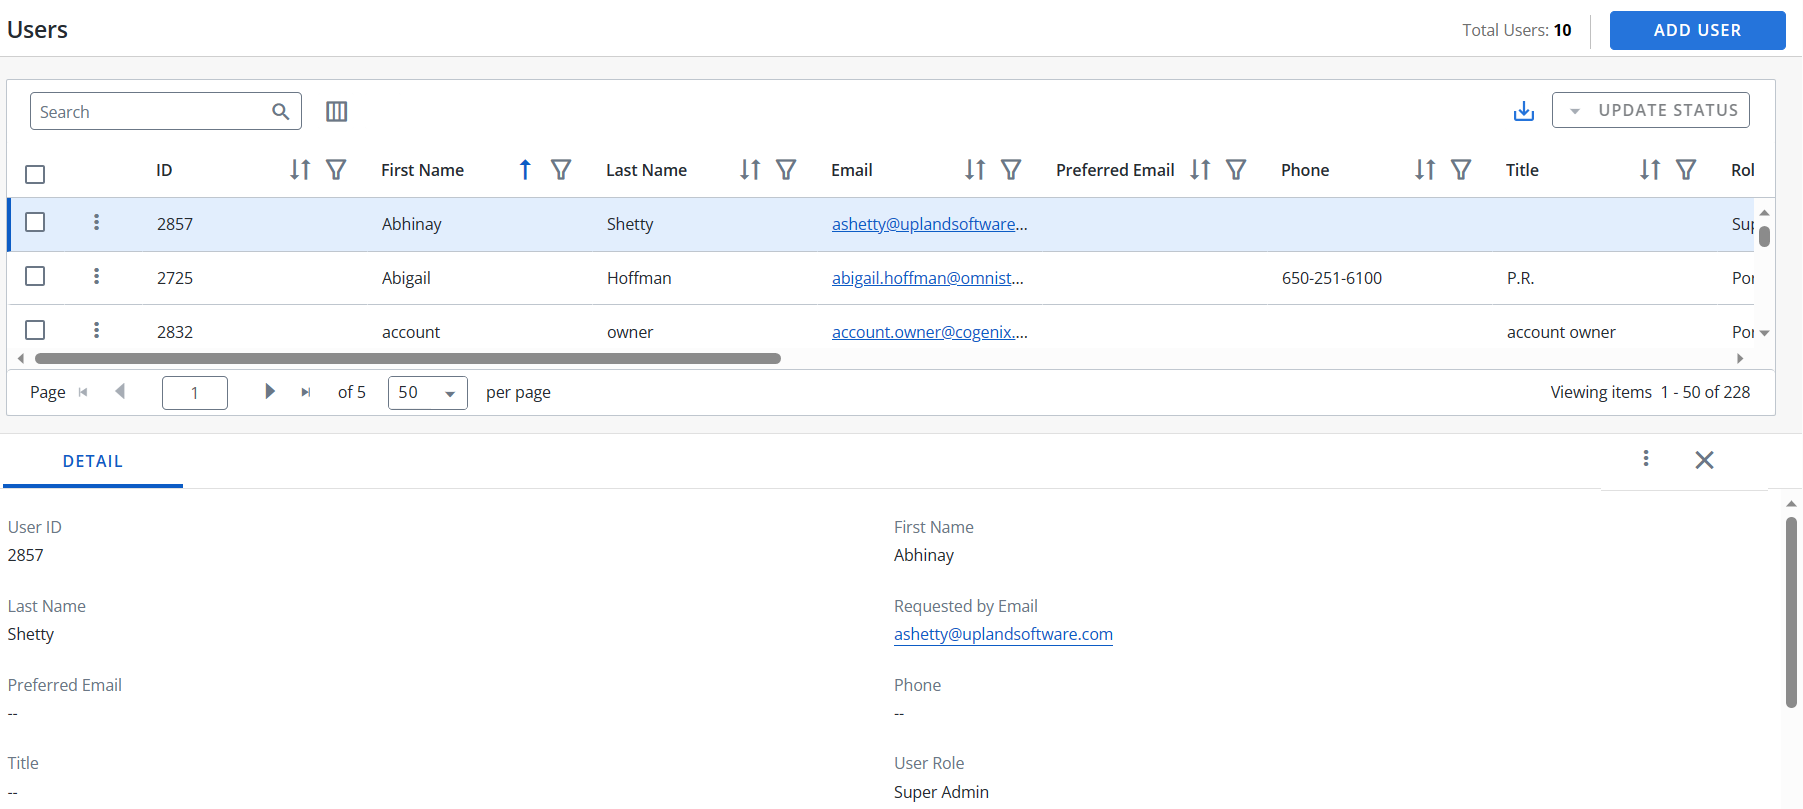
Administrators can create and edit users, assign user roles, and proxy log in as another user.
- Click the Administration icon and select Users.
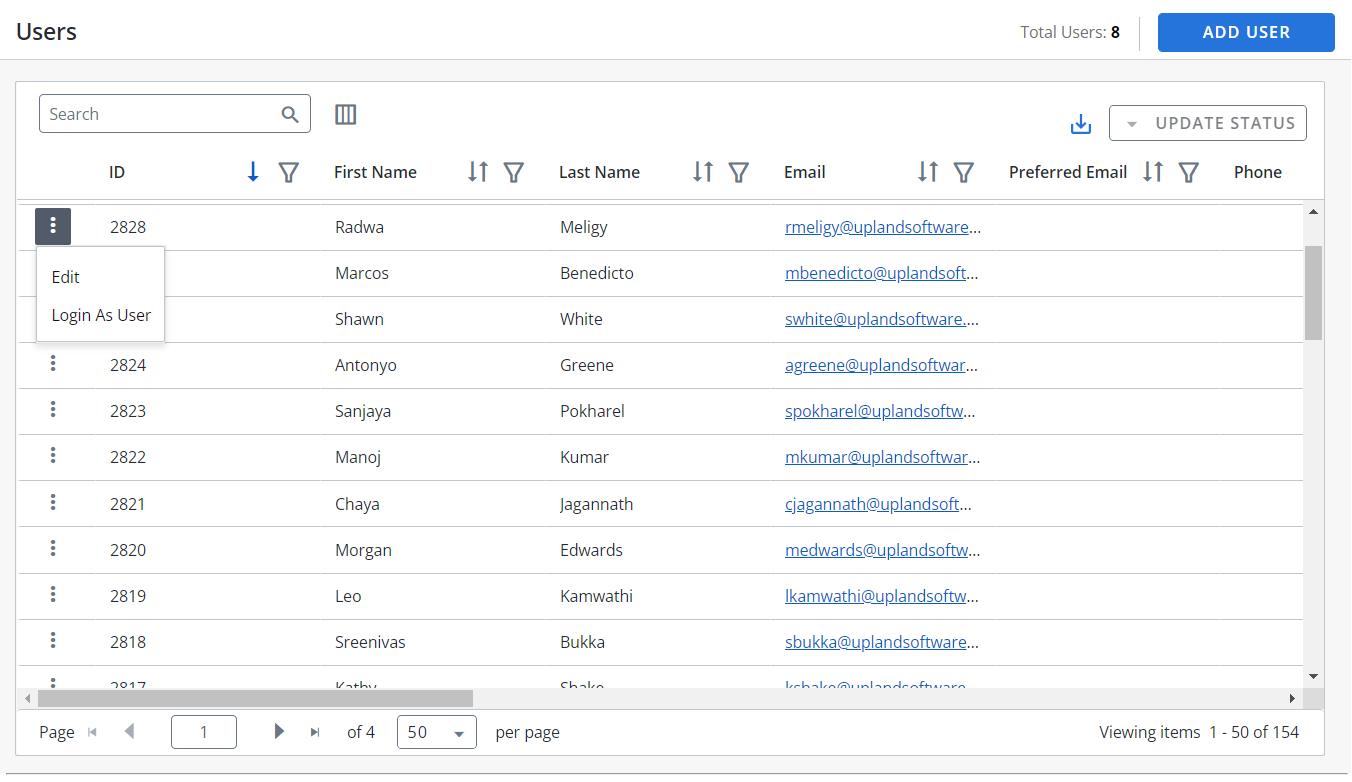
- To view the total number of users in your organization, see the Total Users count.
- To view details for a particular user, select the user from the list. The User Details fields will auto-populate with the selected user's information.
Note: The Total Users count excludes the following users: users not setup for the client company, Super Admins, and users with an "Inactive" or "Locked Out" User Status.
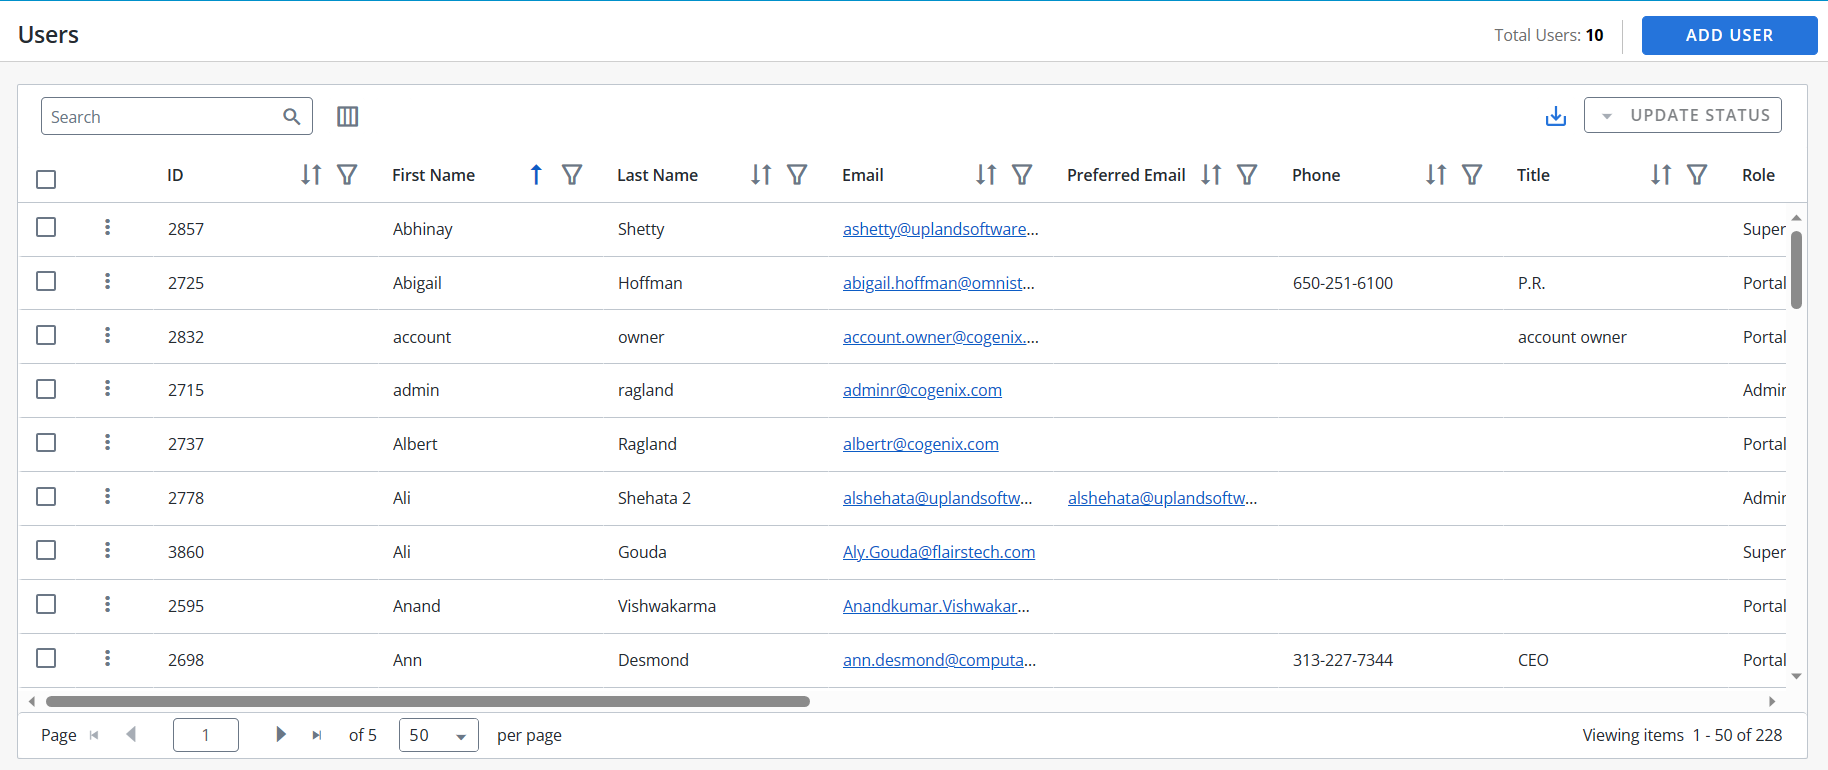
- Navigate to the Users page using the navigation bar icon,
 .
.
- To perform a search, enter two or more characters into the search bar and click Enter. Results begin populating below the search bar once text is entered. Click the X to clear your search bar.
- To configure the Columns, click the
 button and click on the Column name in the Available section and click the
  button to add it to the Current section. You can also rearrange the Columns in the required order in the Current section by dragging the Column name tiles.
 -
The Users ID column is a default column. You can only rearrange it.
-
Click Reset to Default to go back to the default Column arrangement.
- (Optional) Click the
 button next to the column headers to sort the column from either top-to-bottom or bottom-to-top: chronologically for dates, sequentially for numbers, and alphabetically for text. Your sort selections will be remembered as your default preference. The blue arrow
  next to a column header indicates the type of sorting applied to the column.
 - (Optional) Click the
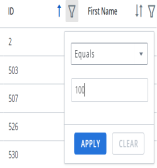
 button next to the column headers to filter what appears in the columns. For example, if you want to filter the Users ID, then click on the button and select the range type from the drop-down menu (equals, greater than, lesser than or Is null) and enter a number. Click Apply. To save the filters, refer to Using the Saved Filter.
 - (Optional) Click the
 button to export all the records or the filtered records to excel. The exported records will follow the sorting order and the columns customized in the grid.
 - (Optional) Use the page scrolling controls at the bottom left of the grid to view Users on other pages. To go to a specific page, click in the field, type the page number, then press Enter. Select the number of rows you want to display in the grid by clicking the drop-down menu.

- Click the
 button on any User's row to use Edit and Login As User options. See Editing Users and Logging in as User.
 - Click anywhere on the desired User to view additional details at the bottom of the screen.
Note: If you are an Admin, navigate to Admin > Grid Configuration to set default columns for all users.

Note:
Note: The RO platform will remember your Filter selection even if you leave the Users page and return to it later.
Note:
-
Click the
button on this screen to find options such as Edit, Login As User and Delete. -
You can only delete a User using the bottom screen
button.
Users can filter the columns based on their requirements and save the filters for future use. This allows users to quickly access the information they need and eliminates the need to manually filter columns every time they use the grid.
To create a saved filter:
-
Filter the columns in the grid as desired. The Save Filter button is displayed next to Filters along with the number of filters applied.
- Click Save Filter and enter a filter name. This dialog displays the column names of the applied filters.
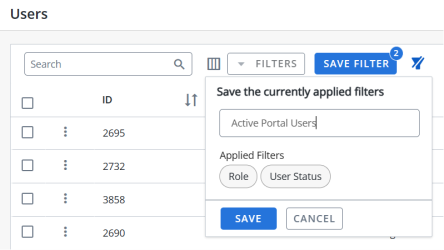
- Click Save to save the filter.
Note: The "Clear All Filters" button,
 , will display once a filter has been applied. Click the icon to clear all applied filters.
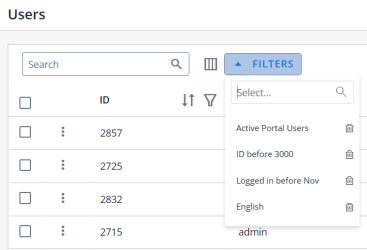
 - To find the saved filter, open the Filters drop-down menu and select the desired saved filter.
- To delete the saved filter, open the Filters drop-down menu and click
 icon.
icon.


Note:
-
It is not possible to create saved filters with the same filter name.
-
The RO platform will remember your Save Filter selection even if you leave the page and return to it later.
Individuals accessing the RO Platform for the first time via CRM or SSO will automatically have a Portal User Role created and assigned to them. This User Role assignment can be changed later by the Admin.
- Click the Administration icon and select Users.
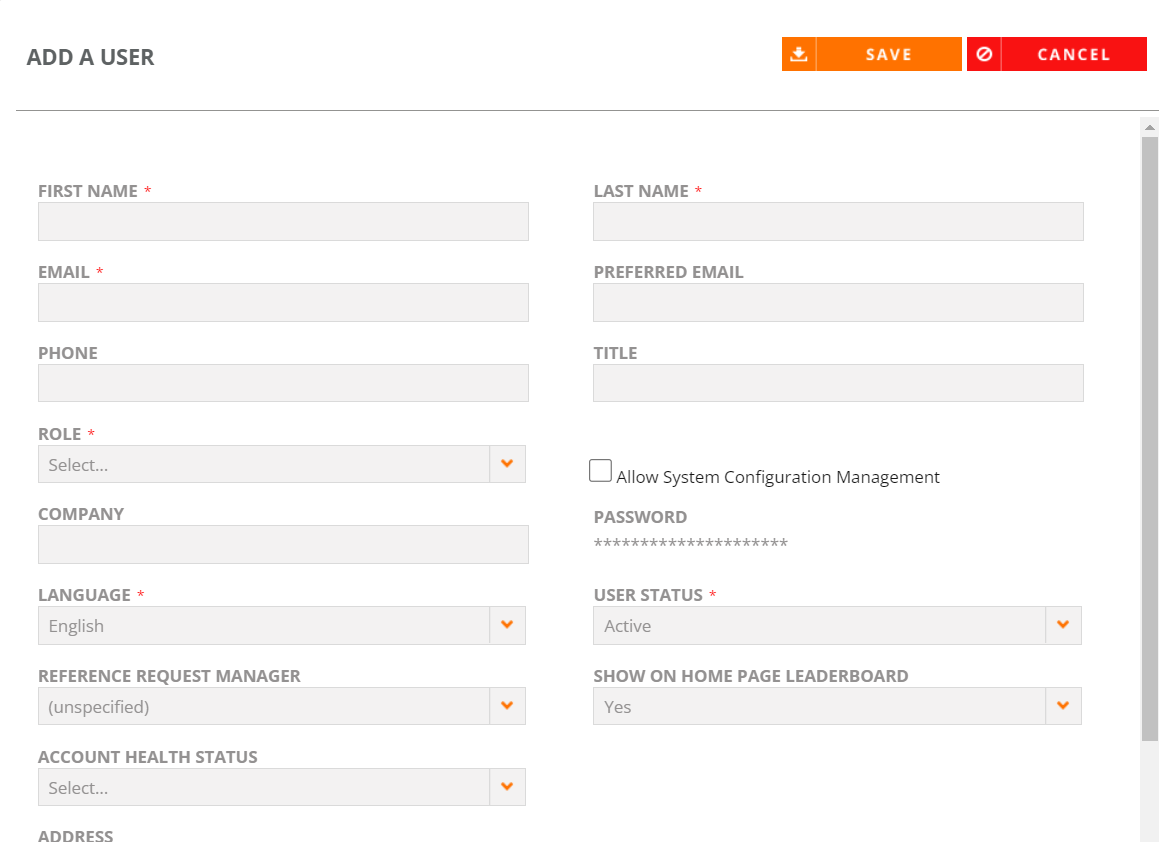
- Click Add User. Empty User Detail fields will appear.
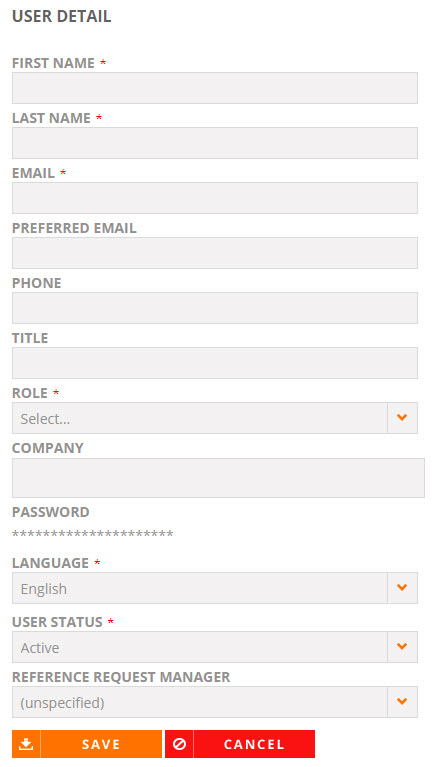
- Enter your User Details. Fields marked with an asterisk are required.
- First Name: Enter the first name of your new user.
- Last Name: Enter the last name of your new user.
- Email: Enter the email of your new user.
- Preferred Email: If your new user has a preferred email, enter it here.
- Phone: Enter the phone number of your new user.
- Title: Enter the job title of your new user.
- Role: Select the applicable user role. For more information on Roles, see Types of User Roles
- Allow System Configuration Management: This setting must be enabled to edit the SAML Configuration. This permission is only available to Super Admins.
- Company: Enter the company associated with your new user.
- Language: Select the language of your new user.
- User Status: Select the status of your new user.
- Active: Active users will count towards your "Total Users".
- Inactive: Inactive users will NOT count towards your "Total Users".
- Locked Out: Blocks your new user from logging into the RO Platform.
Note: If you would like an automatic User Status update for infrequent users to become Inactive, contact support to enable Automated License Maintenance. This nightly service is configured to track inactivity for 6, 9, or 12 months. Inactive users subsequently engaging in RO via their CRM/SSO or when needed to process Request automated approvals, will be allowed access with an automated User Status update to Active.
- Reference Request Manager: If you are intending on using a user-specific Reference Request Manager in an automated workflow, select the Reference Request Manager associated with your new user.
Note: Reference Managers and Administrators can change the User Status for Sales/Portal users. An email alert containing instructions on resetting passwords is sent to the Sales/Portal user who's User Status has been re-activated.
- Click Save.
Individuals accessing the RO Platform for the first time via CRM or SSO will automatically have a Portal User Role created and assigned to them. This User Role assignment can be changed later by the Admin.
- Navigate to the Users page using the navigation bar icon, .
- Click Add User button on the top-right corner of the grid.
- Enter your User Details. Fields marked with an asterisk are mandatory.
- First Name: Enter the first name of your new user.
- Last Name: Enter the last name of your new user.
- Email: Enter the email of your new user.
- Preferred Email: If your new user has a preferred email, enter it here.
- Phone: Enter the phone number of your new user.
- Title: Enter the job title of your new user.
- Role: Select the applicable user role. For more information on Roles, see Types of User Roles
- Allow System Configuration Management: This setting must be enabled to edit the SAML Configuration. This permission is only available to Super Admins.
- Company: Enter the company associated with your new user.
- Language: Select the language of your new user.
- User Status: Select the status of your new user.
- Active: Active users will count towards your "Total Users".
- Inactive: Inactive users will NOT count towards your "Total Users".
- Locked Out: Blocks your new user from logging into the RO Platform.
Note: If you would like an automatic User Status update for infrequent users to become Inactive, contact support to enable Automated License Maintenance. This nightly service is configured to track inactivity for 6, 9, or 12 months. Inactive users subsequently engaging in RO via their CRM/SSO or when needed to process Request automated approvals, will be allowed access with an automated User Status update to Active.
- Reference Request Manager: If you are intending on using a user-specific Reference Request Manager in an automated workflow, select the Reference Request Manager associated with your new user.
Note: Reference Managers and Administrators can change the User Status for Sales/Portal users. An email alert containing instructions on resetting passwords is sent to the Sales/Portal user who's User Status has been re-activated.
- Click Save.
- Click the Administration icon and select Users.
- To edit a particular user, select the user from the list. The User Details fields will auto-populate with the selected user's information.
- Edit the user as desired. See Adding Users for more information.
- Click Save.
Note: If you are CRM-integrated or connected via SSO, some user information sourced from the CRM or SSO will not be editable in the RO Platform.
Note: To lock a user out of the RO Platform, change the User Status to Locked Out.
- Navigate to the Users page using the navigation bar icon, .
- Click the button on any User and select Edit. The User Details fields will auto-populate with the selected user's information.
- To edit a particular user, select the user from the list. The User Details fields will auto-populate with the selected user's information.
- Edit the user as desired. See Adding Users for more information.
- Click Save.
Note: If you are CRM-integrated or connected via SSO, some user information sourced from the CRM or SSO will not be editable in the RO Platform.
Note: To lock a user out of the RO Platform, change the User Status to Locked Out.
- Select one or more checkboxes to enable the desired Users for bulk actions.
- Click Update Status. Available statuses will appear in the drop-down menu.
- Apply one of the following status to selected Users:
Active
Inactive
Locked Out
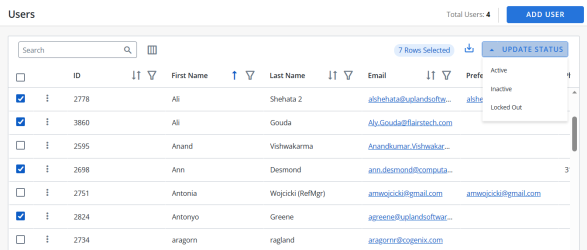
Note: Select the checkbox in the header to enable all Users for bulk actions.

Proxy login allows Admin users to login by proxy into other users' accounts for testing and trouble shooting.
Note: Reference Managers CANNOT proxy login.
- Click the Administration icon and select Users.
- To proxy login as a particular user, select the user from the list. The User Details fields will auto-populate with the selected user's information.
- Click Login As User. Once logged in, you will be automatically directed to that particular user's RO system view.
- To return to your original user profile, select Logout from the User Info menu in the header. You will be re-directed to the Users Administration page.
Proxy login allows Super Admins & Administrators to login by proxy into other users' accounts for testing and trouble shooting.
Note:
-
Reference Managers CANNOT proxy login.
-
You can proxy login only if the user status is Active. For other user statuses, the Login As User option is disabled.
- Navigate to the Users page using the navigation bar icon, .
- Click the button on any User and select Login As User to proxy login as a particular user.
- Once logged in, you will be automatically directed to that particular user's RO system view.
- To return to your original user profile, select Logout from the User Info menu in the header. You will be re-directed to the landing page.
Administrator
This role has access to all areas of functionality (add new customer records, view all customers, upload assets, search for assets, create, send out or delete spotlights, create and manage reference requests and nominations, view the dashboards, and generate reports) in the RO Platform, including the Administration sections. The Administration section includes:
- Users: Adding and deleting users
- Export: Exporting fields for custom reports
- Credentials: Enter your credentials for any of your Integrations here
- Email Templates: Editing email templates
Reference Manager
This role has access to all areas of functionality, but no access to Administration sections of the application. Reference Managers have access to all areas of the customer record (contacts, product details, notes, quotes, etc.) and have edit/delete capabilities within the customer record. A user with this role can upload, edit, and delete customer and marketing assets. However, Reference Managers cannot edit or delete recommended spotlights, unless the spotlights were created by the logged-in Reference Manager. Reference Managers can edit reference requests and nominations, but do not have the ability to delete the objects. Users with this role can create new customers (standalone platforms) or bring in new customers from Salesforce (integrated platforms) via the New Customer page. Finally, users with this role can nominate new customers and have visibility into the Tasks list.
Portal User
This role has access to all areas of functionality in RUX. The Portal role can search for customers and assets that have been made available by the reference team. It can also nominate customers, request customer references, download content, and send spotlights. This role doesn’t have access to any customer contact information or the ability to edit customer information in the full RO Platform.
Marketing
This role is essentially a more robust version of the Portal User role. In addition to the Portal User functionality and permissions, Marketing users can also: upload content assets into the customer record or library, access My Requests, and view the RO Reporting Suite if enabled.
Note: If the individual assigned to the Marketing role requires more robust functionality, such as maintaining customer records, producing and/or editing content, or using the track content module, they should be assigned Reference Manager permissions.
| Upland RO Innovation Area | Portal (RUX) | Marketing (Full RO Platform) | Reference Manager (Full RO Platform) | Administrator (Full RO Platform) |
|---|---|---|---|---|
| Search (Customers, Collateral, & Citations) |

|
|
|
|
| Customer Edit |
|
|
||
| Requests (ALL) |
|
|
||
| My Requests |
|
|
|
|
| Nominations (ALL) |
|
|
||
| My Nominations |
|
|
|
|
| New Customer |
|
|
||
| New Collateral |
|
|
|
|
| Spotlights |
|
|
|
|
| Surveys |
|
|
||
| Tasks |
|
|
||
| Sales Wins |
|
|
|
|
| Record Review |
* |
* |
|
|
| Upland Analytics |
|
|
||
| RO Reporting Suite |
|
|
|
|
| Administration |
|
|||
| * Role has limited editing privileges (when product area is enabled for user role). | ||||
Credentials
Enter your credentials for any of your Integrations here.
Upland RO Innovation will create a login with Administrator User Role privileges for the Salesforce admin, allowing the admin to enter their Salesforce login and credentials during the implementation process. This will enable the Salesforce admin to reset the RO login in Salesforce as needed and also enter their Salesforce credentials directly into the RO Platform to ensure a proper connection.
- Once your Salesforce Admin has received the credentials link email from Upland RO Innovation, navigate to: Administration | Credentials | Salesforce.
- Enter the following credentials:
- Salesforce Login
- Salesforce Password
- Salesforce Security Token
- Click Save.
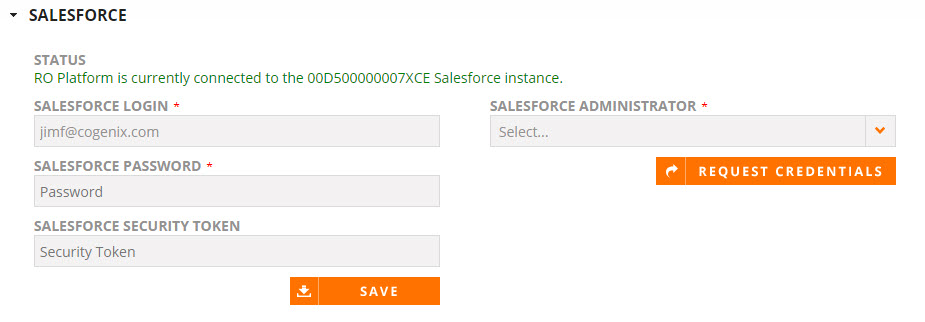
Note: The Status will indicate if your Salesforce instance is already integrated.
Caution: Do NOT edit the Salesforce Administrator setting.
In order to access the SAML Configuration section within Credentials, you must have Super Admin Role permissions and enable the "Allow System Configuration Management" User setting (which only Super Admins can do). Once these requirements are met, you will see the SAML Configuration dropdown section within the Credentials page.

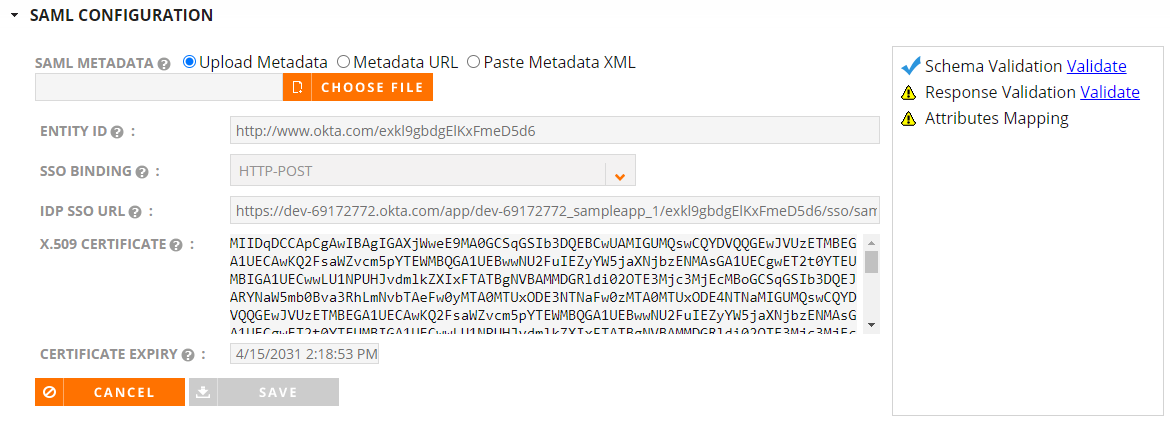
- Once you've met the above requirements, navigate to: Administration | Credentials | SAML Configuration.
- Depending on your metadata format, select one of the following options:
- Upload Metadata
- Metadata URL
- Paste Metadata XML
- Once you've input your SAML Metadata, click the Validate link beside "Schema Validation".
- Once the SAML is validated, click the Validate link beside "Response Validation". This will simulate the real-time SAML authentication and produces the response with the attributes.
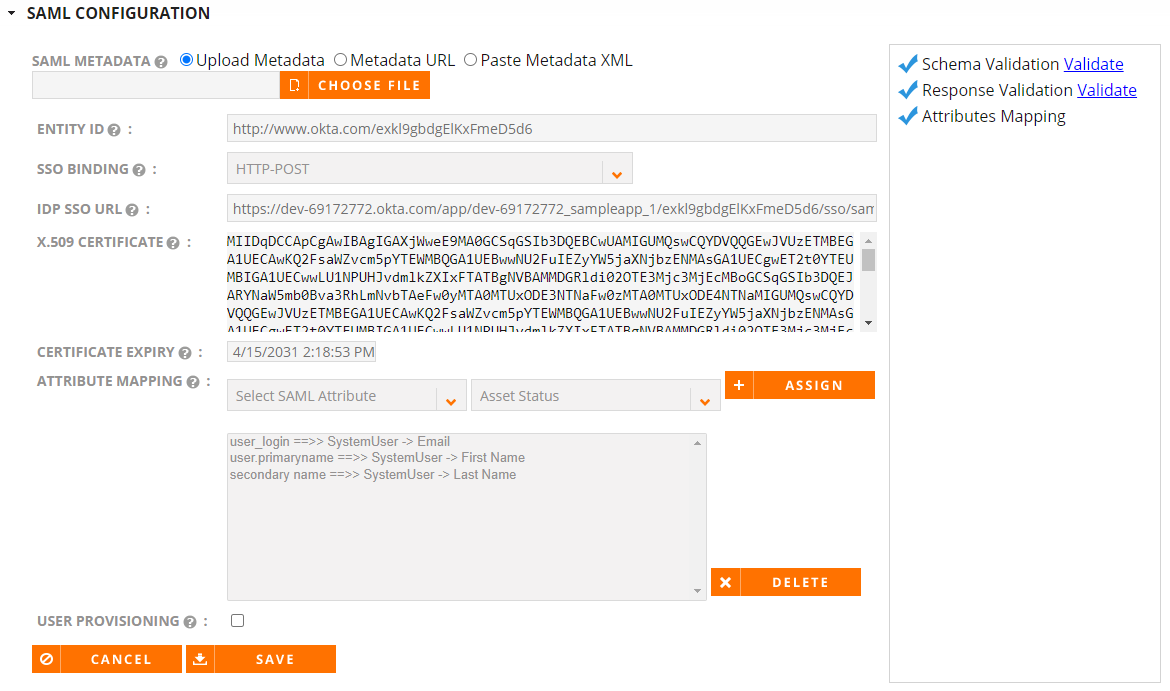
- If the system was unable to identify all the SAML attributes, you must enter the Attribute Mapping manually and Assign the relationship between the SAML Attribute and System Attribute. For a successful SAML configuration, RO needs the following 3 attributes: Email, FirstName, and LastName. All other attributes are optional.
- Select the User Provisioning checkbox and specify the Default Role to automatically create a new user that does not currently exist in the ROI system.
- Click Save.
Note: You will need SAML Metadata from your IdP in order to begin configuration.
Note: Once sucessfully validated, a blue checkmark will appear next to the "Schema Validation" link and the following fields will appear directly below the SAML Metadata field: Entity ID, SSO Binding, IDP SSO URL, X.509 Certificate, and Certificate Expiry. These fields will automatically be populated by the SAML Metadata you have just validated.
Note: Once successfully validated, a blue checkmark will appear beside "Response Validation" and a list of attributes from the SAML Response will be populated in the Attribute Mapping field. If any non-required attributes present in the SAML Response or if the system cannot auto-map the SAML Attributes to ROI System Attributes, a red X icon will appear next to "Attributes Mapping".
| SAML Attribute | System Attribute |
|---|---|
| user.Email | System User → Email |
| user.FirstName | System User → First Name |
| user.LastName | System User → Last Name |
Note: We recommend using our standard SAML attribute names in your IdP Portal. This helps the auto-mapping and reduces likelihood for errors. If you do have custom SAML attribute names, please ensure that the mapping is provided correctly. Once all attributes are successfully added, a blue checkmark will appear next to "Attributes Mapping".
Note: If at any point there are errors in the configuration, click the red View Errors button to display the errors in a dialog window.
Email Templates
Administrators can author and manage email templates for various events or situations that occur throughout your engagement with prospects and customers. Spotlight Invitations are the most common email types administrators make email templates for (e.g. Spotlights sent to automotive companies would use a different email template than Spotlights being sent to gas companies).
Note: If any Email Type is sent to a contact, that information is automatically captured in the contact history. This information can be viewed on the Contact History tab of the Contact record. For more information, see Editing Customer Information.
Note: If Email Templates feature is not enabled in platform, contact RO Innovation support.
- Click the Administration icon and select Email Templates.
- Click Create. The "Add Email Template" dialog will appear.
- Select the Email Type:
- AutoFulfill Event Feedback
- Contact: Used to contact customer references on the Request page.
- Reference Event Feedback
- Reference Request: Allows Reference Managers to reach out to the reference customer (e.g. asking if they will ‘take a reference call' using an email). This email is also written to the contact record where the Reference Manager can keep track of these contacts with the reference contact.
- Spotlight Invitation: Must be created in order for Reference Managers to automatically email Portal Users, asking them to provide updates to select customer records. Logos and/or graphics can be added to this Email Type.
- Spotlight Thank You
- Select the Recipient. The available Recipients will change depending on the selected Email Type.
- Enter a Title.
- If applicable, select a Send Method:
- Automatic
- Default Client
- Both
- Enter a Subject.
- To make your new email template the default, select the Default Template checkbox.
- If creating a Spotlight Invitation Email Type, determine whether the email template will be used for iPad invitations by selecting the Use for iPad Invitations checkbox and if Portal users have access by selecting the Available to Portal Users checkbox.
- Enter the Body of your email template. For a full list of available merge fields, see Email Template Merge Fields.
- Click Save.
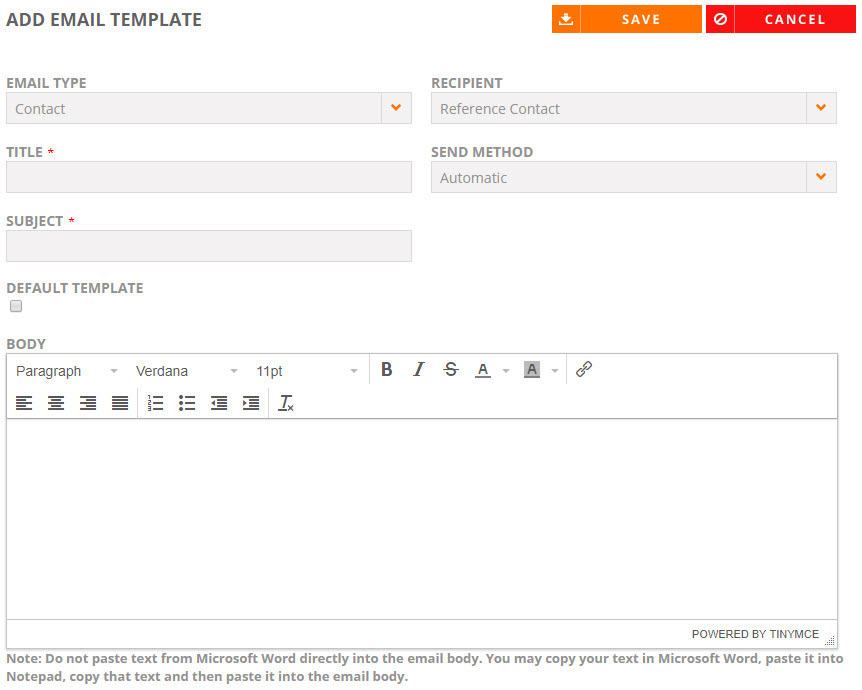
Note: Do not paste text from Microsoft Word directly into the email body. You may copy your text in Microsoft Word, paste it into Notepad, copy that text and then paste it into the email body.
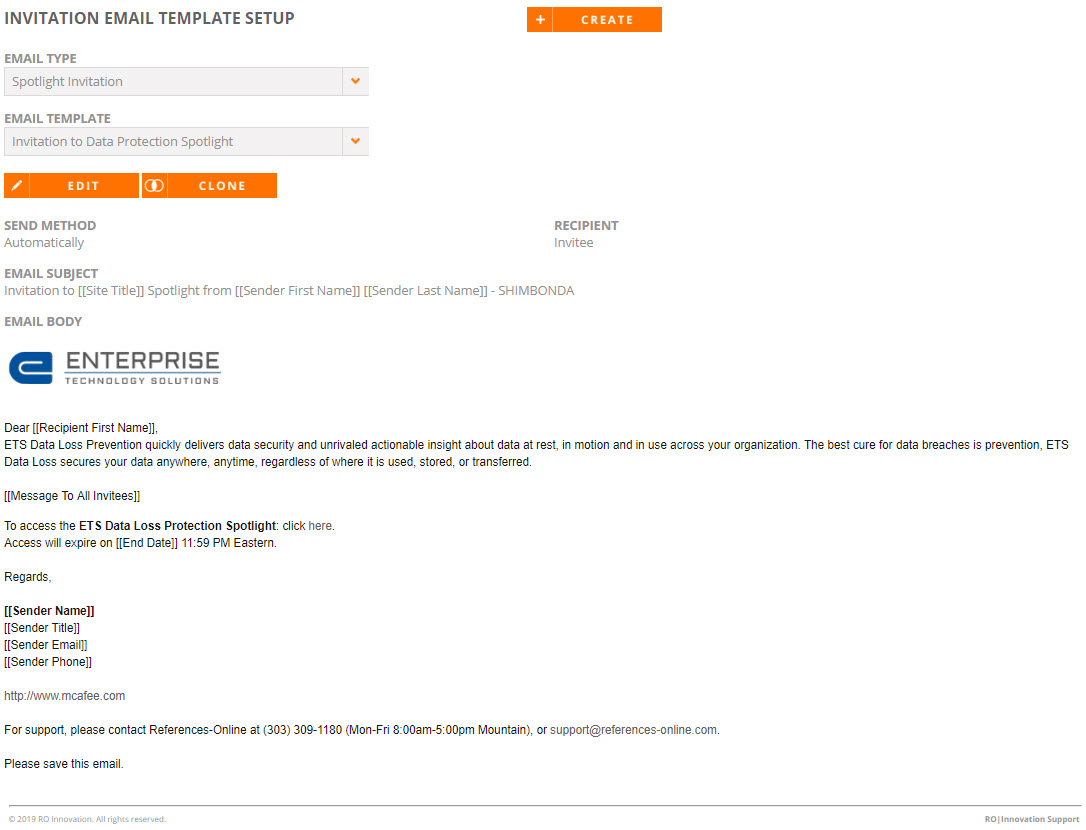
- Click the Administration icon and select Email Templates.
- Select the Email Type and Email Template.
- Click Edit to edit the existing email template.
- Click Clone to create a copy of an existing template.
- Edit the email template as desired. For more information, see Creating Email Templates.
- Click Save. To remove an email template from the system entirely, click Delete.
Merge fields are configurable text field placeholders within an email template. When sales reps select an email template for their Spotlight invitation, they can enter custom text into the [[Message To All Invitees]] merge field. The following email template merge fields are available for various email types:
AutoFulfill Event Feedback
| AutoFulfill Event Feedback: Merge Fields |
|---|
| [[Recipient First Name]] |
| [[Recipient Last Name]] |
| [[Recipient Email]] |
| [[Recipient Company]] |
| [[Sender Name]] |
| [[Sender First Name]] |
| [[Sender Last Name]] |
| [[Sender Title]] |
| [[Sender Email]] |
| [[Sender Phone]] |
| [[Opportunity Name]] |
| [[Asset Type]] |
| [[Request Status]] |
| [[Request Closed Date]] |
| [[Request Deadline Date]] |
| [[Request Submitted Date]] |
| [[Account Name]] |
| [[Sales Stage]] |
| [[Deal Size]] |
| [[How will this reference be used?]] |
Note: Configurable fields that appear on requests can be merged as long as they use the double brackets (e.g. [[Industry]]).
Contact
| Contact: Merge Fields |
|---|
| [[Recipient First Name]] |
| [[Recipient Last Name]] |
| [[Recipient Email]] |
| [[Recipient Company]] |
| [[Sender Name]] |
| [[Sender First Name]] |
| [[Sender Last Name]] |
| [[Sender Title]] |
| [[Sender Email]] |
| [[Sender Phone]] |
Reference Event Feedback
| Reference Contact | Requester |
|---|---|
| [[Recipient First Name]] | [[Recipient First Name]] |
| [[Recipient Last Name]] | [[Recipient Last Name]] |
| [[Recipient Email]] | [[Recipient Email]] |
| [[Recipient Company]] | [[Recipient Company]] |
| [[Sender Name]] | [[Sender Name]] |
| [[Sender First Name]] | [[Sender First Name]] |
| [[Sender Last Name]] | [[Sender Last Name]] |
| [[Sender Title]] | [[Sender Title]] |
| [[Sender Email]] | [[Sender Email]] |
| [[Sender Phone]] | [[Sender Phone]] |
| [[Requester Name]] | [[Opportunity Name]] |
| [[Opportunity Name]] | [[Asset Type]] |
| [[Asset Type]] | [[Request Status]] |
| [[Request Status]] | [[Request Closed Date]] |
| [[Implementation]] | [[Request Deadline Date]] |
| [[Request Closed Date]] | [[Request Submitted Date]] |
| [[Request Deadline Date]] | [[Account Name]] |
| [[Request Submitted Date]] | [[Sales Stage]] |
| [[Account Name]] | [[Deal Size]] |
| [[How will this reference be used?]] | [[How will this reference be used?]] |
Note: Configurable fields that appear on requests can be merged as long as they use the double brackets (e.g. [[Industry]]).
Reference Request
| Reference Contact | Requester |
|---|---|
| [[Recipient First Name]] | [[Recipient First Name]] |
| [[Recipient Last Name]] | [[Recipient Last Name]] |
| [[Recipient Email]] | [[Recipient Email]] |
| [[Recipient Company]] | [[Recipient Company]] |
| [[Sender Name]] | [[Sender Name]] |
| [[Sender First Name]] | [[Sender First Name]] |
| [[Sender Last Name]] | [[Sender Last Name]] |
| [[Sender Title]] | [[Sender Title]] |
| [[Sender Email]] | [[Sender Email]] |
| [[Sender Phone]] | [[Sender Phone]] |
| [[Requester Name]] | [[Opportunity Name]] |
| [[Opportunity Name]] | [[Asset Type]] |
| [[Asset Type]] | [[Request Status]] |
| [[Request Status]] | [[Request Closed Date]] |
| [[Implementation]] | [[Request Deadline Date]] |
| [[Request Closed Date]] | [[Request Submitted Date]] |
| [[Request Deadline Date]] | [[Account Name]] |
| [[Request Submitted Date]] | [[Sales Stage]] |
| [[Account Name]] | [[Deal Size]] |
| [[How will this reference be used?]] | [[How will this reference be used?]] |
Note: Configurable fields that appear on requests can be merged as long as they use the double brackets (e.g. [[Industry]]).
Spotlight Invitation
|
Spotlight Invitation: Merge Fields |
|---|
| [[Personal Message]] |
| [[Recipient First Name]] |
| [[Recipient Last Name]] |
| [[Recipient Email]] |
| [[Recipient Company]] |
| [[Site Title]] |
| [[Start Date]] |
| [[End Date]] |
| [[Sender Name]] |
| [[Sender First Name]] |
| [[Sender Last Name]] |
| [[Sender Title]] |
| [[Sender Email]] |
| [[Sender Phone]] |
| [[Link]] |
Spotlight Thank You
|
Spotlight Thank You: Merge Fields |
|---|
| [[Recipient First Name]] |
| [[Recipient Last Name]] |
| [[Recipient Email]] |
| [[Recipient Company]] |
| [[Site Title]] |
| [[Spotlight Name]] |
| [[Sender Name]] |
| [[Sender First Name]] |
| [[Sender Last Name]] |
| [[Sender Title]] |
| [[Sender Email]] |
| [[Sender Phone]] |
Export
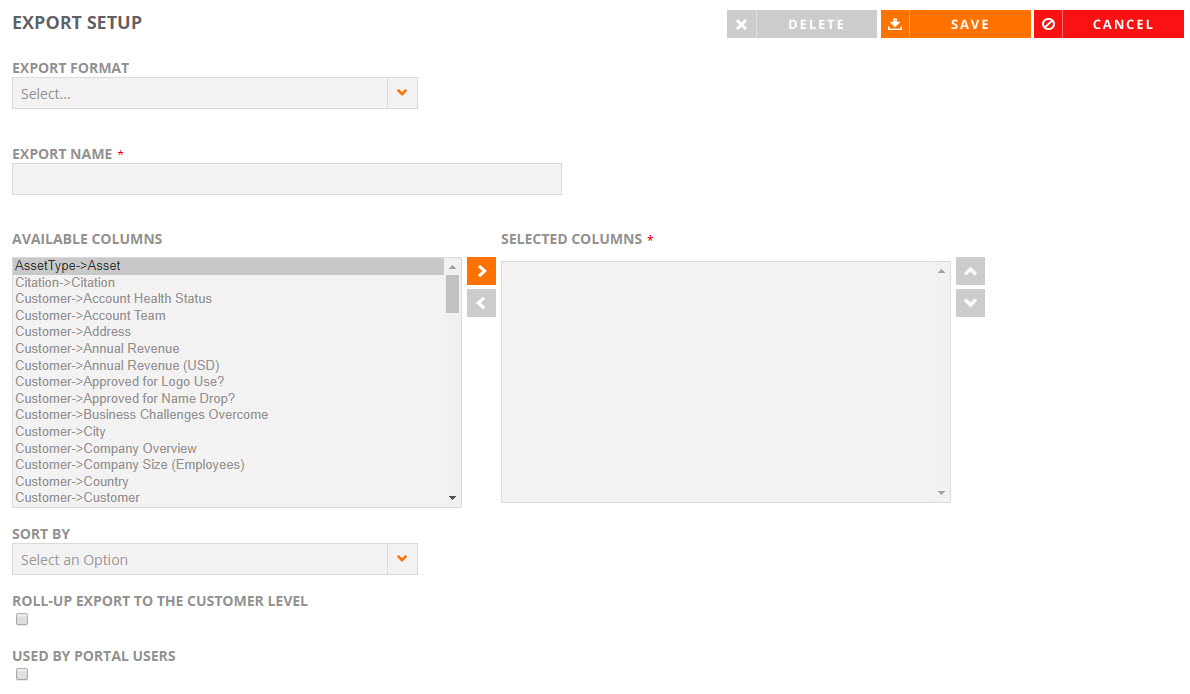
Creating an Export Format will add the Export Results button to the Reference Managers' Customer Search Results page. From the Customer Search Results, Reference Managers can select the export format they wish to send to their Search Results.
- If the export template already exists, select it from the Export Format dropdown menu.
- Enter an Export Name.
- Select the field(s) you want in your export from the Available Columns and add to the Selected Columns using the
 button.
 - If desired, reorder the Selected Columns using the
 and
and  buttons.
 - If desired, determine the Sort By behavior of the fields.
- Select the Roll-Up Export To The Customer Level checkbox to also include the export to include customers.
- Select the Used By Portal Users checkbox to enable Export functionality for Sales/Portal users. If enabled, Sales/Portal users will see the Print Results button on the Search Results page.
- Click Save.
Note: By default, the Export feature is enabled only for Reference Managers and Admins. There is no limit to the number of exports that can be defined for users with an Admin or Reference Manager role.
Analytics Configuration
Admins must contact RO Innovation support to add custom configured fields to their records. Once added, admins can then choose which of their configured fields appear within Upland Analytics, allowing their organization to track information that goes beyond the standard system fields. You can set some of these configured fields as your standard on-page filters or create your own custom reports and dashboards, which include these selected fields.
Example: You may want to add a configured field to the user record that tracks “Region” to report on users’ system usage by geography.
- Click the Administration icon and select Analytics Configuration. The following page will be displayed:
- Select the data Area you wish to configure field values for:
- Customer
- Contact
- Request
- Nomination
- Content: This allows you to bring configured fields from your Customer Records, Product Records, and Marketing Library content submission screen for more customized reporting in Upland Analytics.
- Tracked Assets
- Spotlights
- Content Usage: Report on content being used within configured Customer and Product fields. This can help demonstrate program value to key stakeholders, ensuring longevity of the reference program.
- Users
- Sales Win
- User Adoption: This allows you to bring configured fields from User Records for more customized reporting in Upland Analytics.
- Choose the Available Field Values you wish to use as dashboard filters for the selected data Area.
- Click
 to move the desired Available Field Values to the Configured Field Values column. These fields will be available as filters for your dashboards.
 - (Optional) Reorder the Configured Field Values by dragging and dropping them within the column.
- Click Save.
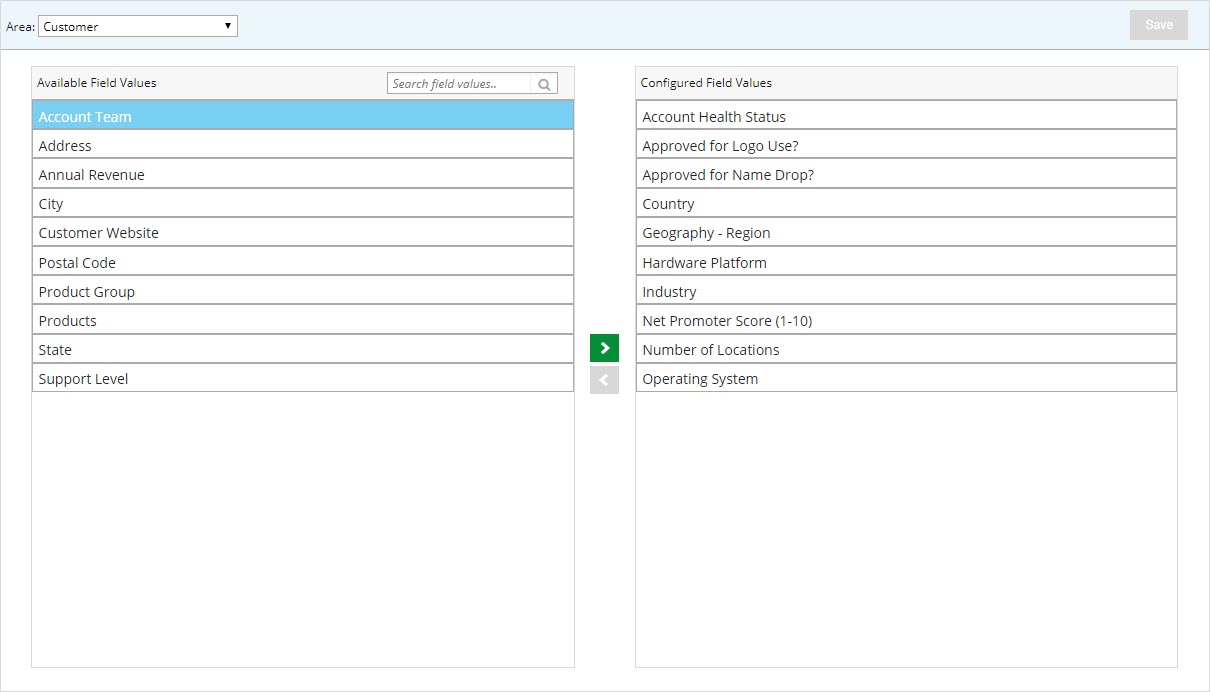
Note: To remove fields from the Configured Field Values column, select the desired fields and click  .
.
Caution: The order of the configured field values matters because the top 5 selections will automatically appear as on-page filters in your Upland Analytics standard dashboards.
Note: The Upland RO Innovation Help Center has information on Upland RO Innovation standard dashboards, fields, sources, and related events. To learn more about working with the dashboards and reports, see the Upland Analytics Help Center.
Grid Configuration
If the RO Default grid configuration does not suit your company's requirements, system administrators can choose what columns appear in the respective grid Platform Configuration. Unless a user at your company sets their own User Preferred Configuration, they will see your Platform Configuration when they log into RO. If a user has set their own User Preferred Configuration, they can return to your Platform Configuration when they click Reset to Default button on the Configure Columns dialog.
- Click the Administration icon and select Grid Configuration. The following page will be displayed:
- Select the grid you want to configure from the Area drop-down.
- Choose the Available Grid Columns you wish to appear in your company's default grid.
- Click to move the desired Available Grid Columns to the Default Grid Columns. To remove fields from the Default Grid Columns, select the desired columns and click .
- (Optional) Reorder the Default Grid Columns by dragging and dropping them within the column.
- Click Save.
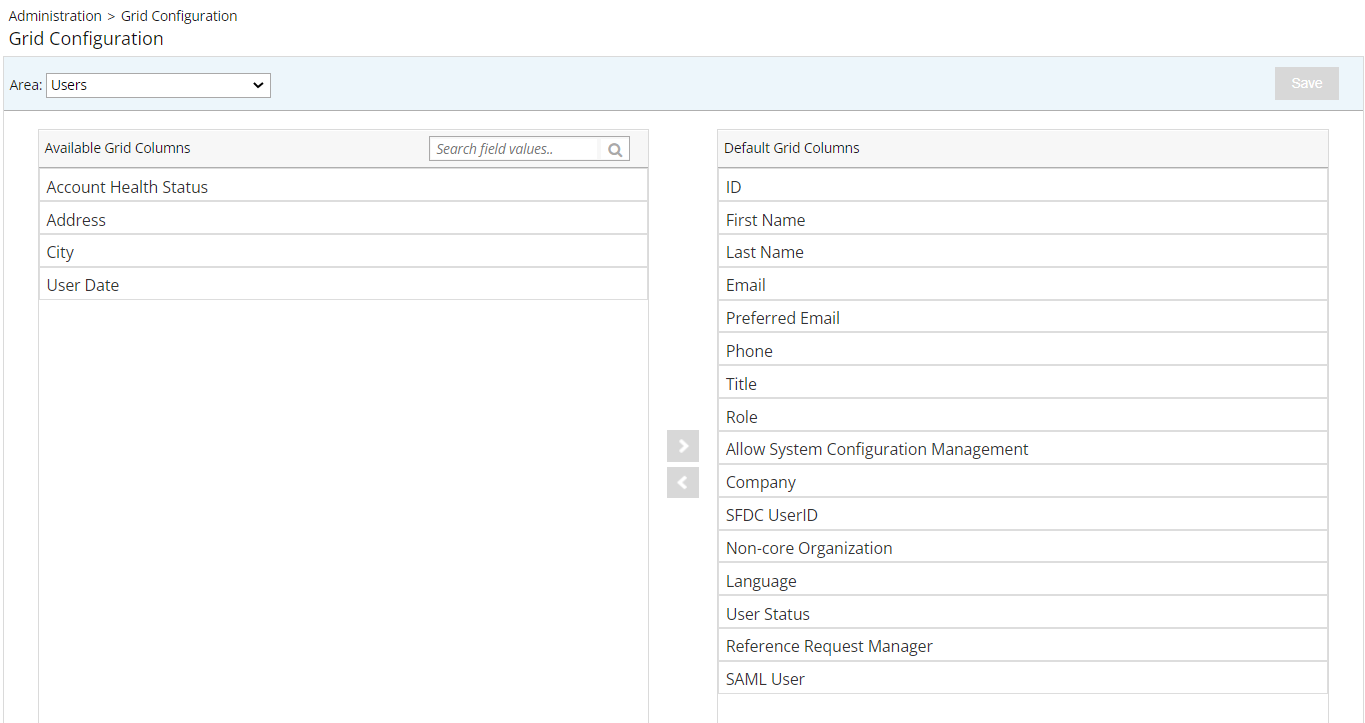
Note: The ID column cannot be removed from the Default Grid Columns, but can be reordered within the grid.
Details Configuration
If the RO default Details configuration does not suit your company's requirements, administrators can choose what details appear in the 'Details' page of all the grids.
- Click the Administration icon and select Details Configuration. The following page will be displayed:
-
Select one of the following grids from the Area drop-down:
-
Request - Sales
-
Request - Marketing
-
Sales Wins
-
Nominations
-
Users
-
Tasks
-
Tasks - Tracking
-
Spotlights
-
- Choose the details from Available column and drag and drop them to Column 1 or 2 as you want it to appear in your grid details tab.
- Click Add Empty Cell to add empty cells to the column 2.
-
Empty cells can only be added to column 2.
-
It is mandatory to add empty cells if you want to add a gap between two fields in column 2.
-
All the fields available in the respective grids page are made available to configure in this page.
- (Optional) Reorder the Details by dragging and dropping them within the column.
- (Optional) Click Reset to Default to go back to the default setting. You will see a confirmation pop-up before it resets.
- (Optional) Click Clear to move all the fields from column 1 and 2 to Available section.
Note: Refreshing or leaving the page after clicking Clear will not retain the action. You must click Save to retain the action.
- Click Save to publish your details configuration changes.
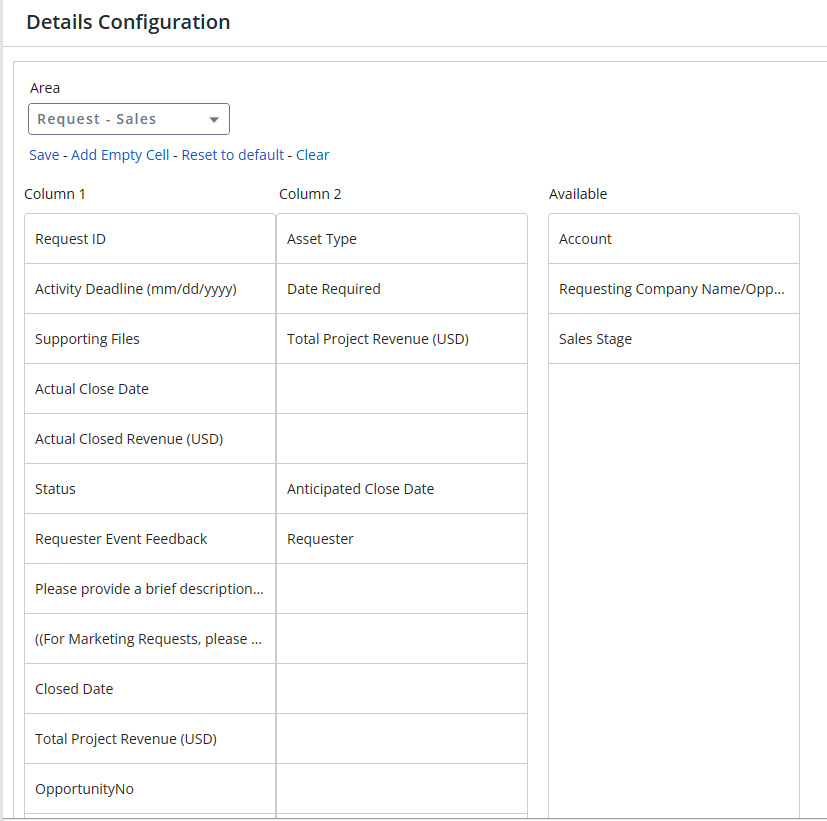
Tip: The details in the Column 1 are displayed on the left side of the screen and the details in the Column 2 are displayed on the right side of the screen in the Details tab.
Example: If there is a large text field in column 1, you cannot add any field in column 2 in the same row otherwise an error message is displayed. To avoid this, you must add empty cells to column 2 in the same row. This is to make it easier to read in the Details tab.
Note:
Tip: It is recommended to build column 1 first and then build column 2 from top to bottom as you cannot add fields in the middle without adding empty cells.
User Outreach
This is where administrators can better communicate with Sales Users and clients.
Create and control the custom messages that appear on the RUX Home page. Tailor messages to the needs of sales and marketing audiences. This extends platform and program communication from the Reference team to key Sales Users, which keeps sales up to date, promotes user adoption, and reduces user frustration through proactive communication.
- Click the Administration icon and select User Outreach.
- Open the Announcement Banner section. The following will be displayed:
- Enter the message, including any styling and links, into the Announcement Message rich text editor.
- Select the Announcement Enabled checkbox so the message will appear on the RUX Home page. The message will be displayed until you deselect the Announcement Enabled checkbox.
- Click Save.
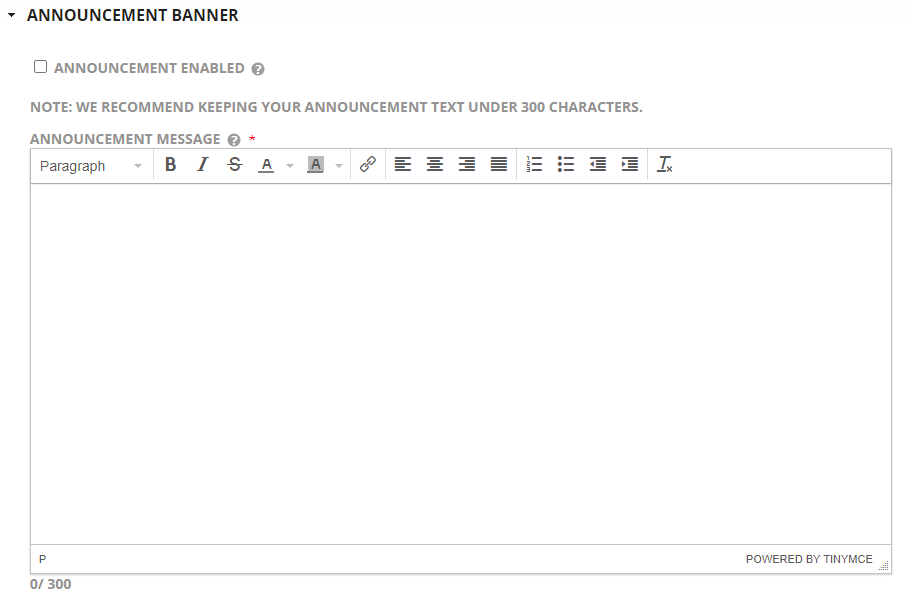
Note: We recommend keeping your announcement text to under 300 characters.
Note: When the Announcement Message is dismissed by the RUX Sales Users, it will reappear after 24 hours (or if a change is made to the Announcement Banner) until the “Announcement Enabled” checkbox is deselected.
Example:
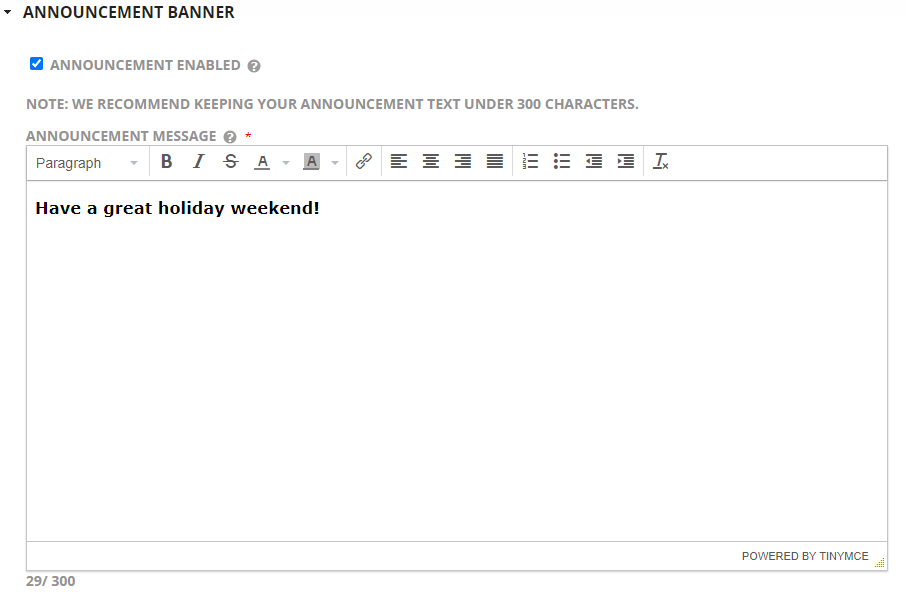
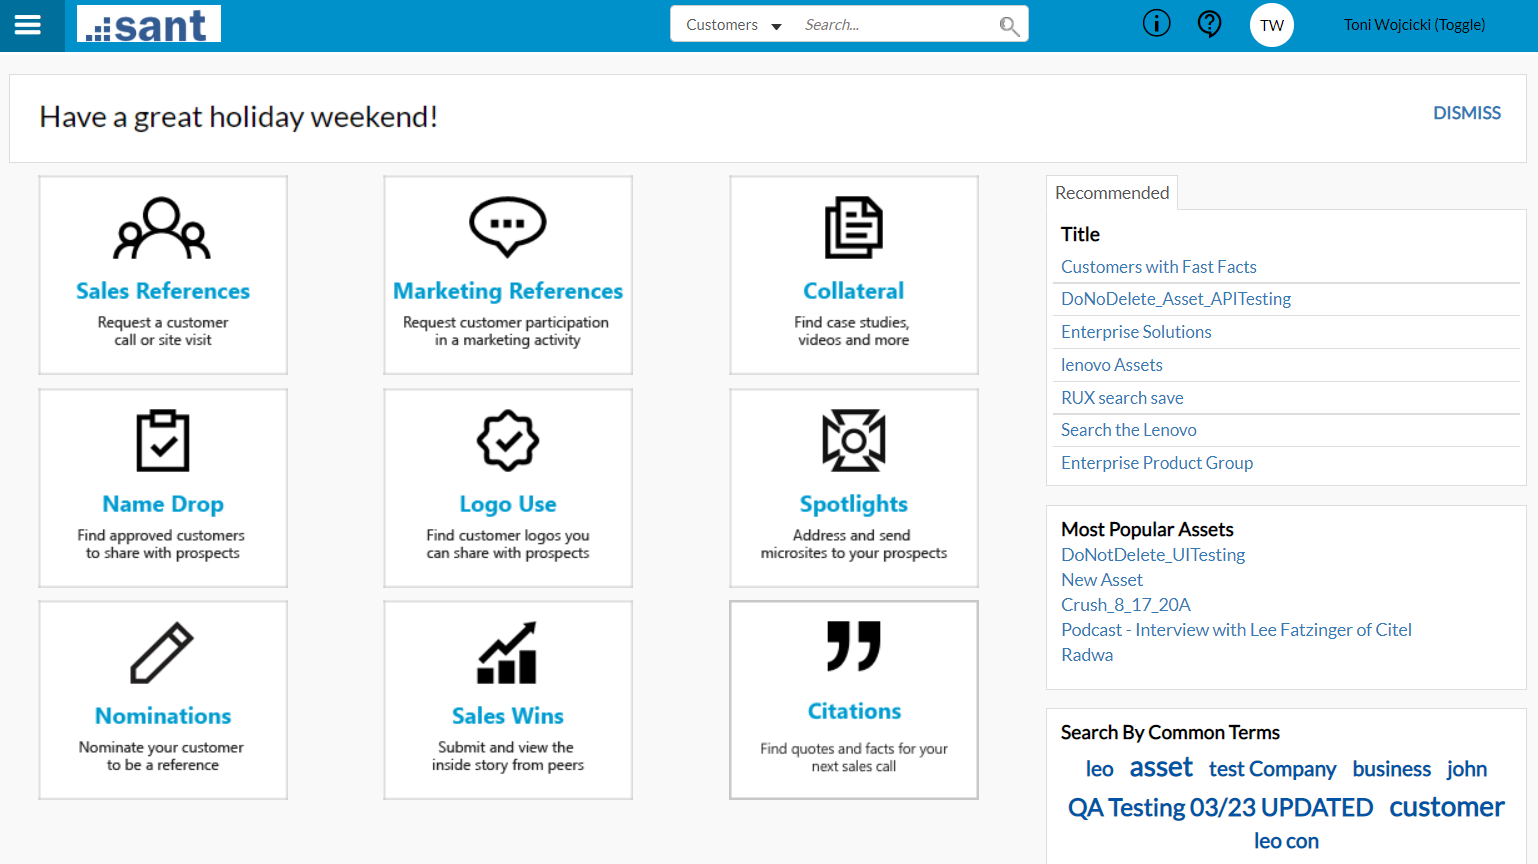
An Announcement Banner message created in Administration (left) and how it appears in the RUX Home page (right)
The RO platform has enabled RUX Feedback Survey feature that allows the reference team to obtain direct user feedback about their experience while using RO Searches as well as Request and Nomination submissions in the RUX platform.
- Click the Administration icon and select User Outreach.
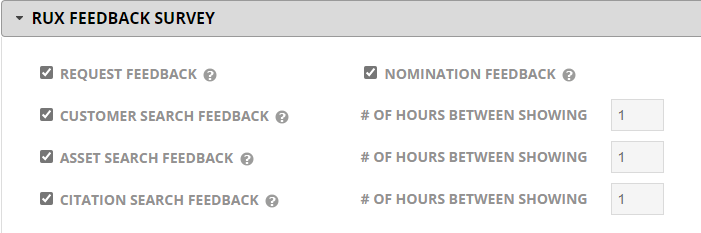
- Open the RUX Feedback Survey section. The following will be displayed:
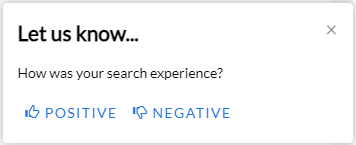
- Select any or all of the checkboxes from the following options:
Request Feedback - When a user submits a request, a survey pop-up appears to allow the users to share their positive or negative experience.
Nomination Feedback - When a user submits a nomination, a survey pop-up appears to allow the users to share their positive or negative experience.
Customer Search Feedback - This setting determines in how many hours a user will be prompted with a survey after performing a customer search.
Asset Search Feedback - This setting determines in how many hours a user will be prompted with a survey after performing an asset search.
Citation Search Feedback - This setting determines in how many hours a user will be prompted with a survey after performing a citation search.
Example:
If you select Customer Search Feedback checkbox and enter the # Of Hours Between Showing field as 1, then the feedback pop-up is shown to users once in every 1 hour.
Once the feedback is submitted by the users, admins can generate a report of all the feedback by navigating to Analytics > Report under the name of Users Experience Survey Report in Quick Report tab.