How do I export an individual invoice?
Before invoices can be exported to QuickBooks, they must be in the Allow Invoice to be exported state of the Invoice Workflow. Invoices can be exported to QuickBooks as:
- Individual invoices. Click here to view the how do I export an individual invoice for more information.
- Multi-client invoices. Click here to view he how do I export a muli-client invoice for more information.
Tenrox allows users to export individual invoices to QuickBooks from either the Post Invoice or Invoice Manager page.
1. Click Financial>Invoice Manager
- Click Financial>Invoice Manager to open the Invoice Manager page.
2. Click an Invoice #
- Click an Invoice # to open the Invoice Edit page for the selected invoice.
- Click the Transactions link to open the Financial Transactions page, which displays all financial transactions.
Note: The information displayed includes the account number, account name, debit, credit, currency type, date and reference.
Note: The Summarized Transaction View is Deprecated as of Tenrox 2011 R3. On viewing the Financial Transactions page, the Transaction View drop-down is disabled and locked to the Detailed selection, therefore there is no longer the ability to select the Summarized view.
Note: Debit and Credit amounts should balance to zero.
3. Verify there is no Account Information on the Financial Transactions page
- Verify there is no account information on the Financial Transactions page displayed in red.
- Click the Back link to return to the Invoice Edit page.
Note: Account information appears in red font color if the accounts are not properly associated Click here to view the how do I map objects between Tenrox and Quickbooks chapter for more information.
4. Click the Post Link
- Click the Post link to open the Post Invoice page.
4.1 Click the Calendar Button
- Click the calendar button beside the Post Date box to select a new date, if the date is not correct.
4.2 Select a Template
- Select a template from the Invoice template list.
- Click the Preview link to view the layout of the invoice report.
Note: The Payment Overview section is read-only and displays the total of all expense and charge entries included in the invoice.
4.3 Click the Export Button
- Click the Export button to open the Invoices Export to QuickBooks page that displays the status of the export process.
Note: Upon successful export of the Invoice:
- The Tenrox Invoice Number (Available as of Tenrox 2011 R3) appears in the QuickBooks Online Memo field of the QuickBooks Online version.
Note: The ability to export the Tenrox Invoice Number to the QuickBooks Memo field is available as of QuickBooks 2010.
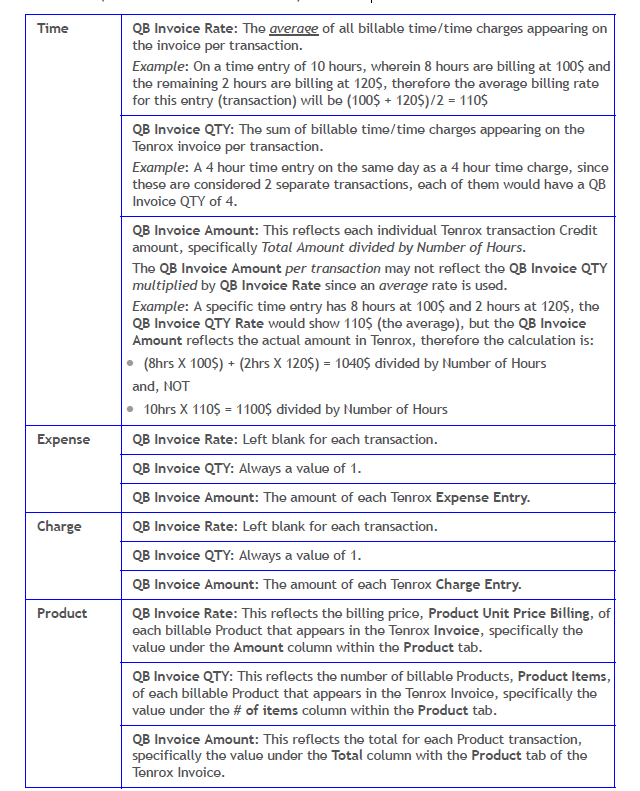
- Specific information, including the average rate and number of hours/quantity, are mapped to QuickBooks (Available as of Tenrox 2011 R3) as follows above.
Note: The export of individual invoices is also performed from the Invoice Manager page by selecting the check box of an Invoice # and then clicking the Export button. After an invoice is exported, the Invoice Export to QuickBooks page indicates that the invoice was successfully exported. If the export process fails, an error message indicates the problems and possible solutions
4.4 Click the Back Link
- Click the Back link to return to the Invoice Edit page.
- Click Back again to return to the Invoice Manager page.
5. Select the check box
- Select the check box for an Invoice Number.
- Click the Post button to post the invoice batch (marks all entries as billed).
6. Click The Following
- Upon being prompted to confirm the posting of the invoice, click either:
- Yes to proceed with the posting
- No to cancel the request