The Project Header is the bar at the top of the page that contains several useful information as well as access to functionality such as editing the Project Name, accessing the context-sensitive information and instructional Online Help article, actioning on the Project and exporting information to Excel.
The Project tab navigation menu provides a number of menu items that allow you to quickly locate and navigate through content.
This article details the available options in the Project Header as well as the available tabs and respective content or context menus.
1. The Project Header
The Project Header is the bar at the top of the page. It remains accessible when accessing the Settings, Overview, Manage, Planners, Attachments and History pages.
- Project Name: Inline editing is enabled for the Project Name. Simple click the edit icon and make the necessary adjustments, after which clicking anywhere outside of the Project Name box will auto-save the entry. Version note: Available as of Tenrox 2019 R1 SP3
- Export to Excel: Click Export to Excel to export the information available within the Details, Summary and Milestones, Team Members and Invoices sections of your Project to Excel.
- Actions: Click the Actions button to view the available Transitions and to move the project to the next State.
- Back: Click the Back button to return to the previous page
2. The Project Tab Navigation
Version Note: As of Tenrox 2019 R1 SP3: Tab menus with associated sub menu items now readily expand upon hovering the mouse pointer over them, showing the available options, thus removing the need to click to expand and action on the sub menu items.
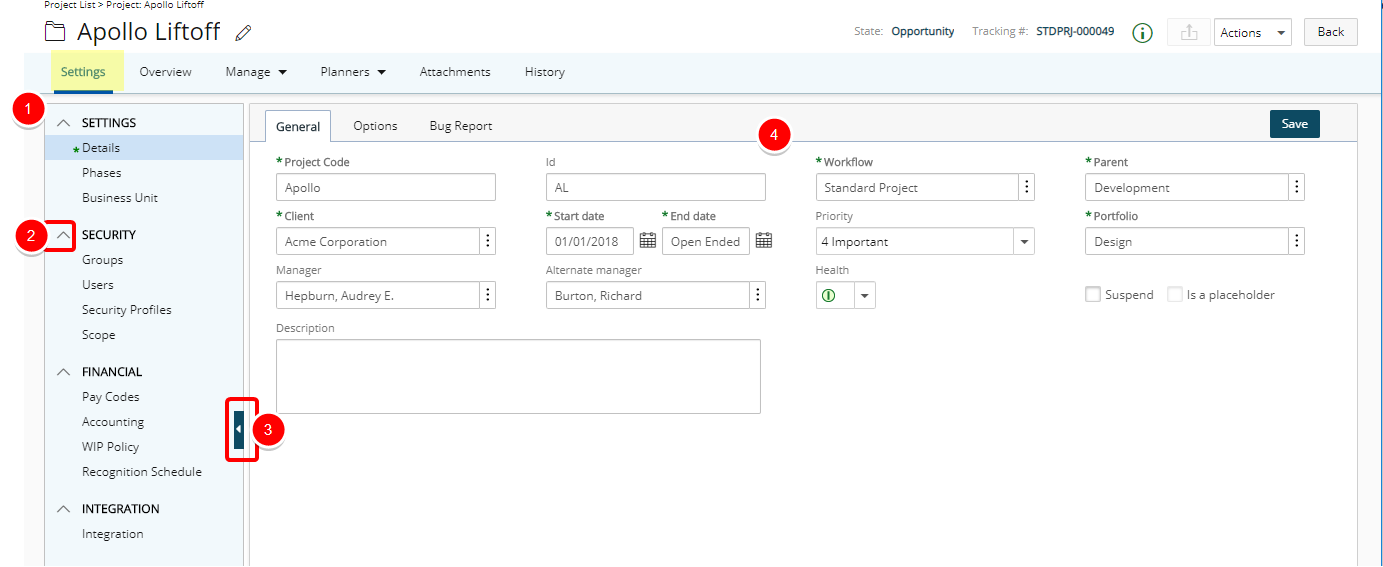
Upon clicking on a Project name from the Project List page, the chosen project is opened in edit mode and the settings tab is displayed where you can modify your Project details and settings.
- The main menu options (Settings, Security, Financial and Integration) in the left navigation can be collapsed or expanded.
- The default view for the left navigation is such that the sub-menu items are shown automatically and are fully expanded, eliminating the need to click to open the categories to view the items within. Clicking the top arrow will collapse the navigation items, showing only the main menu option.
- Clicking the left arrow will collapse the left navigation allowing for optimal usage of the available space. Upon collapsing the menu, your choice will be remembered until navigating away from the Project Edit. Version note: Available as of Tenrox 2019 R1 SP4
- The layout and spacing of various elements on the Project Edit page have been improved for a more streamlined and easier experience as well in keeping with the UplandOne standards. The Project Details General, Options, and User Defined Field tabs now have a four-column layout.Version note: Available as of Tenrox 2019 R1 SP4: A fourth Layout column has been added to the User Defined Fields layout for the Project.
For more information on the Settings tab and the available options click here.
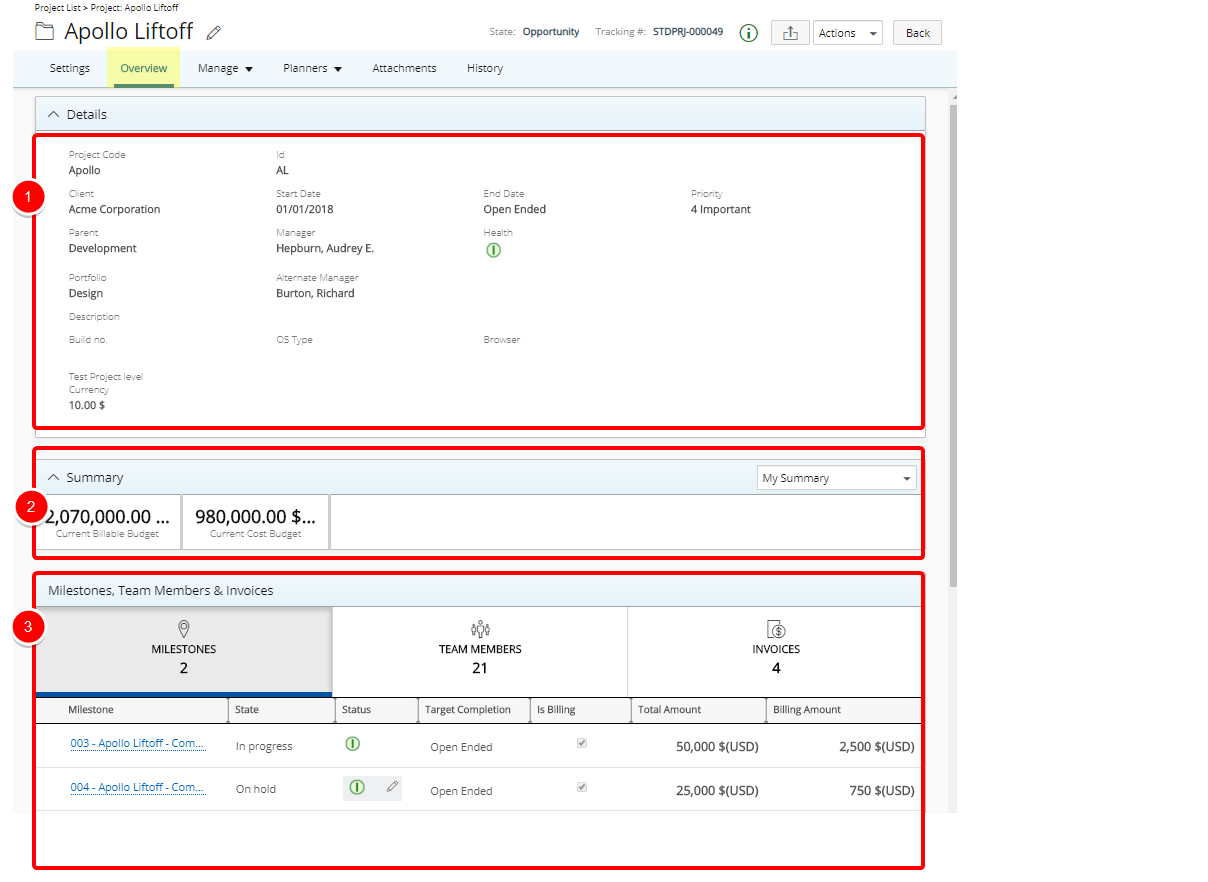
The Overview tab gives you an overview of your Project. The available information is displayed in 3 sections:
- The Details section allows you to view the details of your Project as set on the General tab when creating a project.
- The Summary section allows you to view a summary overview of your Project as defined in the Summary Setup page accessed through Setup > Work > Project Overview.
- The Milestones, Team Members and Invoices section contains 3 sub tabs:
- Milestones tab: Within the Milestones tab a list of all Milestones/Billing Milestones is displayed.
- Team Members tab: The Team Members tab contains a list of all Project Team members.
- Invoices tab: The Invoices tab contains a list of all Project Invoices.
Version Note: As of Tenrox 2019 R1 SP3:
- The layout of elements on the Overview Details section have been improved to match the layout of elements on the edit panel for a more streamlined and easier user experience and in keeping with the UplandOne standards.
- Addition of Roles to the Team members tab within the Milestones, Team Members & Invoices section of Project Overview.
For more information on the Overview tab and the available options click here.
The Manage tab has an associated context menu which allows you to easily access the key areas to manage your Project such as:
- Tasks: Clicking Tasks will open the Project Task page where you can manage your project tasks.
- Milestones: Clicking Milestones will open the Project Milestones page where you can manage your project Milestones.
- Project Team: Clicking Project Team will open the Project Team page where you can manage your project Team.
- Cost: Clicking Cost will open the Project Cost page where you can manage your Fixed or Hourly Project costs settings.
- Billing: Clicking Billing will open the Project Cost page where you can manage your Milestone, Recurring, Fixed Time, Split or Hourly Project billing settings.
Version Note: As of Tenrox 2019 R1 SP4: The Cost and Billing menu items are moved under the Manage tab.
For more information on the Manage tab and the available options click here.
The Planners tab has an associated context menu which allows you to easily access:
- Project Planner: Clicking Project Planner will open the Upland Project Planner for the project.
- Work Plan: Clicking Work Plan will open the Project Work Plan.
- Financial Planner: Clicking Financial Planner will open the Project Financial Planner.
- Budget: Clicking Budget will open the Project Budget Planner where you can enter the budgeted amounts in the respective Time, Cost, Billable and Non-Billable item boxes for tasks.
For more information on the Planners tab and the available options click here.
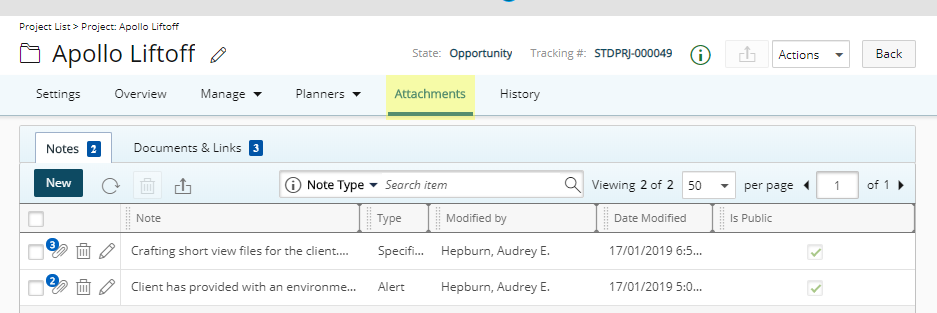
- Clicking Attachments will open the Attachments page where Notes and Documents & links can be associated to the project or removed from it. An easy to use Export to Excel option also allows for the Notes and Documents & links list to be exported in Excel format. It is also possible to filter or search for items.
For more information on the Attachments tab and the available options click here.
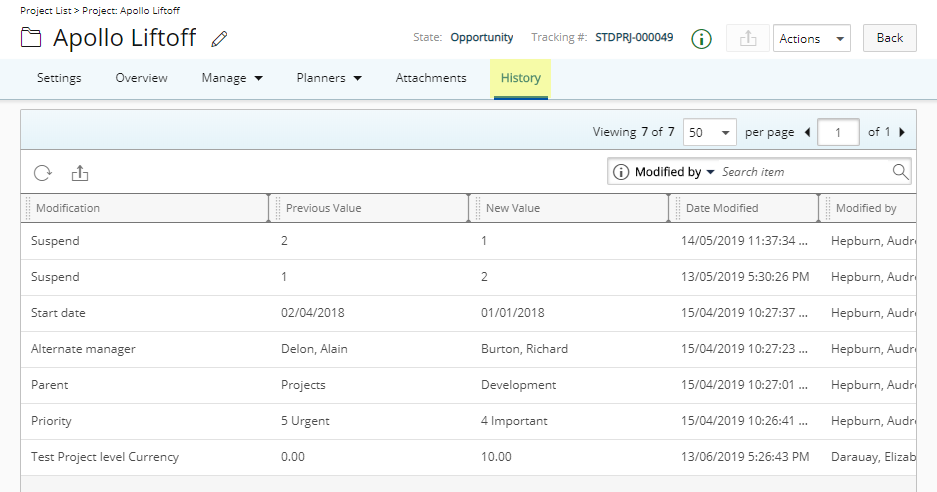
Clicking History will open the Project History page where you can view the Project State change History. An easy to use Export to Excel option also allows for the History list to be exported in Excel format. It is also possible to perform a search.
The Project Edit History page, previously only detailing the changes made to the Project State, now provides more information including the Modification, Previous Value, New Value, Date Modified and Modified by. When the new Project Detailed Auditing option, available under Setup > Work tier within the Audit Trail settings is enabled, changes made to the Project within the Project Details page (General, Options and UDF tabs) can now be tracked and available on the History page to indicate what, when and by whom it was made.
For more information on the History tab and the available options click here.


