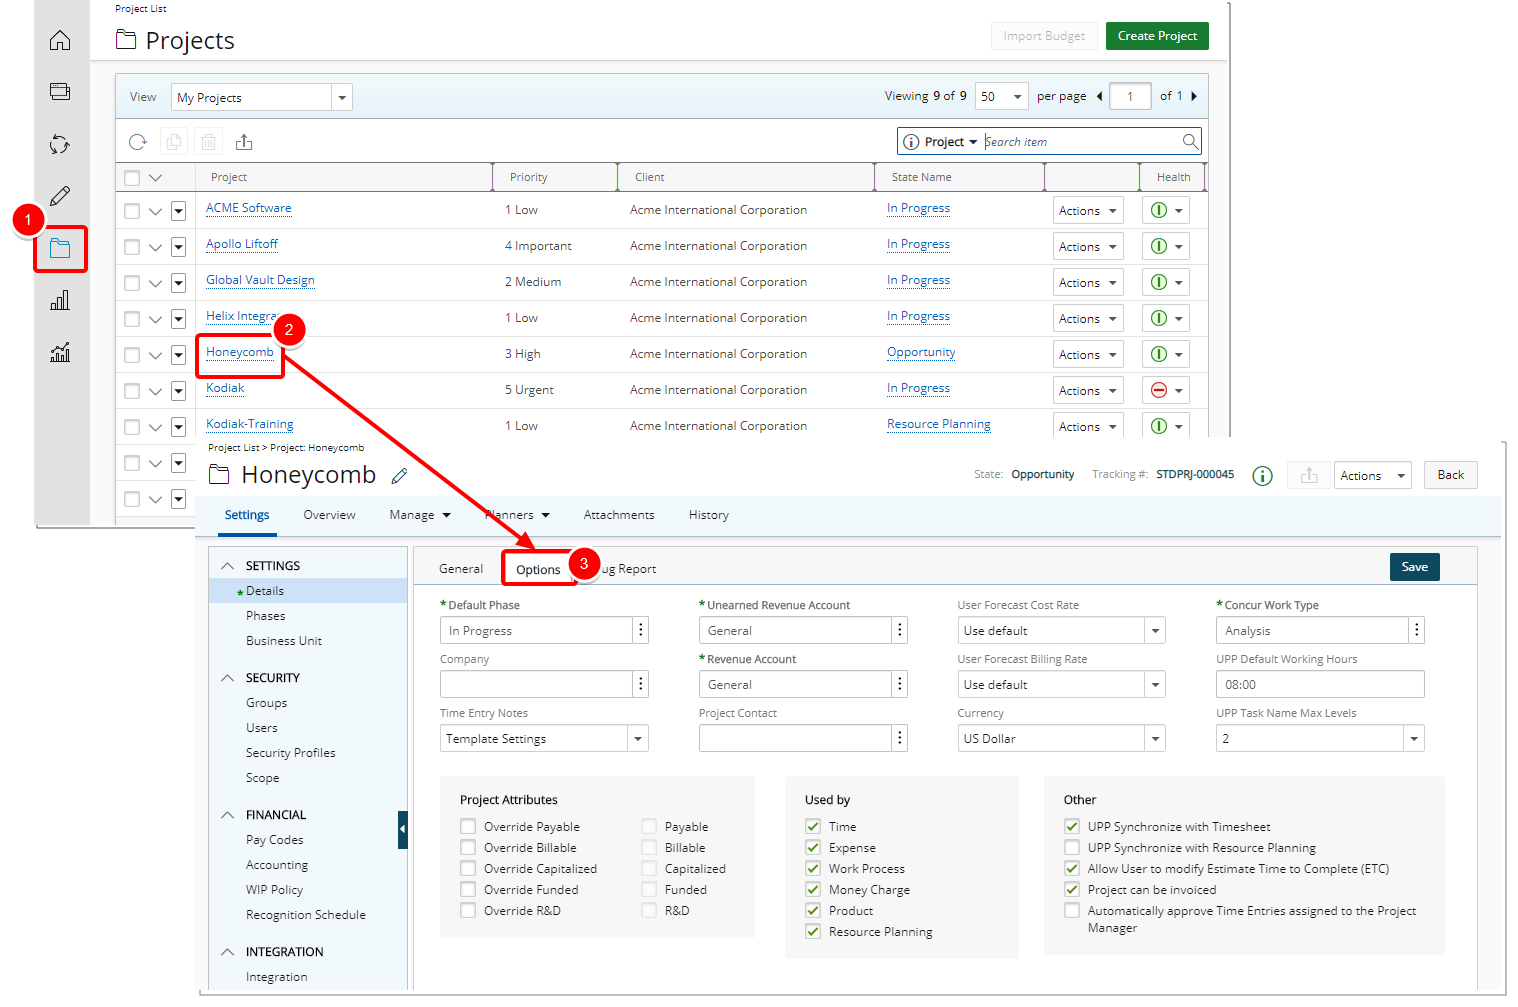
Once you have created your Project you can access the Project Options tab.
The Options tab of the Project Edit page allows users to set the cost and billing rules that can be associated to projects. By setting the cost and billing rules for a selected project, all new time, charge, and expense entries related to the project inherit the specified attributes. The cost and billing rules set for a specific project can also be overridden. By selecting the project attribute override check boxes, only the attributes of the time, expense, product and charge entries associated to the project are overridden; however, the attributes of the work types and tasks associated to the project do not change.
For more information on setting the project attributes, see the Project Attribute Setup Scenarios
1. Access the Project Options tab
- Click Project List from the Icon Bar.
- From the Project List select the project you wish to edit.
- The Project edit page will be displayed with an open General tab. Click the Options tab located next to it.
Version Note: Available as of Tenrox 2019 R1 SP4: Addition of a fourth Layout column to the Project Details General, Options, and User Defined Field tabs.
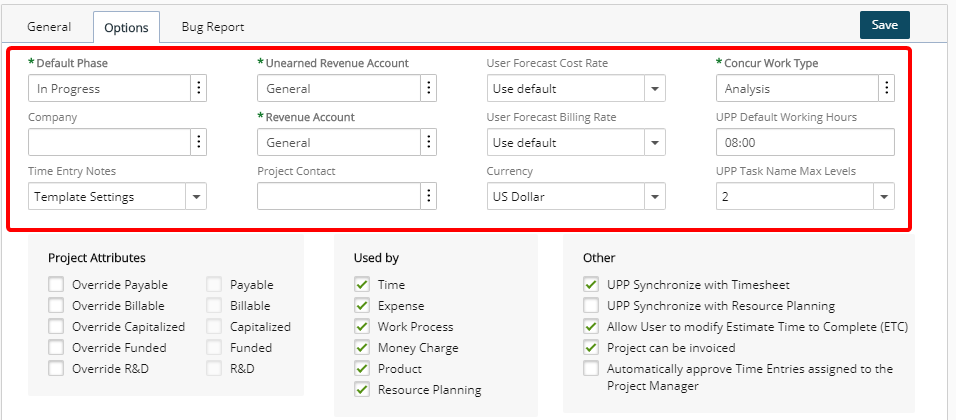
2. Set the options for the selected project
| FIELD / OPTION | DESCRIPTION |
|---|---|
| Default Phase * | Click the Browse button (...) to change the system default Phase. |
| Company | Click the Browse button (...) to select the Company associated to your Project. |
| Time Entry Notes | Choose from one of these options: Template Settings, Required, Not allowed and Optional. |
| Unearned Revenue Account * | Click the Browse button (...) to change the system default Unearned Revenue Account. |
| Revenue Account * |
Click the Browse button (...) to change the system default Revenue Account.
The Revenue Account is used in the Revenue Batch only when a Recognition Schedule exists at the Project level with a Fixed amount defined.
For more information see Setting Up Revenue Recognition Rules at the Project Level and Setting Up Revenue Recognition Schedules for Projects. Note: The Revenue Account field is:
|
| Project Contact | Click the Browse button (...) to select a Project Contact associated to your Project. |
| User Forecast Cost Rate | Choose from one of these options: Use Default, Role Forecast Rate, User Forecast Rate, User Actual Rate, User Actual Rate with Client Dependency and User Actual Rate with Project Dependency. |
| User Forecast Billing Rate: | Choose from one of these options: Use Default, Role Forecast Rate, User Forecast Rate, User Actual Rate, User Actual Rate with Client Dependency and User Actual Rate with Project Dependency. |
| Currency | Select the Project Currency. Note: Available only when Enable Project Currency override is selected at the system level. |
| Concur Work Type | Define a project level default expense work type. |
| UPP Default Working Hours | Select the Upland Project Planner Default Working Hours. |
| UPP Task Name Max Levels | |
| * Required |
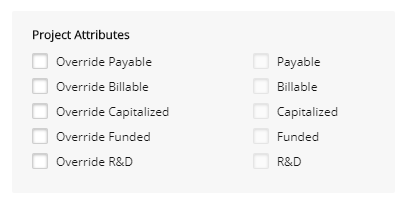
3. Select the Project Attributes
Select the appropriate attributes from the Project Attributes section to set the project's billing and cost calculation rules; for more information, see the Project Attribute Setup Scenarios:
| FIELD / OPTION | DESCRIPTION |
|---|---|
| Override Payable Override Billable Override Capitalized Override Funded Override R&D |
Select any of the Override options to override the Entry Attributes of the associated tasks. |
| Payable | Select this option when the project incurs a cost for the company (company pays costs incurred by the project). |
| Billable | Select this option when the project generates a profit for the company (clients are billed for the costs incurred by the projects). |
| Capitalized | Select this option when the project is part of a company’s capital expenses (capital expenditures create future benefits and are part of a company’s assets). Note: Reports can be generated for all entries marked as Capitalized. |
| Funded | Select this option when the project is part of a company’s capital expenses (capital expenditures create future benefits and are part of a company’s assets). |
| R&D | Select this option to associate the project to research and development (R&D) when it is necessary to accurately track all actuals that relate to R&D projects and tasks, such as cases wherein an R&D project receives a government grant. |
| * Required |
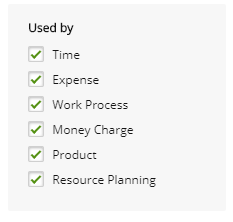
4. Select the appropriate Tenrox module(s)
Select the appropriate Tenrox module(s) from the Used By section to define the settings at the task level at the time of creation. The entry verifications are performed against the task attributes.
- Time
- Expense
- Work Process
- Purchase
- Money Charge
- Product
- Resource Planning
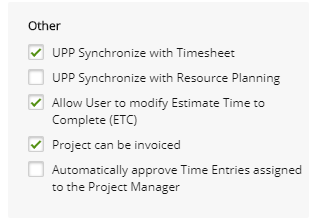
5. Other Section
| OPTION | DESCRIPTION |
|---|---|
| UPP Synchronize with Timesheet | Select to allow Upland Project Planner to synchronize with Timesheet. |
| UPP Synchronize with Resource Planning | Select to allow Upland Project Planner to synchronize with the Resource Management Work Plan. For more information see activating the synchronization of UPP with Resource Planning at the Project level |
| Allow User to modify Estimate Time to Complete (ETC) | Check this option to allow users to modify the ETC. Note: By default, the status of the Allow User to modify Estimate Time to Complete (ETC) option is defined at the Timesheet Template level (Setup>Timesheet>Timesheet Templates>Timesheet Template Edit) and is disabled for placeholder projects. The ETC is set to the value specified at the global level when a project is imported from an accounting or CRM system, the Project Planning Tool or MSP application, or the Excel Import. When the ETC value is negative, it is reset to zero. |
| Project can be invoiced | Check this option to allow users to define whether a project should be included in an invoice; for more information, see Including Projects in Invoices. |
| Automatically approve Time Entries assigned to the Project Manager | Check this option to allow the automatic approval of time entries for projects while in the Project Manager (PM) approval process; for more information, see Auto-Approving Time Entries for Projects. |
