About WebApps DMS Document Profiling
Document Profiling also known as Document Tagging is a feature that helps users access and retrieve documents stored in a document management system (DMS). A document profile specifies the DMS location, format, and metadata for delivery, identification, and searching purposes.
The WebApps Client supports DMS document profiling. In addition, the Desktop Client is integrated with the WebApps Client and is used for configuring WebApps DMS document profiling. WebApps users will be able to create DMS profile records when creating distributions and using MyFiles.
This integration only supports the following document management systems.
-
DM
-
DocuShare
-
FileBound
-
FileShare
-
iManage
-
OpenDocs
-
RecordsManager (previously known as Trim)
-
SharePoint
-
Worldox
Note: It does not support cloud-based document management systems.
The Desktop Client can be configured to integrate with document management systems and other specialized applications that extend the functionality of pre-existing document storage and retrieval methods.
Before you begin
Administrators must complete the following tasks.
- Obtain and activate the Desktop Client license, if necessary. Contact your Account Manager and see Activating a license for more information.
Note: The WebApps Client is part of the standard server installation and does not require a license.
- Install the Desktop and WebApps Client, if necessary. See the Clients Installation Guide > Installation > Desktop and WebApps sections for more information.
Note: The WebApps Client is installed on the server or another remote IIS system. The Desktop Client is not installed on the server, but must be installed on each user’s desktop.
- Configure the Desktop and WebApps Client. See the Clients Installation Guide > Required Configuration > Desktop and WebApps sections for more information.
Desktop Client WebApps DMS Document Profiling Configuration Checklist
This checklist highlights some important configuration requirements that Administrators and WebApps users must do to set up WebApps DMS document profiling after the Desktop and WebApps Clients are installed.
The FileShare connector is being used as an example for illustrative purposes only and may not reflect your company’s unique DMS connector configuration in the steps below.
Configuration Requirements
DMS connector
A DMS connector routes documents from the server to your company’s document management system.
To add a DMS connector
- Start the Server Administrator.
- Right-click Connectors and select New Connector.
- Select a DMS connector on the shortcut menu.
- Use The Create Connector wizard to specify the parameters required.
- Click Next as needed.
- Click Finish. The DMS connector appears in the Connectors details pane.
To configure the DMS connector
- Right-click the DMS connector in the Connectors details pane.
- Select Properties on the shortcut menu.
- Select the Advanced tab and go to the DMS Configuration area.
- Click Configuration.
- Specify the Network Folder path and Multiple Use option.
- Click Next as needed and specify any additional parameters required.
- Click Finish.
- Click OK.
Note: Make a note of the Network Folder or appropriate DMS related path. You and the WebApps user will need this information to configure the DMS in the Desktop Client.
See About DMS Connector and Adding a DMS Connector for more information.
Watch Folder
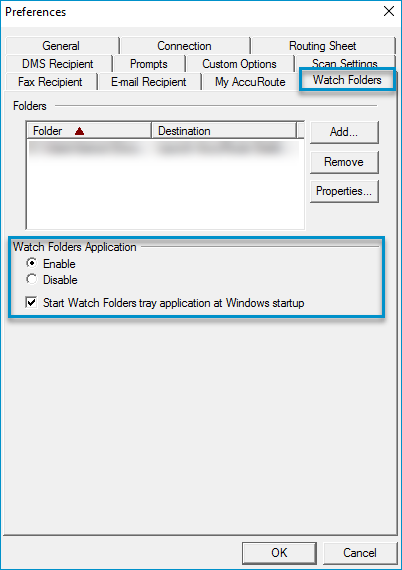
A Watch folder application is automatically configured and enabled for WebApps Client use. The WebApps DMS Document Profiling feature will not work if it is disabled. No additional configuration is required.
See the Desktop Client > Tools Preferences dialog box example below.

WebApps Profiles
WebApps profiles are used to select which web applications will be available for your designated groups. Web applications; for example, Create Distributions and MyFiles must be added to any WebApps profiles you create.
Note: The Default profile has a set of default web applications that can be used for Groups > Client Access.
To add web applications to a profile
- Start the Server Administrator.
- Expand Configuration on the Server Administrator tree.
- Right-click WebApps . The Properties shortcut menu appears.
- Select New > Profile. The New Profile Properties dialog box appears.
- Type a profile name in the Name box.
- Type a description in the Description box.
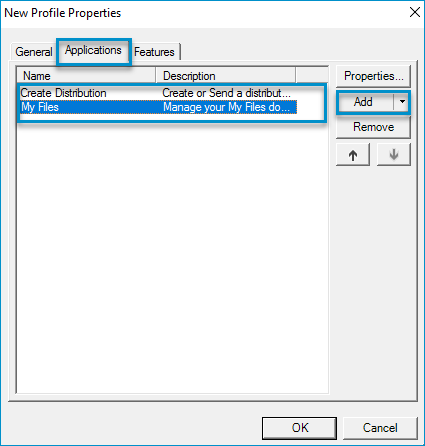
- Select the Applications tab.
- Select the Add button. The Applications shortcut menu appears.
- Select the appropriate application; for example, Create Distribution and MyFiles.
- Specify the General, Options, Attachment Permissions, and Actions parameters, if necessary. The applications appear in the Name and Description table.
- Click OK.
See the WebApps > New Profile Properties dialog box example below.

Groups > Client Access and Final Forms
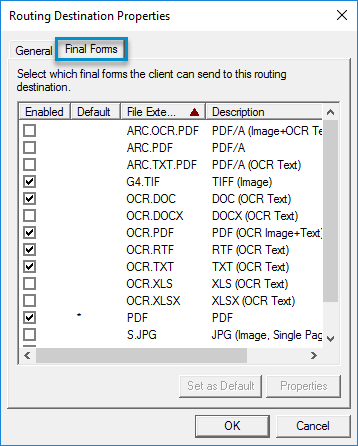
User permissions are assigned via groups. Administrators can configure client options, prompts, scan settings, and more for each group. Groups are also used to assign access to a company’s document management system. In addition, final forms must be set up. These are the formats; for example, PDF that WebApps users will select for their routing destinations.
To provide groups client access and identify final forms
- Start the Server Administrator.
- Expand Configuration on the Server Administrator tree.
- Select Groups. The Default and other groups previously created appear in the Groups details pane.
- Select the appropriate group. The Group Properties dialog box appears.
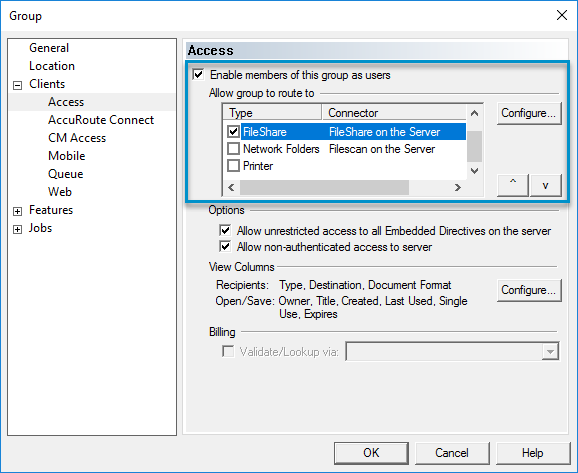
- Expand Clients, if necessary, and select Access.
- Ensure the Enable members of this group as users check box is selected.
- Choose the Allow group to route to (DMS) type from the Type/Connector table and click Configure.
- Select the Final Forms tab and choose the appropriate formats that the Client can send to the routing destination.
- Click OK on the Routing Destination Properties dialog box.
- Click OK on the Group Properties dialog box.
Note: These forms will appear in the WebApps Client when the WebApps user creates distributions.
See the Group Properties > Client Access and Configure > Routing Destination Properties > Final Forms dialog box examples below.

|

|
See the Clients Installation Guide > Requirement Configuration > Desktop and WebApps for all configuration requirements.
Desktop Client Setup for Multiple Systems and Users
Running Desktop Client Setup in Silent Mode
Silent Mode is a method of installing software that requires no user interaction. It is also known as an automated or unattended installation, and it is used in scenarios where Administrators and not users will manage the installation process. Administrators with multiple systems and users can run the Desktop Client setup in silent mode.
To run the Desktop Client Setup in Silent Mode
For 64 bit systems, the path is C:\Program Files\UplandAccuRoute\AccuRoute \Clients\AccuRouteDesktop\setup.exe.
- To install Desktop Client in another system, run: setup.exe /s /v"/qn" This installs Desktop Client to the default location: C:\Program Files\UplandAccuRoute\AccuRouteDesktop.
Note: To install Desktop Client for all users in silent mode, see Installing Desktop Client for all Users in Silent Mode below.
- Optionally, to change the location, set the property INSTALLDIR, run setup.exe /s /v"/qn INSTALLDIR=<short name path>" where <short name path> is the short name path to the target folder. (The entire path must be in short name format. For example, if the long path is J:\Program Files\UplandAccuRoute\AccuRouteDesktop, then the short path is J:\PROGRA~1\UPLANDACCUROUTE\ACCURO~1.)
Tip: The command for short name conversions is dir /x. Run this command in any directory to return the short names of all folders in that directory. For example, to do a short name conversion on J:\Program Files, change the current directory to J:\ and run dir /x.
- Verify that Desktop Client is installed on the client by navigating to …\UplandAccuRoute\AccuRouteDesktop on the client and verifying that the Desktop Client program files are installed.
Installing the Desktop Client for all Users in Silent Mode
To install the Desktop Client for all users in silent mode
- Start by following the instructions in Running the Desktop Client Setup in silent mode.
- Add the following argument ALLUSERs=2: setup.exe /s /v"/qn ALLUSERS=2" where you run the setup file.
Note: The ALLUSERS argument is required in order for the install to complete successfully. If you do not use this argument, and you log into the system using a user credential that is different than the one who ran the install, the Desktop Client does not show in Add/Remove Program list.
- Sign in as a different user and verify that the Desktop Client is listed in Start > All Programs > Add/Remove programs.