The Epic connector has been developed to integrate the Epic healthcare system and AccuRoute Server for On-prem and Cloud use. Epic users are able to send faxes from their Epic healthcare system to the server. Faxes are routed and delivered to their appropriate destinations via the connector and server. Routing rules for the connector are preconfigured. Tracking delivery of the faxes can be done with the use of the Server Administrator In Process and History folders which is a standard protocol for all messages processed by the server.
Note: Contact Epic Technical Support for information about setting up faxing on the Epic healthcare system. The information in this topic is related to setting up faxing on the AccuRoute Server.
Before you begin
Administrators must complete the following tasks.
-
Create your Epic account credentials. You will need the credentials when setting up the Epic connector.
-
Determine whether you will be using the connector in an on-prem or cloud environment.
-
Create and set up the Epic connector for on-prem or cloud use.
You will need the following endpoint information for the Epic healthcare system configuration.
-
For Cloud configuration - https://uplandcapture.com/epic/accuroute
-
For On-prem configuration - http://servername/sitename/epic/accuroute
Note: Contact AccuRoute Technical Support if you are planning on using the connector in a cloud environment. You will need credentials for Upland Intelligent Capture (UIC). The UIC technology is used to support the fax integration between the Epic healthcare system and server in a cloud environment. These credentials are required. The credentials are not required for On-prem configurations.
Setting up Epic connector
You can create and set up the Epic connector by using Connectors in the Server Administrator.
To create the Epic connector
-
Start the Server Administrator.
-
Right-click Connectors. The Connectors shortcut menu appears.
-
Select New AccuRoute connector. The Create New Connector wizard appears.
-
Use the default server address or specify the remote server address.
-
Select Next.
-
Use the default name or type a new one in the Name box.
-
Select Next.
-
Select Finish. The Epic connector appears in the Connectors details pane.
To set up the Epic connector
-
Right-click the Epic connector in the Connectors details pane. The Properties shortcut menu appears.
-
Select Properties. The Properties dialog box appears.
-
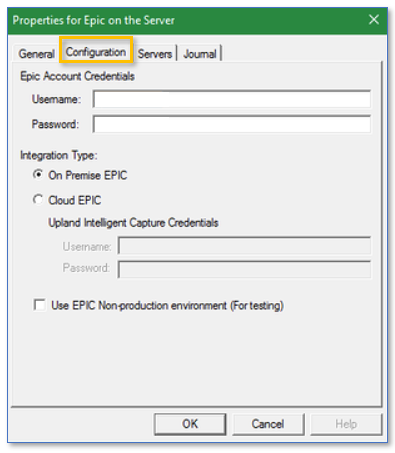
Select Configuration.
See the Epic Connector Properties dialog box example below.
-
Specify your Epic account credentials in the Username and Password boxes.
Note: Both Cloud and On-prem configurations require the Epic account credentials.
-
Select one of the following Integration types.
-
On Premise EPIC
-
Cloud EPIC
-
-
Specify the Upland Intelligent Capture credentials in the Username and Password boxes if Cloud EPIC is selected.
-
Select the Use EPIC Non-production environment (For testing) check box for testing purposes only.
Note: The Use EPIC Non-production environment (For testing) setting allows Administrators to test in a non-production environment for both Cloud and On-prem configurations. It ensures the correct Client ID is provided for connection between the Epic healthcare system and the server.
-
Select OK.
Cover Page Variables
The following cover page variables are available for Epic users when sending documents.
-
Sender Email
-
Epic User Name
-
Epic (default)