Administrators can apply a variety of properties to device buttons via the Server Administrator. The following properties can be set to new or existing buttons based on your workflow requirements.
-
General is used to edit button name, display text, and description, specify location, and other options like requiring authentication.
-
Options is used to set which folders to display at a device.
-
Job Properties is used to set job properties.
-
Confirmations is used to set different types of notifications when jobs fail.
-
Prompts is used to set user prompts for additional information at the device.
-
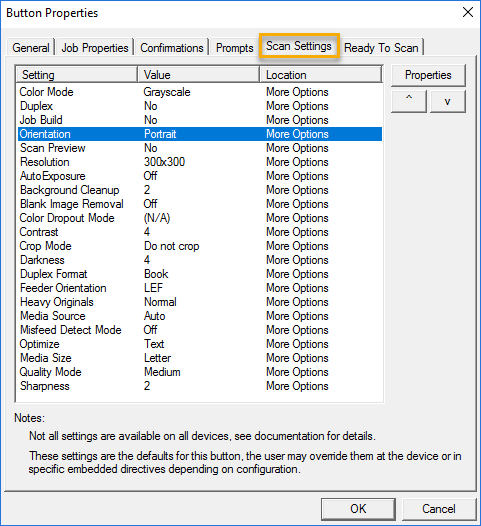
Scan Settings is used to set a variety of settings like orientation.
-
Ready to Scan is used to enable Scan to Email functionality.
Note: A series of default buttons and properties are set up for you based on your device configuration. You can modify the default buttons and properties if necessary.
Setting up Scan Settings
There are a series of default scan settings that are applied to device buttons configured in the Server Administrator which include color mode, duplex, job build, orientation and more.
Note: Various device models may not have all scan settings available.
The following instructions describe how to change the default Portrait to Auto-Detect orientation. These instructions are for illustrative purposes only and may not apply to your unique device workflow requirements.
To edit the orientation scan setting
-
Start the Server Administrator if necessary.
-
Select Devices.
-
Right-click the appropriate device group. The Properties shortcut menu appears.
-
Select Properties. The Device Group Properties dialog box appears.
-
Select the Buttons tab.
-
Select the appropriate button. The Button Properties dialog box appears.
-
Select the Scan Settings tab.
See the Button Properties > Scan Settings dialog box example below.
-
Select Orientation. The Scan Settings Properties dialog box appears.
-
Select Auto-detect on the Orientation drop down list.
-
Select OK on the Scan Setting Properties dialog box. Auto-detect appears as the updated value in the Setting table.
-
Select OK on the Button Properties dialog box.
-
Select OK on the Device Group Properties dialog box.
Note: You can use the instructions listed above to edit any of the Scan Settings by selecting the appropriate setting in the table.
Enabling Scan Settings to Specific Device User Groups
You can enable members of a specific group to use particular Scan Settings that you do not want available to all users. Once a user in the group logs in to a device, they can use the scan settings configured for the group.
-
Start the Server Administrator if necessary.
-
Select Groups.
-
Right-click the appropriate group. The Group dialog box appears.
-
Expand Features and select Scan Settings.
-
Select Enable members of this group to use the selected Scan Settings check box.
-
Select the scan settings you want for the group.
-
Select OK.