Administrators that use DTT (Destination Translations Table) can add a Route To Destination column and view the information displayed in the
Before you begin
Administrators must complete the following tasks.
-
Add the Route To Destination Column.
Adding the Route to Destination column
You can add a Route to Destination column by using the Server Administrator > Routing > Routing Application Properties dialog box. Although the following instructions are specific to a Route to Destination column, they can also be used to add other columns you want to see in the routing table.
Note:
To add the Route to Destination column
-
In the Server Administrator, expand Configuration and select WebApps . The profiles appear in the Details pane.
-
Select a profile associated with your DTT. The Profile Properties dialog box appears.
-
Select the Applications tab.
-
Select Routing. The Routing Application Properties dialog box appears.
-
Select the Columns tab.
-
Select Add. The Column Properties dialog box appears.
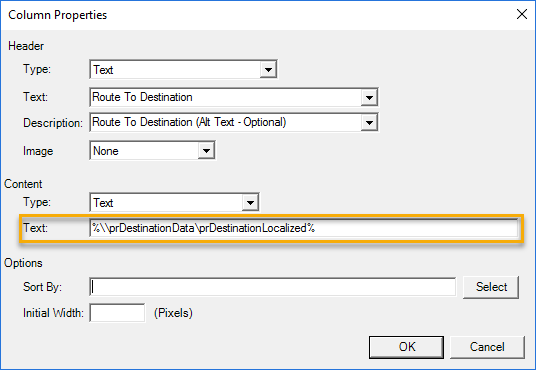
See the Column Properties dialog box example below.
-
In the Header area, select a Header type from the Type drop-down list, for example, Text.
-
Type a column header, for example, Route to Destination in the Text box.
Note: You can select a pre-defined property from the Text drop-down list to use as a column header. In this scenario, you must specify a Column header name, for example, Route To Destination.
-
Type a description in the Description box. (optional) The description is displayed as Alt Text when users move the mouse over the column header.
-
Select an image type from the Image drop-down list. (optional)
-
In the Content area, select a cell format from the Type drop-down list, for example, Text.
-
Type the following property value in the Text box.
%\\prDestinationData\prDestinationLocalized%
-
Select OK on the Column Properties dialog box.
-
Select OK on the Routing Application Properties dialog box.
-
Select OK on the Profile Properties dialog box.
Note: In the Options area, you can specify how you want to sort the items in a column by selecting a property value and change the default column width.
See also