You can create a rule based on another rule by duplicating an existing rule and then modifying the copy to meet your workflow requirements.
To duplicate a rule
-
In the Server Administrator, expand RuleSets.
-
Select a ruleset.
-
Right-click the rule you want to duplicate. The RuleSet shortcut menu appears.
-
Select Duplicate. A copy of the rule appears in the Details pane.
-
Select the copy. The Rule Properties dialog box appears.
-
Rename the copy of the rule by typing the new name in the Name box.
-
Select a RuleSet from the RuleSet drop-down list if necessary.
-
Change the priority order in the Order box if necessary.
Note: Changing the priority order of the rule is optional. The Order value is automatically increased by one.
-
Select the Criteria tab and modify the Criteria Expression by using the Insert button to insert system or user-defined properties.
-
Select the Actions tab and select Add to add more actions or select an existing action and modify its properties by using the Properties button.
-
Select OK when you are done.
The following examples are used to show how existing rules can be duplicated and modified to create new rules. The steps listed below are for illustrative purposes only and may not meet your unique workflow requirements.
In this example, the Administrator of a banking firm has a requirement to send certain print jobs to a printer in the Marketing department. A button is created for device users to sends print jobs to the Marketing department. An existing rule in the Default RuleSets is duplicated and modified to send jobs to the Marketing printer.
Resources used to create this rule include:
-
Device Button - Marketing Printer
-
Default RuleSets - All "Print Jobs" to the Printer connector rule
To duplicate and modify the All "Print Jobs" to the Printer connector rule
Adding the Marketing Printer device button
The Administrator adds a device button to send print jobs to the Marketing printer by choosing the appropriate device group configured in the Server Administrator.
To add the Marketing Printer device button
-
In the Server Administrator, expand Devices.
-
Right-click the appropriated device group, for example, Default. The Properties shortcut menu appears.
-
Select Properties. The Device Group Properties dialog box appears.
-
Select the Buttons tab.
-
Select the Add button. The Add Button dialog box appears.
-
Select Scan to Destination from the Type drop-down list.
-
Type a name, for example, Marketing Printer in the Name box.
-
Select OK. The button appears on the Device Home Screen list.
-
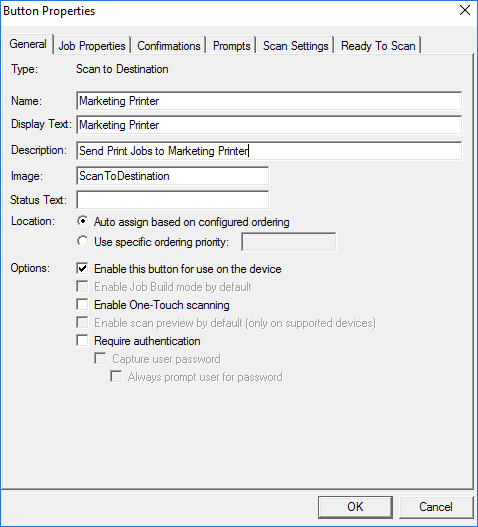
Select Marketing Printer on the list. The Button Properties dialog box appears.
See the Button Properties dialog box example below.

-
Type a name, for example, Marketing Printer in the Name box.
-
Type a name, for example, Marketing Printer in the Display Text box.
-
Type a description, for example, Send Print Jobs to Marketing Printer in the Description box.
-
Select the Job Properties tab.
-
Select Destination. The Set Job Property dialog box appears.
-
Type a value, for example, Marketing in the Value box.
-
Select OK on the Set Job Property dialog box.
-
Select OK on the Button Properties dialog box.
-
Select OK on the Device Group Properties box.
Duplicating and modifying the "All Print" Jobs to the Printer Connector rule
-
In the Server Administrator, expand RuleSets.
-
Select the Default RuleSets.
-
Find the All "Print Jobs" to the Printer connector rule.
-
Select the rule and ensure it is highlighted in the list.
-
Right-click the rule. The Properties shortcut menu appears.
-
Select Duplicate. A copy of the rule appears below the existing rule.
-
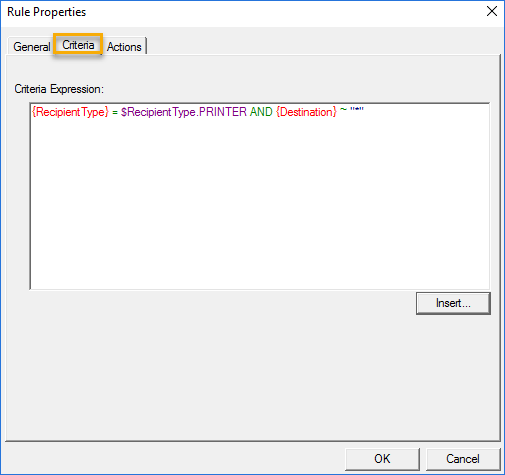
Select the Copy of All "Print Jobs" to the Printer connector rule. The Rule Properties dialog box appears.
See the Rule Properties dialog box example below.

-
Type a new name for the rule in the Name box, for example, Marketing Printer.
-
Select User from the RuleSet drop-down list to move the new rule to the User RuleSets folder.
Modifying the Criteria expression
-
Select the Criteria tab.
-
In the Criteria Expression box, modify PRINTER and type the letter, E after the period in the expression.
See the Criteria Expression box example below.

-
Select the $Recipient Type.Email expression from the Macros list if necessary
-
Replace the asterisk inside the quotations, "*" with Marketing. Do not remove the quotations.
Note: The server treats the delivery of the documents in this scenario as an email message. The destination can be expressed as an email address or any job property label you have used as a destination. You are not restricted to using an email address format when using the Email recipient type.
Modifying the Actions tree
-
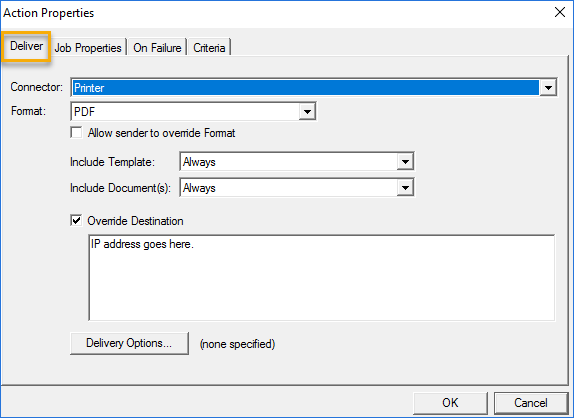
Select the Actions tab and the Deliver action. The Action Properties dialog box appears.
See the Action Properties > Deliver dialog box example below.

-
Select the Override Destination check box.
-
Type the device's IP address in the Override Destination box.
-
Select OK on the Action Properties dialog box. The modified Deliver action appears on the Actions tree.
-
Select OK on the Rule Properties dialog box.
Note: The Administrator changes the priority order of the rule so that it is processed before the Default RuleSet > All "Print Jobs" to the Printer connector rule.
In this example, the Administrator of a car manufacturing firm has a requirement to send bar-coded invoices to a network folder for the Accounting department. A button is created for device users to sends jobs to Accounting. An existing rule in the User RuleSets is duplicated and modified to send jobs to the Accounting folder.
Note: The Send Print Jobs to a Department Printer rule example described above will be duplicated and modified to create the Send Bar-coded Invoices to Accounting rule. Administrators can choose any rule to duplicate and modify so that it meets their company's document workflow requirements.
Resources used to create this rule include:
-
Device Button - Accounting folder
-
User RuleSets - Send Bar-coded Invoices to Accounting rule
To duplicate and modify the Send Print Jobs to a Department Printer rule
Adding the Accounting folder device button
The Administrator adds a device button to send print jobs to the Marketing printer by choosing the appropriate device group configured in the Server Administrator.
To add the Accounting folder device button
-
In the Server Administrator, expand Devices.
-
Right-click the appropriated device group, for example, Default. The Properties shortcut menu appears.
-
Select Properties. The Device Group Properties dialog box appears.
-
Select the Buttons tab.
-
Select the Add button. The Add Button dialog box appears.
-
Select Scan to Destination from the Type drop-down list.
-
Type a name, for example, Accounting Folder in the Name box.
-
Select OK. The button appears on the Device Home Screen list.
-
Select Accounting Folder on the list. The Button Properties dialog box appears.
-
Type a name, for example, Accounting Folder in the Name box.
-
Type a name, for example, Accounting Folder in the Display Text box.
-
Select the Job Properties tab.
-
Select Destination. The Set Job Property dialog box appears.
-
Type a value, for example, Accounting in the Value box.
-
Select OK on the Set Job Property dialog box.
-
Select OK on the Button Properties dialog box.
-
Select OK on the Device Group Properties box.
Duplicating and modifying the Send Print Jobs to a Department Printer rule
-
In the Server Administrator, expand RuleSets.
-
Select the appropriate ruleset, for example, User RuleSets.
-
Find the appropriate rule, for example, Marketing Printer rule.
-
Select the rule and ensure it is highlighted in the list.
-
Right-click the rule. The Properties shortcut menu appears.
-
Select Duplicate. A copy of the rule appears below the existing rule.
-
Select the copy of the rule, for example, Copy of Marketing Printer rule. The Rule Properties dialog box appears.
-
Type a new name for the rule in the Name box, for example, Accounting Folder.
-
Select a RuleSets folder from the RuleSet drop-down list to move the new rule to a different folder if necessary (optional).
Note: In this example, the Administrator keeps the duplicated rule in the User RuleSets folder.
Modifying the Criteria expression
-
Select the Criteria tab.
-
Use the $Recipient Type.Email expression.
-
Replace the value inside the quotations, for example, "Marketing" with Accounting. Do not remove the quotations.
Note: The server treats the delivery of the documents in this scenario as an email message. The destination can be expressed as an email address or any job property label you have used as a destination. You are not restricted to using an email address format when using the Email recipient type.
Modifying the Actions tree
-
Select the Actions tab and the Deliver action. The Action Properties dialog box appears.
-
Select the appropriate connector, for example, Filescan on the Server.
-
Select the appropriate format, for example, PDF.
-
Select the Override Destination check box.
-
Type the Accounting folder's network path, for example, a:\Accounting in the Override Destination box.
-
Select OK on the Action Properties dialog box. The modified Deliver action appears on the Actions tree.
-
Select OK on the Rule Properties dialog box.
See also