The following Server certificate request tasks are required to configure SSL between the AccuRoute Server and Lexmark device.
See About Lexmark Device SSL Configuration for more information.
Creating a Server certificate request
Using Internet Information Services (IIS) Manager, you must create a Server certificate request after creating the Self-Signed CA certificate and generating a Private key.
To create a Server certificate request
- Open the Internet Information Services Manager (IIS) on the computer where the AccuRoute Server is located.
- Select the Server connection on the Connections pane.
- Select Server Certificates on the IIS section.
- Select Create Certificate Request on the Actions pane. The Request Certificate wizard appears.
See IIS > Actions > Create Certificate Request pane below.

- Type or copy/paste the following information from the Self-Signed CA certificate.
- Common name
- Organization
- Organizational unit
- City/locality
- State/province
- Country/region
- Click Next. The Cryptographic Service Provider Properties wizard dialog box appears.
- Select the Microsoft RSA Cryptographic Provider from the Cryptographic service provider drop-down list.
- Select 2048 from the Bit length drop-down list.
- Click Next. The File Name wizard dialog box appears.
- Specify a certificate request file name in the box provided with a *.CSR extension and use the Browse ellipsis (…) button to select a location, if necessary. Ensure the file name includes the .CSR extension.
Note: If you select the Browse button to specify a different location for the certificate request, you will need to specify the file name with the *.CSR extension in the File name box again, change the *.txt to *.* parameter in the box next to the File name box and click Open.
- Click Finish.
Note: In this example, the *.CSR (certificate server request) file is saved to the \OpenSSL-Win64\bin folder.
Creating a Server certificate
Using a CA resource, you must create a Server certificate by using the Self-Signed CA certificate and Server certificate request created previously.
Note: Refer to the documentation provided by your CA resource. The next series of steps use OpenSSL as an example and may not apply to your specific SSL configuration.
To create a Server certificate
- Run OpenSSL as an Administrator.
- Type the following command at the OpenSSL prompt to create a Server certificate.
OpenSSL> x509 -req-in certificateserverrequest.csr -CA certificate.crt -CAkey PrivateKey.key -CAcreateserial -out *.server.crt -days 500 -sha256
- Replace the information highlighted above with your certificate-related information.
- Ensure the following information is specified in the command and press Enter.
- certificateserverrequest.csr (certificate server request)
- certificate.crt (self-signed CA certificate)
- privateKey.key (self-signed CA certificate private key)
- *.server.crt (new server certificate filename)
Note: The new server certificate filename appears in the /OpenSSL-Win64/Bin folder.
Completing the Server certificate request
Using Internet Information Services (IIS) Manager, you must complete the Server certificate request.
To complete the Server certificate request
- Open the Internet Information Services Manager (IIS) on the computer where the AccuRoute Server is located.
- Select the Server connection on the Connections pane.
- Select Server Certificates in the IIS area.
- Select Complete Certificate Request on the Actions pane. The Complete Certificate Request dialog box appears.
- Use the Browse ellipsis(…) button next to the File name box and find the Server certificate. If necessary, you can change the file name search criteria from *.cer to *.*.
- Select the Server certificate (*.crt) and click Open.
- Type a friendly name in the box provided.
- Click OK. The Server certificate completed request appears on the Server Certificates list.
Installing and importing a Self-signed CA certificate
Using a CA resource, you must install and import a Self-Signed CA certificate into Internet Information Services (IIS).
To install and import a Self-signed CA certificate
- Using File Explorer, go to the OpenSSL > bin folder (if you are using OpenSSL).
Note: If you are using a different CA resource, go to the appropriate CA resource folder where the Self-signed CA certificate was saved to. These steps may not apply to the CA resource you are using. Refer to the CA resource's Help to determine whether installing and importing a Self-signed CA certificate is required. For illustrative purposes, these instructions are specific to OpenSSL.
- Right-click the certificate's filename; for example, *.crt. The File Explorer shortcut menu appears.
- Select Install Certificate. The Certificate Import Wizard appears.
- Select Local Machine and click Next.

- Select Place all certificates in the following store.
- Click the Browse button, select Trusted Root Certification Authorities and click OK.
- Click Next. The Completing the Certificate Import Wizard dialog box appears.
- Click Finish.
- Click OK. The import was successful message appears.
Verifying certificates in the MMC snap-in
Using the MMC snap-in, you can verify your certificates. You may need to add the MMC snap-in.
To verify the certificates
Adding the MMC snap-in
-
Right-click the Start menu and select Run.
-
Type mmc in the Run dialog box.
-
Select Add/Remove Snap In. The Add/Remove Snap-ins window appears.
-
Choose Certificates on the Available snap-ins list and select Add.
-
Select Computer account and click Next.
-
Select Local computer.
-
Click Finish.
-
Click OK.
Verifying certificates
-
Select Console Root in the MMC snap-in and expand Certificates (Local Computer).
Note: A list of directories for each type of certificate appears. You can view, export, import, and delete its certificates from each certificate directory.
-
Expand Personal and select Certificates.
-
Select the General tab and verify the certificated information is accurate.
-
Select the Certification Path tab and verify the certification path and status are accurate.
-
Click OK.
-
Expand Trusted Root Certification Authorities. The Certificate dialog box appears.
-
Select the Certification Path tab and verify the certification path and status are accurate.
-
Click OK.
Binding the Server certificate
Using Internet Information Services (IIS) Manager, you must bind the Server certificate to the sites that require SSL.
To bind the Server certificate
- Select Default Web Site on the Connections pane.
- Select Bindings on the Actions pane. The Site Bindings dialog box appears.
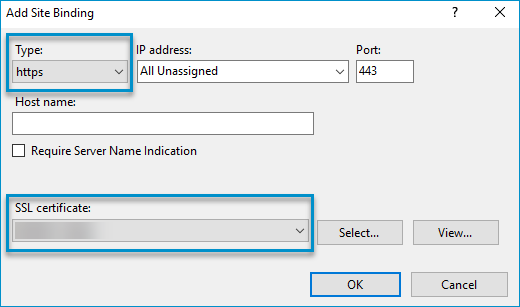
- Click Add. The Add Site Binding dialog box appears.
- Select https from the Type drop-down list.
- Specify 443 in the Port box.
- Select the Server certificate you created from the SSL certificate drop-down list box.
- Click OK.
See the Add Site Binding dialog box below.
See also
About Lexmark Device SSL Configuration
Lexmark SSL Configuration Device Client and Web API
Lexmark SSL Configuration XML Files
Lexmark SSL Configuration Server and Device