The following server and device tasks are required to configure SSL between the AccuRoute Server and Lexmark device.
See About Lexmark Device SSL Configuration for more information.
Before adding the Self-Signed CA Certificate to the Lexmark device, you will need to add the SSL URL to the Device Group Properties.
Adding the SSL URL to the Device Group Properties
Using the Server Administrator, you must add the SSL URL to the Device Group Properties.
To add the SSL URL to the Device Group Properties
- Start the AccuRoute Server Administrator.
- Expand Devices on the Server Administrator tree.
- Right-click the appropriate device group and select Properties. The Device Group Properties dialog box appears.
See the Device Group Properties dialog box below.
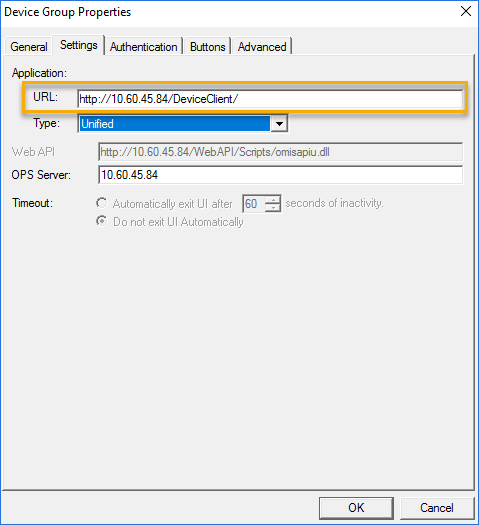
- Click the Settings tab.
-
Ensure you enter the fully qualified domain name and port number in the following format. See example below.
- Click OK.
Example: https://fully_qualified_domain_name:port_number/DeviceClient/
Adding the Self-Signed CA certificate to the Lexmark device
You must create a PFX Certificate file by using the following command in OpenSSL. See example below.
Example: openssl pkcs12 -export -out certificate.pfx -inkey privateKey.key -in certificate.crt -certfile more.crt
Understanding the command line
|
Command Line Component |
Description |
|---|---|
| openssl | Runs OpenSSL. |
| pkcs12 | Use the OpenSSL PKCS#12 file utility. |
| -export -out certificate.pfx | Export and save the PFX file as certificate.pfx. |
| -inkey privateKey.key | Use the private key file privateKey.key as the private key to combine with the certificate. |
| -in certificate.crt | Use certificate.crt as the certificate the private key will be combined with. |
| -certfile more.crt | Optional. Use if you have additional certificates you want to include in the PFX file. |
Note: After entering the command, you need to enter and verify an export password to protect the PFX file. Make a note of this password! You will need it when you export the certificate and key.
Creating the PFX Certificate file
Use OpenSSL and the Command line components listed above to create the Certificate PFX file.
To create the Certificate PFX file
-
Run OpenSSL.
-
Type the following Command line with your certificate parameters.
openssl pkcs12 -export -out certificate.pfx -inkey privateKey.key -in certificate.crt -certfile more.crt
-
Type the Export Password and make a note of it .
-
Verify the Export Password.
Adding the PFX Certificate file to the Lexmark device
Use the device's Embedded Web Server (EWS) to add the PFX Certificate file to the Lexmark device.
To add the PFX Certificate file
-
Open the device’s EWS (Embedded Web Server) by entering the device’s IP address in your browser’s address bar.
-
Log into the Lexmark device.
-
Select Settings > Security on the Select Option pane.
-
Select Certificate Management below Network Accounts on the Security pane.
-
Select Importon the Device Certificates section. The Device Certificate Import dialog box appears.
See the Device Certificate Import dialog box example below.

-
Type the certificate's friendly name previously created when completing the certificate request in the Friendly Name box.
-
Type or select Browse to find the PFX Certificate file.
-
Type the file password previously created when creating the Self-Signed CA certificate in the File Password box.
-
Click Save.
See Configuring Upland AccuRoute ESF Application JAR file to complete the Lexmark device configuration.
See also
About Lexmark Device SSL Configuration
Lexmark SSL Configuration Server Certificate Request
Lexmark SSL Configuration Device Client and Web API
Lexmark SSL Configuration XML Files