WebApps Queue Thumbnail Page Management
How it works
-
The Thumbnail panel is docked to the left of the Preview window and cannot be docked to a different area of the user interface.
-
The Thumbnail panel can be resized during a session. The width will remain as is until the user changes it during a session.
-
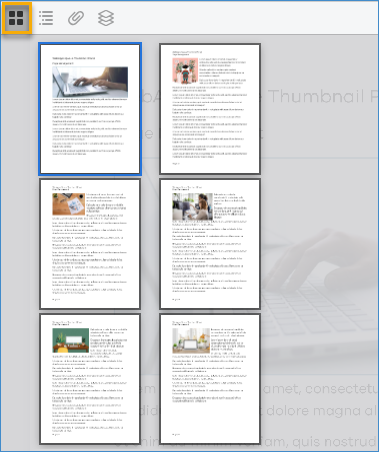
A selected page in the Thumbnail panel has a blue border.
-
Any page selected allows the user to go to that specific page.
-
Tool tips are provided to identify page numbers and page management icons. The icons allow users to reorder, move up or down, rotate clockwise or counter clockwise, merge, delete pages if necessary and download.
See the Thumbnail icon and panel example below.
Using WebApps Queue Thumbnail and Page Management
Queue users can use the Thumbnail panel, drag and drop method, or buttons on the toolbar to complete the following page management tasks when reviewing documents.
Note: The page management tasks described below can be completed by drag or drop, using the appropriate page icon or button on the toolbar. All methods are described below.
-
Reorder pages by drag and drop
-
Add pages to a different document by drag and drop
-
Move pages up or down
-
Rotate pages 90 degrees clockwise or counter clockwise
-
Merge documents (no new file created)
-
Split documents
-
Delete pages
-
Download documents
Selecting and locking documents
A lock appears next to a job (document) when it is selected by a user for review and editing. The Lock User name appears in the Lock User column and identifies who has access and controls the document. This prevents other users from accessing and making any changes to the document while another user is reviewing and editing the document.
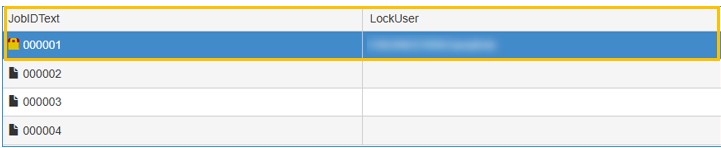
Note: Documents locked by a user on a system cannot log into a different system and attempt to unlock the documents. Locking and unlocking documents must be completed on a single system.
Auto unlocking documents
Your Administrator can set an auto unlock timer for documents in a queue that are being reviewed by multiple users. This prevents any user in the group to lock a document for long periods of time.
See page management steps and examples below.
Use the press and drag mouse method to reorder pages in a document.
-
Select a page.
-
Press and drag the page to its new location. A gray shadow appears on the page as it is being moved.
-
Release the mouse when you are done. The page appears in its new location.
See the Reordering pages example below.
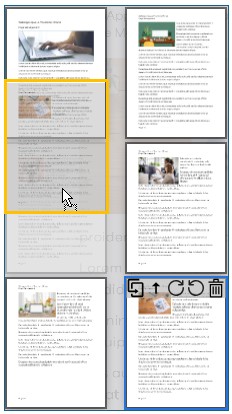
Note: The orange border is used for illustrative purposes and to highlight the shaded area in the example above. It does not appear when reordering pages.
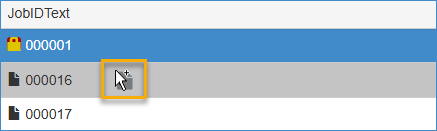
Use the press and drag method to add pages to a different document in the queue.
-
Select the page from the Thumbnail panel
-
Press and drag the page to a different document in the table.
See the Adding pages to a different document example below.
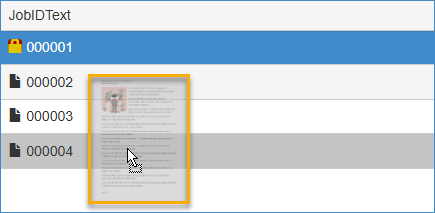
Note: The gray highlight in the table shows the new document selected. The page is appended to the end of the target document. A message appears: Selected page is appended to Job ID, for example, 000004.
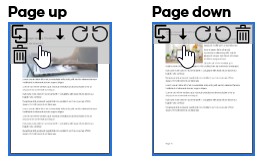
Use the Move page up or Move page down icons to move pages in a document.
-
Select the page you want to move.
-
Select the Move page up or Move page down icons.
See the Moving pages examples below.
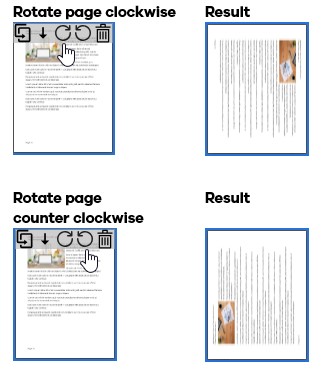
Use the Rotate page clockwise or Rotate page counter clockwise to rotate pages in a document.
-
Select the page you want to rotate.
-
Select the Rotate page clockwise or Rotate page counter clockwise icons.
See the Rotating pages examples below.
Use drag and drop or the Merge button on the toolbar to merge documents. When documents are merged no new file is created. Pages are appended to the end of the target document.
Drag and drop method
-
Press and drag the selected document to a different document. A gray highlight and document icon appear in the table.
-
Release the mouse button to complete the merge.
Note: A Merging message appears when you release the mouse button. The document is appended to the end of the target document. Multiple documents cannot be merged using the drag and drop method. Use the Merge button on the toolbar to merge multiple documents if necessary.
See the Merging documents by drag and drop example below.
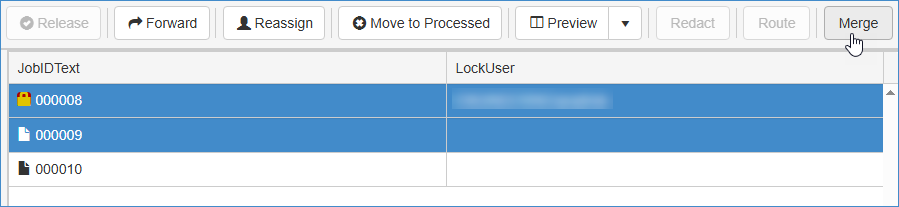
Merge button method
-
Select the appropriate documents you want to merge.
Note: You can use the Ctrl or Shift key and mouse to select multiple documents.
-
Select the Merge button on the toolbar.
See the Merge button example below.
Note: A Merging message appears when you release the mouse button. The document is appended to the end of the target document. Another message appears at the top right of Preview window that informs the user the number of documents merged and target document, for example, Merged 2 documents into (JobID value). Messages in the Queue table are labeled as Job IDs.
See Merge user message example below.

Use the Split icon to split a document at a certain page. A new document is automatically created that includes the page where the split occurred and the remaining pages of the document, if any. The page numbers included in the document appear in the new filename, for example, new_multipage_document.p4-8.pdf.
See the Split icon example below.

Note: Single page documents cannot be split.
Use the Delete page icon to delete pages in a document.
-
Select the page you want to delete. Ensure a blue border appears around the page.
-
Select the Delete icon.
Note: Pages can only be deleted one at a time.
See the Deleting page and Confirmation message examples below.

Note: The following message appears, Page x deleted, at the top right of the Preview window when the user selects Yes. The Go to page locator will automatically update as pages are deleted.
Use the Download button on the toolbar to download documents.
-
Select the appropriate document in the table.
-
Select the Download button on the toolbar.
Note: You can only download one document at a time.
See the Download button example below.
