WebApps Queue Route
The
The
With the Route action, Queue users can route jobs to specific recipients, include additional data like sender name, company name and email address. In addition, the queue user can route the entire document or specific pages and add comments if necessary.
Note:
Using
Additional features enable users to:
-
Edit and annotate jobs before routing them.
-
Route and re-route single jobs.
-
Reassign jobs to other queues.
Routing documents
To route documents
-
Open
-
Select Queue.
-
Select a document to route and review.
-
Select Route on the Queue toolbar.
See the Queue toolbar example below.

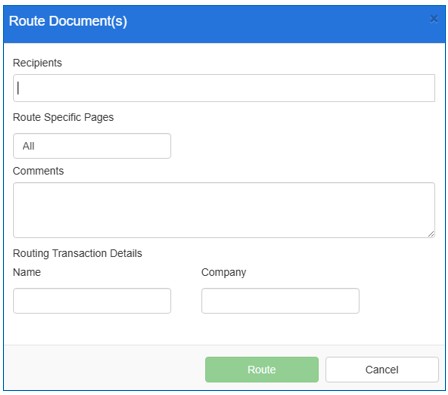
The Route Documents dialog box appears.
-
Specify recipients in the Recipients box, for example, username@company.com.
-
Use the default All or specify pages to route, for example, 1-5, 8, 10 if not all pages are to be routed in the Route Specific Pages box.
The following error message is displayed if page numbers are specified in a descending order when using the Route Specific Pages field.
-
An invalid page number was specified.
Page numbering must be specified in ascending order. See examples below.
-
In a range, for example, 1-5
-
Separated by commas, for example, 6,9,15
-
Or A combination of both formats, for example, 20-25, 30, 47, 52
-
Specify comments in the Comments box.
-
Specify name and company in the appropriate boxes.
Note: Contact your Administrator for the appropriate name and company values to be used in the fields if not known. These fields will only appear if they are required by your workflow. The following error message will appear if the fields are required and you did not provide the information.
See the error messages example below.

-
Select Route and repeat steps 3-9 as needed.