Mapping Raiser's Edge Fields to an Adestra Workspace and Table
After you successfully authenticate your Raiser's Edge connection with Adestra and connect Raiser's Edge to Adestra via Remote Connection, you will need to:
-
Map your Raiser's Edge fields to the fields in the selected core table.
-
Add optional consent rules.
Selecting a workspace and core table
On step 2 of the app authentication:
-
Press the Browse button next to the Workspace field to open a list of available workspaces.
-
Locate and select the radio button for the workspace to be linked with Raiser's Edge.
Tip: use the search bar to filter the list of workspaces.
-
Press the Select button to confirm your workspace.
-
Press the Browse button next to the Core table field to open a list of available core tables.
-
Locate and select the radio button for the core table to be linked with Raiser's Edge.
Tip: use the search bar to filter the list of tables.
-
Press the Select button to confirm your table.
-
Use the checkboxes to select the Constituent Types to sync: Individual, Organization (you may select both).
-
Press the Next button to move to mapping your fields.
Mapping your fields
There are two mandatory fields to map, pre-populated by default: Adestra's email field and the Blackbaud System Record ID.
You can map fields manually or use the Guess Mappings button to search Adestra for matches.
Using the Guess Mappings button
Enter your Blackbaud fields and auto-search Adestra for matching fields.
Note: you must map the email field and the Blackbaud System Record ID manually if they cannot be guessed.
-
Add rows to your mapping table by pressing the + Add Row button.
-
In the Blackbaud Node column, select the node that contains your field to map.
-
In the Blackbaud Field column, select the field to map, e.g. Last Name.
-
When you have added all the Blackbaud fields you want to map to Adestra, press the + Add Row button.
The Adestra app displays the results on the guess mappings page.
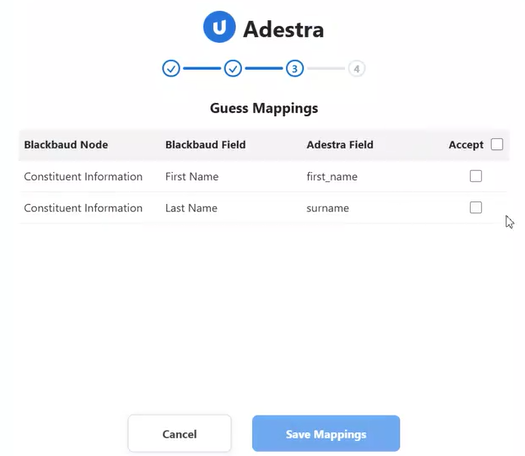
-
Check the box at the end of a row to select those rows that are correctly guessed.
Tip: if all rows are correct, check the box in the table header row to select all rows simultaneously.
-
Press the Save Mappings button to return to the main mapping page.
-
If there are rows that could not be guessed, you will need to map your fields manually. When all fields are mapped, press the Next button.
Note regarding solicit codes in Raiser's Edge.
If you wish to sync a Solicit Code, you will need to create an Adestra field that matches the code to get updated, e.g. Do not phone = do_not_phone.
Mapping fields manually
If there are fields that cannot be found using the Guess Mappings button, you will need to manually map those fields.
There are two mandatory fields: email and system record ID.
Mapping the email field
In row 1:
-
In the Blackbaud Node column, select the node that contains your email address field.
-
In the Blackbaud Field column, select the field containing your email addresses.
Mapping the system record ID field
In row 2:
-
In the Adestra Field column, select the field from your core table that corresponds to the constituent ID.
Mapping additional fields manually
Note: the number of fields is capped to 30. If you need to map more than 30 fields, please contact support.
To map additional fields:
-
Press the + Add Row button.
-
In the Blackbaud Node column, select the node that contains your field to map.
-
In the Blackbaud Field column, select the field to map, e.g. Last Name.
-
In the Adestra Field column, select the corresponding field from your core table, e.g. lastname.
-
Continue adding rows until you have mapped all the fields you wish to map.
Tip: if you add too many rows, delete extra rows using the trashcan icon at the end of the row.
-
When finished, press the Next button to move to managing consent rules.
Note regarding solicit codes in Raiser's Edge.
If you wish to sync a Solicit Code, you will need to create an Adestra field that matches the code to get updated, e.g. Do not phone = do_not_phone.
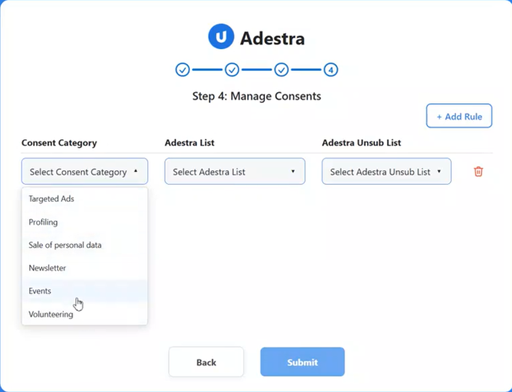
Managing consent rules
Before submitting your mapping, you have the option to add consent rules. These are optional rules that update lists and unsub lists in Adestra if a consent status changes.
To add a consent rule:
-
Press the + Add Rule button.
-
Use the Select Consent Category dropdown to select a consent category, e.g. Events.
-
Select the Adestra list you want to associate with the consent category from the Select Adestra List dropdown menu.
-
Select the Adestra unsub list you want to associate with the consent category from the Select Adestra Unsub List dropdown menu.
Note: the available lists will depend on your workspace selection. If you do not see your required list, check you have selected the correct workspace and core table during setup.
-
Add additional rules by pressing the + Add Rule button and defining additional consent categories, lists, and unsub lists.
-
When you have finished adding consent rules, press the Submit button. You will receive a confirmation popup that your configuration saved successfully.
Note: you cannot submit your mappings if there is an undefined consent rule. To remove unwanted rows from the table of consent rules, press the trashcan icon next to any unused rows.
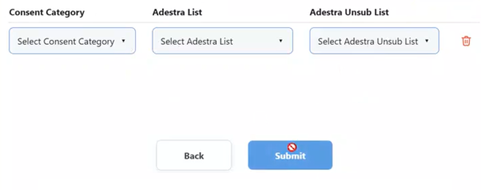
Tip: consent rules are optional. You can remove all rows and submit an empty table.
Once mapped, sync will occur according to your set schedule (daily by default), allowing you to use your Raiser's Edge data in Adestra campaigns.
Note: remote lists created via the Raiser's Edge connector do not work in the same way as traditional remote lists as they are only updated by a scheduled sync.
If you attempt to 'update count' in Adestra you will not get an updated count. The count will only update as and when the next scheduled sync takes place.
Tip: when you press the Submit button, you will have the opportunity to review your mappings. Pressing this button will take you back to the field mapping step.