Target
After entering your campaign options, use the target step to:
- Select a list containing the contacts who will receive your campaign.
-
Creating a new list if a suitable list does not already exist.
-
Add a filter to refine your selection using demographic or behavioural rules.
When all required items are complete, press the next button to progress to the compose step.
Selecting a List
-
Press the select list button to open a window with your available lists.
Tip: if a list is not available, it may be associated with a different core table to the one selected when creating your campaign.
-
Use the radio buttons to select a list and press the okay button.
The list name, description and list count will appear in the table with the options to change or remove the list.
Note: the list count does not always reflect the number of recipients who will receive your campaign as the final recipient count is determined by your filters and suppression table.
In addition, you will have the option to create a dedicated filter or view a suppression report.
Tip: alternatively, you can create a dedicated dynamic list for this campaign.
Creating a new list
If you have a CSV file to import, press the create list button to upload a list. This works in the same way as if you were adding a list via the data menu.
Unlike a dedicated dynamic list, new lists added this way can be used with other campaigns.
Adding a filter
Filters allow you to refine a list by only including recipients that meet defined criteria instead of building a variant of an existing list.
To apply a filter:
-
Press the add filter button to open a window with your available filters.
Tip: if a filter is not available, it may be associated with a different core table to the one selected when creating your campaign.
-
Use the radio buttons to select a filter and press the okay button.
The filter name and count will appear in the table with the options to change or remove the filter.
-
Press the update count button whenever you add or edit a filter to verify the count of contacts affected by the filter is up-to-date.
Note: it may take some time to update the count.
Alternatively, you can create a dedicated filter specific to this campaign.
Creating a dedicated filter
If you do not have a suitable filter, you can create a dedicated filter within the targeting step.
Note: the process for creating a dedicated filter is similar to when you build a standard filter with the exception that it is done within the campaign and will only be available to the campaign it is created within.
-
Press the create dedicated filter button to open the filter editor.
-
Save your filter to apply it to the selected list.
-
Press the update count button to update the filter count.
Updating recipient counts
The number of people receiving your campaign is determined by:
-
The number of people on your list (shown in the list count).
-
The number of people in your list selected by your applied filters (shown in the filter count).
-
The number of people excluded by your suppression table.
-
The number of recipients who are on an associated unsubscribe list.
Example: if you have a filter that excludes 11 people from a list of 344 recipients, you will get a revised distribution of 333 recipients on your filter count.
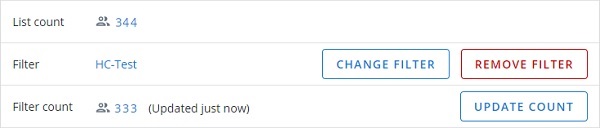
Note: if you edit a filter after it is added to a campaign, the filter count will be incorrect. Press the update count button to get the most recent recipient count.
You will also have the opportunity to update your recipient count on the launch step. Here you can see your list count before and after suppression.
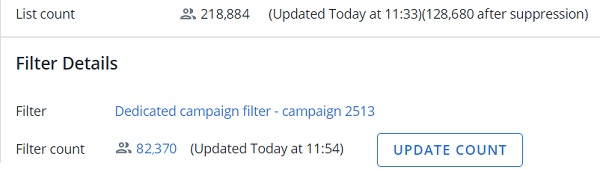
The filter count here is the predicted number of recipients for your campaign after suppression and filters.