Creating and Managing Remote Lists
Note: this is an On Demand feature. If you would like more information about this feature, contact your customer success manager.
Use remote lists to create an automatic, one-way synchronization of data from a remote source into Adestra.
Remote lists supports HTTP and HTTPS, FTP, SFTP, and Salesforce connections. This is useful if you are generating data and want to avoid having to import it into our system.
To add a remote list:
-
Press the Create Remote List button.
-
Add the general information for your connection, e.g. list name, update time, etc.
-
Configure your remote connection and data file settings, e.g. connection type, file path, etc.
-
Specify your remote source information. e.g. separator used, dedupe field, etc.
After configuring and saving, you can manage your remote list from the Remote Source tab.
General information form
Pressing the Create Remote List button, takes you to the general information form. To complete the form:
-
Enter a list name. This is its identifier and should be something memorable.
-
Add a description (optional) - extra information on the list's purpose and associations.
-
Add list tags for quick navigation and organisation (optional).
-
Select the owner user. This defaults to the user creating the list. If creating a list for another user, select them from the user list.
-
Select the core table with which to associate the contacts in your list.
-
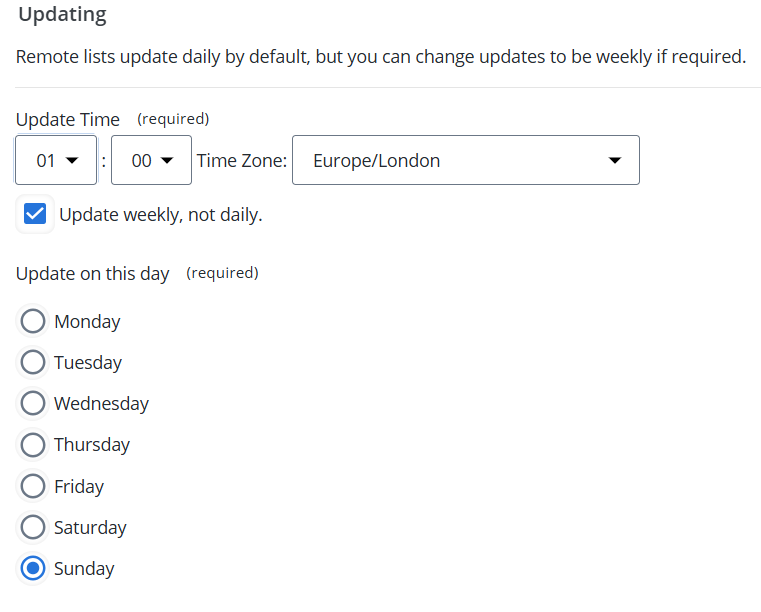
Configure an update schedule. Select the time and timezone for automatic updates.
Note: by default, remote list updates occur daily at the time you set.
If you wish to have weekly updates instead of daily updates:
-
Check the weekly update checkbox below the time fields to reveal the day selector.
-
Press the radio button next to the day you want the update to occur.
Example:
-
Setting the time to 01:00 will result in a daily update at 1am.
-
Checking the weekly schedule and selecting Sunday will result in a weekly update at 1am on Sunday.
Tip: it is best practice to deactivate scheduled updates where no changes occur to keep your account and lists running smoothly.
The list will still be accessible for campaign launches and manual updates.
-
-
Choose if record history will be kept.
-
If the checkbox is checked, additions and removals are tracked.
-
Leaving this unchecked will increase speed of updates but disable list activity reports.
-
When complete, press the Save button to proceed to the remote source connection form.
Remote source connection and data file form
After saving the general information form, you will be shown the remote source connection form. To proceed:
-
Specify your remote source. You can either select an already configured connection from the menu or add a new Remote Connection.
-
Provide a file path for your remote list (this is contextually aware).
If you are using a Salesforce Remote Connection the button will say: 'Select Campaign'. This is so you can import your Salesforce Campaign Members into Adestra.
-
Choose the remote source owner. This defaults to the user creating the list. If creating a list for another user, select them from the user list.
When complete, press the Save button to proceed to the remote source information tab and map your data.
Remote Source Information
Upon saving the connection you will be taken to the remote source information tab. To finalise your remote list:
-
Choose the field separator used in your source data. This defaults to Comma.
-
Choose a dedupe field. You must apply a dedupe field from this section to save. We recommend email.
Note: this option may be locked to a default by your account preferences. In this case, the field is not available for selection.
If you need to change from your account default and this field is unavailable, contact support to update your preferences.
-
Complete the field mapping. Guess matching should have already taken place where possible. Any further empty fields wanted within the remote list should be mapped here.
Note: this section is context aware and will change dependent on the protocol in use.
When complete, press the Save button to start using your remote list.
Tip: use the Remote Source tab to view and manage your remote list settings.
Managing remote lists
Incomplete Remote Source Notification
Without completing the set up of a remote source you will be unable to use a remote list with it. If a remote source's setup is incomplete a notification will warn of this on the overview page.
Remote Lists have their own Remote Source tab.
Under the remote source tab there are three further tabs.
- Overview - details the connection, path and owner.
- Settings - here you can change the connection or create a new one, change the path and owner.
- Remote Source Information - here you can change the field separator, dedupe field and how columns are mapped.
Note: the administrative actions differ slightly with a Remote List. The available options are defined in the Lists topic.
Updating remote list contacts
Remote lists are designed to update on a schedule of your choosing. You can update the list manually by pressing the 'Update' button in the overview. This will show a progression bar and also give you an estimated completion time.
Note: your list size will match the number of valid contacts within your remote data source at the time of updating. The update will skip bad records and de-dupe contacts in the remote source.
Deactivate scheduled updates
Disable remote list source
Note: This is an On Demand feature. If you would like more information about this feature, contact your customer success manager.
Disabling your remote source will convert your list into a regular list.
Caution: Disabling is a permanent action and cannot be reversed.
FAQ
Why am I getting an Unsub List Warning
Because Remote lists are an integration to data outside of Adestra contacts cannot be removed from them. This means that users who click an unsub link in an email will still receive content. An associated unsubscribe list solves this by suppressing the contact at launch.
Why am I getting duplicate records?
If you have multiple lists to set up to retrieve the same file at the same time, this can cause duplicates by forming a race condition. To prevent this from happening you can schedule your list updates at different times.