Adding and Styling Text
To add and style text to an email in the Email Designer:
-
Drag a text block element from the library into your layout.
-
In the text block element, type or paste your content.
-
Apply simple styling to your text using the element formatting options.
-
Apply additional styling to the text and text block using the Design Settings menu.
-
If required, convert some of your text into a hyperlink.
-
Apply personalisation where desired.
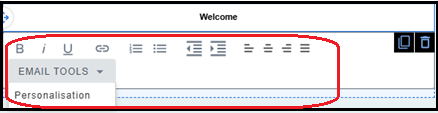
Apply simple text formatting
A simple text formatting menu is available beneath the text block when you select it.
For additional formatting, refer to the design settings menu.
The text block formatting menu includes:
-
Bold - highlight your text and press the bold button to apply bold formatting.
-
Italic - highlight your text and press the italic button to apply italic formatting.
-
Underline - highlight your text and press the underline button to apply underline formatting.
-
Hyperlink - use the link button to convert selected text to a hyperlink.
-
List - Select your list text and press either the ordered list button (for numbered lists) or the unordered list button (for bulleted lists).
-
Indentation - Select a line of text and press the left indent or right indent buttons to adjust the indentation of the line.
-
Text alignment - Select a line of text and press one of the four alignment buttons to change to: left aligned text, centre aligned text, right aligned text, or justified text.
The formatting menu also includes an email tools menu for additional features such as personalisation.
Apply additional formatting
Text box height
Your text box height will automatically scale to the typed content. To set a fixed height:
-
Go to the Design settings tab.
-
Under Content, enter a value in the Text Box Height field.
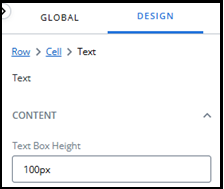
Tip: altering the text box height will add a scroll bar to allow you to view text beyond the set height.
Typography
-
Go to the Design settings tab.
-
Under Typography:
-
Select a Font Family from the dropdown menu, e.g. Verdana.
-
Type a number into the Font Size field, e.g. 14.
-
Enter a value for the line height in the Line Height field, e.g. 1.3em.
-
Use the color picker to select a text color by:
-
Adjusting the slider and selecting from the color chart, or
-
Entering values in the fields.
Tip: use the up/down arrows to choose between RGB, HSL, or HEX.
-
-
Border
To add a border to your text block:
-
Go to the Design settings tab.
-
Under Border:
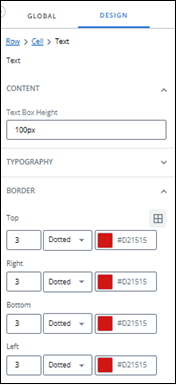
-
Enter a number for your border thickness.
-
Choose a border style from the dropdown menu, e.g. dotted.
-
Use the color picker to select a text color by:
-
Adjusting the slider and selecting from the color chart, or
-
Entering values in the fields.
Tip: use the up/down arrows to choose between RGB, HSL, or HEX.
-
-
-
By default, the border settings are applied to the entire border. Press the custom border icon
 to enable editing of top, right, bottom, and left borders separately.
Spacing
To add margins to your text block:
-
Go to the Design settings tab.
-
Under Spacing:
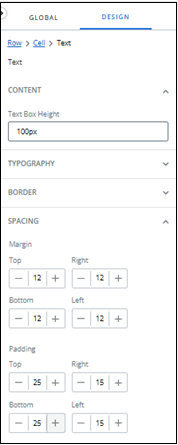
-
Enter a number for your Top margin.
-
Enter a number for your Bottom margin.
-
Add a hyperlink to your text
To add a hyperlink to your text:
-
In your text block, select the words you wish to convert into link text.
-
In the text block formatting menu, press the link icon.
Tip: you can press the link icon without highlighting text first. You will then need to add display text in the popup window.
-
In the popup window:
-
Enter the URL of your link.
-
Confirm your display text.
-
Add any labels you wish to include.
-
Check or uncheck the enable tracking box if you wish to enable/disable link tracking.
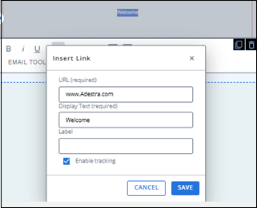
-
-
Press the Save button.
Add personalisation to a text block
To add personalisation to your text:
-
In your text block, select the location where you wish to insert personalisation.
-
In the text block formatting menu, open the Email Tools and select Personalisation.
-
Choose a core table from the dropdown menu, or
Select the Data Table Fields tab and choose from a data table menu.
-
Use the radio buttons to select a field from the list of available fields in your chosen table, e.g. Surname.
-
Use the checkboxes to apply any additional style filters, e.g. Capitalise the first letter.
-
Add a default value to the text field. This is the value that will be used in place of personalisation if the field is empty.
-
Press the Okay button.
Add custom HTML element
This allows you to add custom HTML code to your emails.
To add custom HTML code to your emails:
-
Drag a HTML block element from the library into your layout.
-
In the HTML block element add your HTML content.