Using the Email Designer Library
When composing your campaign content, the Adestra Email Designer Library allows you to:
-
Choose or create a Theme (template) for your design.
-
Drag and drop Layouts to structure your email content.
-
Drag and drop Elements to populate your email.
To use the library:
-
Expand the designer's side panel if it is not already expanded.
-
Select the Library menu.
-
Choose a Theme.
-
Select the Elements tab to view and add available elements.
-
Select the Layouts tab to view and add available layouts.
Note: depending on your screen setup, the side panel may be split between the left (Library) and right (Design) or only on the left to maximise screen space for the designer.
When displayed solely on the left, the Design menus open over the Library menus. Use the collapse menu arrow to return to the Library.
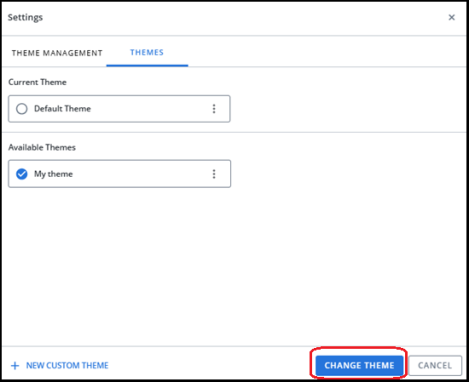
Selecting Themes
Email Designer Themes are predefined style sets that allow you to quickly apply formatting, e.g. colour, to your email.
To change your theme:
-
Open the Library menu.
-
Select the settings cog in the theme field.
-
In the popup window, select the Themes tab.
-
Use the radio buttons to select from the available themes.
-
Press the Change Theme button to apply your selection.
Updating themes
If a theme changes, you can choose to apply theme updates or not.
-
Edits to a theme are not automatically applied to campaigns using that theme.
-
Similarly, updates made to a theme within a campaign are not automatically applied to the theme template.
You need to save edits to your theme template or save your changes as a new theme.
Adding Layouts
Layouts are containers that allow you to structure your email into rows and columns, e.g. create a two column layout on your second row.
To add a layout to your email:
-
Open the Library menu.
-
Select the Layouts tab.
-
Expand the Presets dropdown menu and locate your desired layout.
-
Drag and drop the preset onto the Email Designer canvas.
When you drag the preset, 'drop here' frames will appear as you move around the canvas, indicating where the preset will appear in your email when dropped.
-
Continue dragging and dropping layouts as required to structure your content.
Example:
If you want to structure an email with:
-
A single column in the first row for your intro text.
-
A two column layout in the second row to display an image with accompanying text alongside.
-
A single column layout for the third row for additional text.
You could:
-
Drag two single row presets onto your canvas, one on top of the other.
-
Drag a two column preset and drop it between the two single row presets.
Note: A  plus icon is added to row cells, allowing you to add an extra cell to the right of the selected cell. A
  delete icon is also available to remove a row.
Layouts will appear empty when added. You may stack layouts, i.e. drop another preset into an existing layout, or add elements to your layout to begin populating your content.
Adding Elements
Elements are the building blocks of your email content, allowing you to format and plan the location of your text, images, etc. within your email.
To add an element to your email:
-
Open the Library menu.
-
Select the Elements tab.
-
Select from the available element types.
-
Text - provides a location and settings for a text block. and add custom HTML code to your emails.
-
Media - provides a location and settings for an image.
-
Buttons - adds a button of the chosen variant.
-
Headings - adds a heading of the chosen variant, e.g. h1, h2, etc.
-
-
Drag and drop the element into a Layout on the Email Designer canvas.
When you drag the element, 'drop here' frames will appear as you move around the canvas, indicating where the element will appear in your email when dropped.
Tip: if you drop the element directly onto the canvas, it will automatically create a single column layout for the element.
-
Continue dragging and dropping elements as required to structure your content.
-
With your elements in place, edit your text, media, button, and heading content.
Tip: If you edit a setting and do not like the result, use the undo and redo arrows in the top menu bar to undo and redo your most recent changes.
-
At any time during the editing process, open the See More
 menu and press Save to save your progress.
Tip: use the preview tools to see how your content appears in different view modes.