Creating & configuring your Salesforce integration
After authenticating your connection between Adestra and Salesforce, you will be taken to the Adestra Settings workflow. Here you will:
In addition to mapping your data, you will need to sync your campaigns in Salesforce to complete the integration.
If you are returning to map your core table and fields at a later time, you can get to the app configuration settings by:
-
Logging in to Salesforce as an administrator.
-
Locating the Adestra app (search for Adestra in the main menu).
-
Going to Adestra Settings in the Adestra app.
Note: you may need to collaborate with the end user(s) of the app to complete this workflow.
Create a new Core Table configuration
To create a configuration for a specific Adestra core table, perform the following steps:
-
Open the Adestra app in Salesforce.
-
Go to Adestra Settings.
-
Click
 to add configuration.
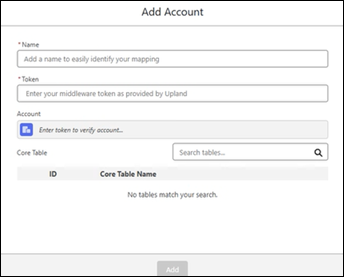
-
Enter the following:
-
Configuration Name – A label to help you identify this mapping.
-
Middleware Token – Token provided during OAuth setup.
Note: A token, once used, cannot be reused for another configuration.
-
Account - After you submit the token, the account details are populated automatically.
-
-
Select the required Core Table.
-
Click Add to save the configuration.
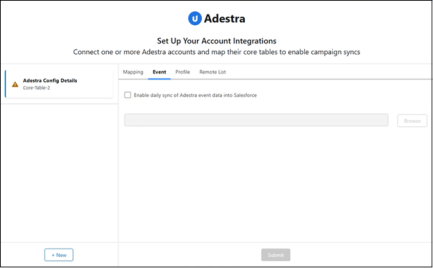
After saving, the configuration opens with multiple tabs: Mapping, Event, Profile, and Remote List.
Mapping
For all configurations, email is a mandatory field.
On the Field Mapping tab:
-
Verify that your email fields for Salesforce and Adestra are correctly mapped.
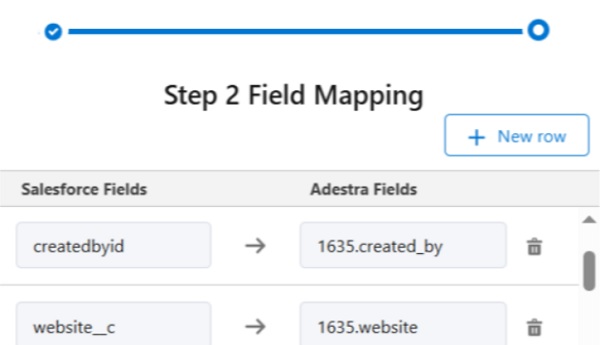
Use the drop-down menus to make changes, if required.
Note:
If you want to sync both leads and contacts then you will need to map email withCampaignMember.email.You need to include the object type and the field, e.g.
CampaignMember.status.You can only map fields to which you have admin access.
Caution: do not map compound fields, e.g. BillingAddress. Instead, use the fields inside the compound fields.
Example: if BillingAddress is a compound field using Name, StreetName, and PostalCode, map the Name, StreetName, and PostalCode fields.
Tip:
If you cannot locate a field to be mapped, ensure they exist in the selected core table within Adestra. If not, you will need to create them in Adestra.
When mapping fields, the drop-downs for Adestra Fields only include the fields in your selected core table. If you need to map a data table field, this will need to be entered manually in the format TableID.FieldName, e.g. 1234.created_by.
The app recognises valid data table entries and will notify you if you enter an invalid name for an Adestra field.
-
If you are performing a daily event data sync from Adestra, the Salesforce contactid field is required.
Use the dropdown menus to map this field to the corresponding field in your Adestra core table.
Note: the Salesforce Contact ID must be mapped to a Core Table field rather than a Data Table for the sync to work.
-
If you are sending lead profiles to Adestra, the Salesforce leadid field is also required.
Use the drop-down menu to map this field to the corresponding field in your Adestra core table.
Note: the Salesforce Lead ID must be mapped to a Core Table field rather than a Data Table for the sync to work.
-
If you are not performing an event data sync or lead send, the associated fields will need to be removed from the mapping.
Press the trashcan icon to remove a row from the mapping.
-
If you wish to add additional rows, press the + New row button.
-
Select the fields to map using the dropdown menus.
Note: you cannot repurpose the default leadid or contactid fields if they are unused. They must be mapped accordingly or deleted.
Event
On the Event tab:
If you wish to enable a daily sync of your Adestra event data into your Salesforce account:
-
Check the “Enable daily sync of Adestra event data into Salesforce” checkbox.
Note: you can return to the Adestra Settings workflow at any time to toggle the daily sync on/off. However, data will not retroactively sync so only toggle data off if you do not want to sync events from the off period, i.e. there will be a gap in your data if turned off.
-
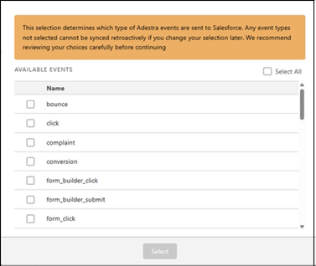
Press the Browse button next to the Event Types field to open a list of event types.
-
Use the check boxes to select the event types to sync.
Tip: consider the storage space of your Salesforce account when choosing how many event types to sync.
Note: all event data will be synced once the checkbox is enabled..
-
Press the Select button to confirm your event selection.
Tip: select only required events to avoid unnecessary data usage in Salesforce.
Profile
On the Profile tab:
Use this tab to control who can access this configuration.
Perform the following steps:
-
Open the Profile tab.
-
Select the Salesforce profiles that should have access.
Note: available profiles depend on Salesforce permissions.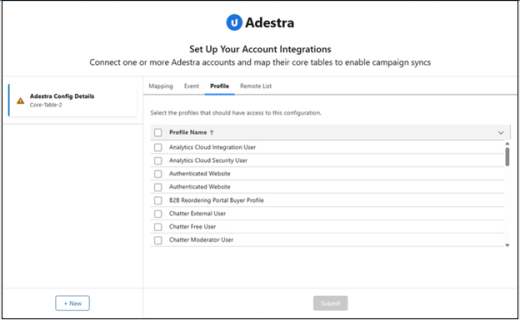 .Note: This mapping is available only to users assigned to the selected profiles. You must select at least one profile.
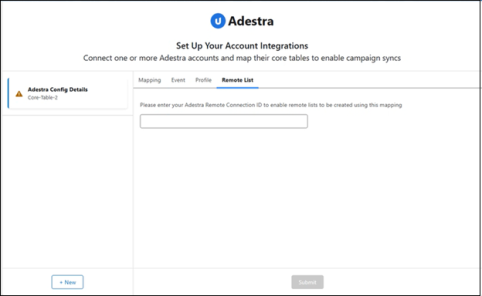
Remote List
On the Remote List tab:
Use this tab to link a remote connection created in Adestra.
Perform the following steps:
-
Open the Remote List tab.
-
Enter the Remote Connection ID
Note: the remote connection must already be created in Adestra. This feature is optional.
When you have mapped all the fields you wish to be mapped, press the Submit button.
If connection is successful, you will get a confirmation that your data is saved.
If you want to set up multiple configurations you can do so by contacting Adestra Support adestra-support@uplandsoftware.com to get a new middleware token.
After mapping all the required fields, you will need to sync your campaigns in Salesforce to complete the integration.