Creating an Insight
- Open the Insight Editor tab in Salesforce.
- Your org's knowledge domains are displayed. Click a domain to open it.
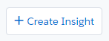
- Click the Create Insight button.
- Complete the following for the new insight.
-
Click Save.
The page for the new insight opens. This page includes two sections where you can add more details to the insight:
The insights in the knowledge domain are organized into categories called 'scopes'. (These are defined by your administrator using filter logic.)
For example, in the Opportunities knowledge domain, there are scopes associated with particular subsets of the org's opportunities. A scope's insights can be displayed by Max in the opportunities belonging to the associated subset.
Note: Fields with an asterisk* do not apply to Contact Insights.
| Item | Description |
|---|---|
| Title | The insight's title. |
| Description |
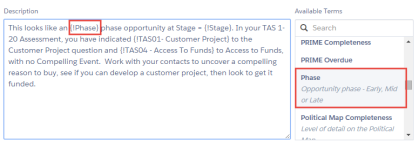
The main body of the insight's text. You can give the insight smart behavior by adding current opportunity or account plan details to the description. Use the Available Terms list on the right. Click a signal in the list to add it to the description at the current cursor position. For example, if you add opportunity Phase to the description (by clicking it), the Phase will be shown in that position in the insight.
Insight Editor: Phase is added to the insight at a suitable position.
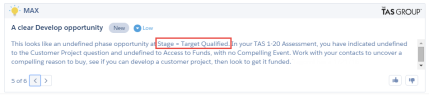
Max pane in an opportunity: The opportunity's Phase is shown in the insight. If you specify a URL in the insight text, such as http://altify.com, this is rendered as an active hyperlink when the insight is shown in an opportunity. |
| Display in* |
When the insight is triggered, it is viewable on any Altify page selected in the Display In drop-down. |
| Click Through* |
This drop-down enables you to make the title of an insight clickable. When the user clicks the title, the page specified in this drop-down opens. If no selections are made in the drop-down, the insight's title is not clickable. |
| Priority* |
This drop-down gives the insight a priority. Urgent insights are shown at the top of the Max pane. Next, High, Medium and Low insights are shown in descending order of priority. Within a priority, insights are listed in random order. |
| Limit Days to show* |
This control sets the number of days until the insight expires after it is first shown. When it expires, it is no longer displayed or included in emails or Chatter messages. |
| Status |
When Status is set to ON, the insight is active. This means that, as long as the scope it belongs to is also active, it is available for use by Max, and can be displayed in opportunities/account plans. Inactive insights are not available for use by Max. |
| Email* |
With Email set to ON, the insight is included in the regular Max email notifications and Chatter notifications sent automatically to users. |