Note: This topic applies only if you use opportunity plan types in your org.
Each preconfigured plan status signal involves calculations that use information from different areas of the Altify opportunity plan:
- The PlanSignal Oppty signal uses Assessment answers.
- The PlanSignal Problems signal uses Assessment answers and Insight Board information.
- The PlanSignal People signal uses Assessment answers and Relationship Map information.
- The PlanSignal Actions signal uses Actions information.
- The PlanSignal T&I signal uses Test & Improve information.
If you use opportunity plan types, opportunities of certain types may not have information used by particular signal calculations. A calculation is carried out by the software only if at least some of the information it uses is available on the relevant plan type.
For example, suppose that the Opportunity Manager Test & Improve tab is excluded from your 'Mid-Market' opportunity plan type. This means that the PlanSignal T&I calculation is not carried out for Mid-Market opportunities. If the PlanSignal T&I is shown for those opportunities, its empty state is displayed (as shown in the example below).
You will probably find it preferable to hide the signal instead. This topic explains how you do that.
Do I need to create a new report type?
Before proceeding with the process below, you need to check to see that the field that defines your opportunity plan types is available to add to the report that underlies the view in TeamView. Hiding plan status signals is only possible if this field is added to the relevant report.
To see if it is available, do the following:
-
In Setup, go to Report Types.
-
Click on the Label of the relevant report type.
-
On the Custom Report Type screen, scroll down to Fields Available for Reports and click Preview Layout.
-
If the field is listed in the preview, you can proceed to Stage 1 below. If the field is not listed, you must do one of the following:
-
If you are using a report type that you created (and is editable), then you can add the field that defines your opportunity plan types to the report type layout. For more information, see Design the Field Layout for Reports Created from Your Custom Report Type in the Salesforce online help.
-
If you are using the managed report type 'Team View+ Booking Report' that is shipped with Altify, you need to create a new report type to accommodate the field that defines your opportunity plan types. For more information, see Create a Custom Report Type in the Salesforce online help.
-
For the Mid-Market plan type example described above, you need to do the following:
-
In Salesforce Classic mode, open the report (that underlies the relevant view) in edit mode.
-
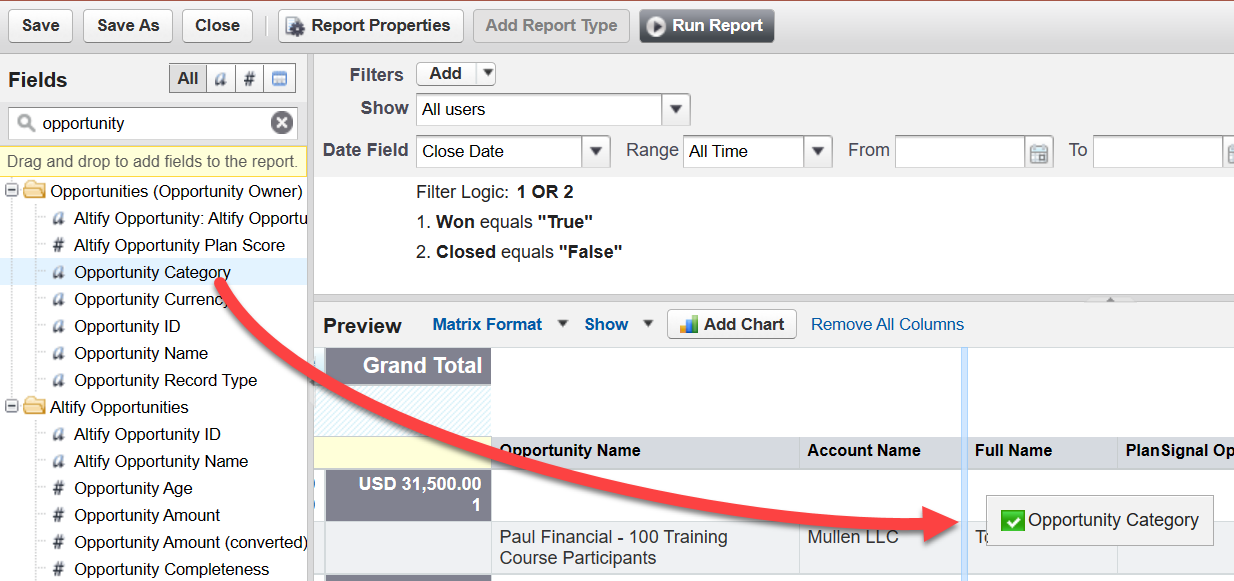
Drag the plan type definition field and drop it in the opportunity details area.
In the example shown below, the customer in question uses a custom field called 'Opportunity Category' to define their opportunity plan types.

-
Click Save.
- In Setup go to Custom Settings.
- Click Manage beside Altify Opportunity Plan Type List.
- Your opportunity plan types are listed. Click Edit beside the relevant plan type.
-
Clear the relevant Show_Signal# checkbox for each signal that you do not want to displayed for the plan type.
For example, if you do not want the T&I signal displayed for the plan type, clear the setting Show Signal 5. The table below explains how the Show_Signal# settings correspond with the default signals shipped with TeamView.
Checkbox Corresponds to signal field Show_Signal1 PlanSignal Oppty Show_Signal2 PlanSignal Problems Show_Signal3 PlanSignal People Show_Signal4 PlanSignal Actions Show_Signal5 PlanSignal T&I Note: The other five Show_Signal# checkboxes are for any additional custom signals you add to TeamView.
- Click Save.
Following the example provided in the introduction, see in the image below how the T&I signal (PlanSignal T&I) is no longer displayed for opportunities where the plan type = 'Mid Market'.

